FDM Printer de Kleine Reus 300x300x900
pinshape
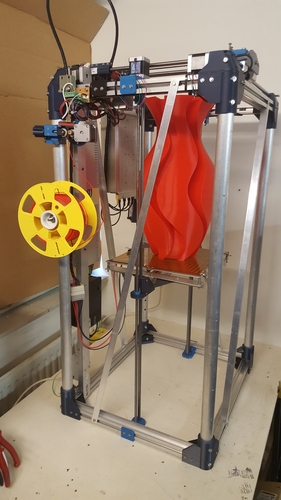
Human: Big FDM Printer: Little Giant Little Giant is the translation of "de Kleine Reus" :-) The creation of this printer began with dismantling of Big DIY Printer 2. It was fun to experiment with this very big printer, but it was time to change it again. I never printed outside the heat bed (300x300mm) although this printer could do much larger than that. Also, it took a lot of space and it was not portable at all. So a new printer design came into my mind. This printer has everything Big DIY Printer 2 had but even higher in the Z axis. The X and Y axes are made much shorter this time because I didn't exceed the dimensions of the heat bed anyway. This new printer is portable and takes up less space. The frame is made of aluminum, with a length of 500mm, a width of 400mm, and a height of 600mm. The X-axis travels 300mm, while the Y-axis travels 200mm. The Z-axis travels 250mm. The printer has a build volume of 300x200x250mm. The extruder is a geared one, with a hotend made of brass. It's driven by a stepper motor and has a filament diameter of 1.75mm. The hotend temperature can be set between 150°C to 260°C. The extruder has a maximum speed of 600mm/s. The printer uses a RepRap-style hotend, with a 0.4mm nozzle. It's made of brass and has a temperature range of 150°C to 260°C. The hotend is driven by a stepper motor and has a filament diameter of 1.75mm. The X-axis is driven by two Nema 17 stepper motors, while the Y-axis is driven by one Nema 17 stepper motor. The Z-axis is driven by one Nema 17 stepper motor. The extruder is driven by one Nema 17 stepper motor. The printer uses a RepRap-style hotend, with a 0.4mm nozzle. It's made of brass and has a temperature range of 150°C to 260°C. The hotend is driven by a stepper motor and has a filament diameter of 1.75mm. The X-axis travels 300mm, while the Y-axis travels 200mm. The Z-axis travels 250mm. The printer has a build volume of 300x200x250mm. The frame is made of aluminum, with a length of 500mm, a width of 400mm, and a height of 600mm. The X-axis travels 300mm, while the Y-axis travels 200mm. The Z-axis travels 250mm. The printer has a build volume of 300x200x250mm. The extruder is a geared one, with a hotend made of brass. It's driven by a stepper motor and has a filament diameter of 1.75mm. The hotend temperature can be set between 150°C to 260°C. The extruder has a maximum speed of 600mm/s. The printer uses a RepRap-style hotend, with a 0.4mm nozzle. It's made of brass and has a temperature range of 150°C to 260°C. The hotend is driven by a stepper motor and has a filament diameter of 1.75mm. The X-axis is driven by two Nema 17 stepper motors, while the Y-axis is driven by one Nema 17 stepper motor. The Z-axis is driven by one Nema 17 stepper motor. The extruder is driven by one Nema 17 stepper motor. The printer uses a RepRap-style hotend, with a 0.4mm nozzle. It's made of brass and has a temperature range of 150°C to 260°C. The hotend is driven by a stepper motor and has a filament diameter of 1.75mm. If you have any questions or need further clarification, please don't hesitate to ask!
With this file you will be able to print FDM Printer de Kleine Reus 300x300x900 with your 3D printer. Click on the button and save the file on your computer to work, edit or customize your design. You can also find more 3D designs for printers on FDM Printer de Kleine Reus 300x300x900.