Fan Mount
prusaprinters
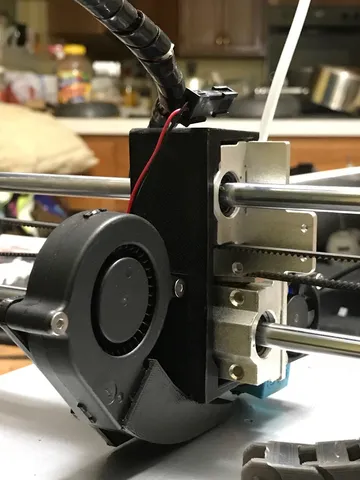
I built this fan mount and duct for a SWMaker Reprap Prusa i3 V6 Bowden x-carriage mount I picked up on AliExpress (https://www.aliexpress.com/item//32817495524.html). The fan bracket/mount clips onto the print head. Use threaded inserts to attach the fan and the fan duct. December 2020 update: Version 4. Another bracket redesign to allow it to clear the frame better. Switched back to a radial fan: more pressure, less turbulence. The fan mount is a fresh redesign, mounting along the x-axis. The duct is adjustable up and down. Oct 2018 update: I found that the original designs were reducing my max build height because the bracket and fan hit the top of the frame. By turning the fan 90 degrees and slimming the bracket I was able to get 20-30mm more build height. Now printed in two pieces and glued together - I used ABS and glued with an ABS slurry. Sept 2018 update: The original version was too narrow and tended to fall off. Worse, when taking it off and putting it back on the arm snapped. I reworked it with stronger clips. I printed one in ABS and it holds fast with no movement. Print Settings Printer Brand: FlashForge Printer: Creator Pro Rafts: No Supports: Yes Resolution: 0.1 Infill: 15% Filament: 3D Hero ABS Black Notes: Printed at 235 degrees on a 105 degree glass bed with brim. Post-Printing ============= Attaching the Fan Mount Version 4 * Tap the 4 holes in the bracket with an M3 tap. * Tap the 2 holes in the fan duct with an M4 tap * Screw 2 M3x12 bolts into the horizontal pair of holes. These are used to hold the bracket in place horizontally and "lock" into the holes on the top bearing block. * Attach the duct to the bracket using 2 M3x6 bolts though the vertical slot on the duct to the two vertically-aligned holes on the bracket. Don't tight yet. * Attach the bracket to the printer. Check alignment and distance from the hot end. Make sure the hot end touches the bed before the duct. Too high and you'll cool your heater block. Too low and you may catch on your print. * Once aligned, use 2 M4x20 bolts to attach the fan to the duct. Older Versions Using a suitable glue (gel super glue for PLA or ABS slurry for ABS), mount the bracket on the X-carriage to determine best placement for the duct to give proper bed clearance. Adjust as needed (I had to file some material off of the bracket), then glue the duct to the bracket. attach the fan and adjust the junction of the fan to the duct as needed. Category: 3D Printer Accessories
With this file you will be able to print Fan Mount with your 3D printer. Click on the button and save the file on your computer to work, edit or customize your design. You can also find more 3D designs for printers on Fan Mount.