Fake Arcade Coin Door Laser Cutter Project
prusaprinters
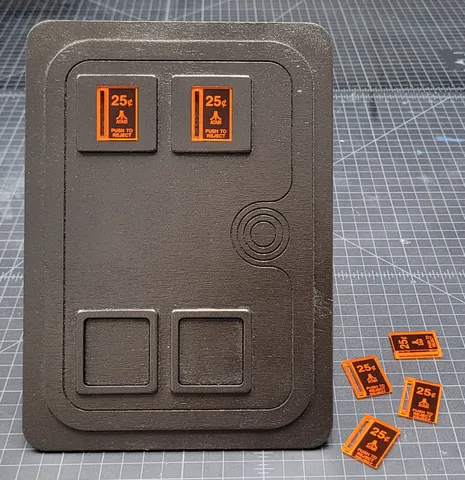
Hi, I hope this these files are helpful to you on your arcade project or just as gifts or keychains or christmas ornaments!Updated to add: earrings/necklaces!I got the idea from a blog that recommended doing fake buttons with spraypaint and a laser cutter but didn't provide any files or how-tos. Hopefully my version will give you everything you need!Our laser cutter prints from a pdf. I have no idea how common that is, so I'm including my printing files, but also the .svg files and .png files I used to make them in the component parts folder. Hopefully they'll be a good starting point if you need to change something!Coin door return button images from: https://forums.arcade-museum.com/threads/atari-coin-reject-button-inserts.490493/Coin door shape drawn from a schematic of an X-Arcade reproduction Coin Door, with the buttons reconfigured to look more like the real thing. I think I sized the door to match coin doors from one of the big companies of the time but lost the tab.I've included a version of the coin return button with and without a hole cut at the top for a ribbon or key chain, so you can do proper arcade buttons or just charms to give as gifts.Stuff you need:A laser cutter1/8th inch plywood1/8th inch colored plexiglass (I used orange)Flat black spraypaintBlack "hammered metal" spraypaintClear Gloss Spray-UrethaneSandpaper (fine grit)Masking Tape (optional)Okay, the how-to:The Coin Door:Cut the three layers of the coin door out of 1/8th inch plywood. Layer 1 and 3 are easy, layer 2 needs to be done twice because I hadn't worked out cutting raster images and vectors in the same job yet (you could edit the files to combine them ahead of time if you wanted). The thick version is to give the tops of the fake door gaps and sides a bit of a rounded shape, and to make the grooves more noticeable. Run the thick version first, then run the cutting version of layer 2 so it traces the raster version. (when we ran it, it was a little underpowered, and had to be run twice to cut through all the way. That worked out well because the outside edge was the first part of the cut, so we could just wait until the second pass finished cutting out the outside, then pause and cancel it. That left us with one solid piece with nice deep cuts on it.Pop out the coin return button boxes so they're extra deep, but leave the rest of it stuck together.Glue Layer Two down onto Layer 1. I used titebond wood glue spread on the middle with a drop of superglue in each corner, so I wouldn't have to hold it very long to get the positioning right. Then I weighed it down and let it dry overnight. Sand the Layer 3 pieces a little. Then repeat the gluing process with the Coin Button frames and Change Door frames from Layer 3.Spray paint it with a black "hammered metal" paint (I used Rustoleum). Give it many light coats, and sand in the middle somewhere, it helped even it out and hide the wood grain a lot.Paint the keyhole part silver with a brushThe Buttons:Take the colored plexiglass of your choice and peel back the protective paper from one side for as much of the material as you plan to use. Spray paint it flat black. (I used Rustoleum flat black enamel)Let it dry completely while you set up your laser cutterRun the file of your choice - button or charm. (this time the raster image and vector lines are in one piece, so it should do both as one job. Again, I don't know how different our process is from normal, sorry if it doesn't work for you)Very gently clean off any soot from the lasering but be careful of your paint, the laser leaves it a little delicate. Tissues worked well for me. (This is mostly optional)Leave the front-side protective paper on for now (unless you really want to check how it came out - I get it)(If you took the paper off, use masking tape for the next step. This will protect the front from any overspray of urethane)Use Clear Spray urethane to protect the back. I used Ace Hardware Gloss Clear and honestly put a really heavy coat on in two passes, rather than lots of light ones like you're supposed to. It came out fine. Once it's dry, remove the protective paper on the front. Combine the parts! The coin return buttons should just pressure-fit into the frames.I included the files for keychains and earrings/necklaces as well. The keychains are sized the same as the regular coin return buttons, they just have a round hole centered at the top. The earrings/necklace charms are smaller, with a much smaller hole and thinner coin slot to make for a stronger finished piece. Urethane them the same way as the buttons.Depending on your earring/necklace hardware, you may need to enlarge the hole (either in the .svg file, or by using a very small drill bit (I used a metric #1)
With this file you will be able to print Fake Arcade Coin Door Laser Cutter Project with your 3D printer. Click on the button and save the file on your computer to work, edit or customize your design. You can also find more 3D designs for printers on Fake Arcade Coin Door Laser Cutter Project.