Extrusion Width Testing of 3D Printed Specimens
thingiverse
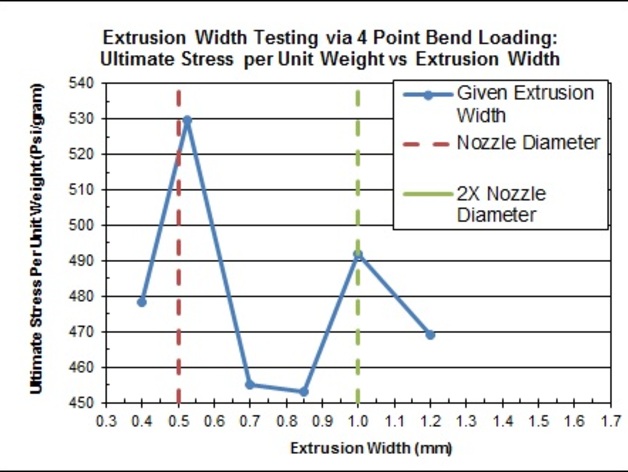
I'm excited to share a unique experiment I conducted and gauge the crowd's input to refine my findings. I conducted mechanical tests on 3D printed prototypes with varying extrusion widths to investigate their impact on printed component durability. To achieve an accurate comparison of results, the measured ultimate strength was divided by the part's mass, compensating for the naturally higher strength of heavier parts. This process enabled fair evaluation across all tested specimens, resulting in the featured graph. Initially, I expected the graph to exhibit a more predictable pattern; however, it turned out to be less anticipated than anticipated. Currently, I believe that Slic3r's extrusion width feature is more intricate than initially thought. My preliminary conclusion and recommendation is to set the extrusion width at its default setting for optimal component durability. An attached PDF document outlines the testing methodology and detailed results in greater depth. Please share your personal experiences with modifying the extrusion width to contribute to my understanding! Here are some accompanying photographs: Average Results: The graph represents the consolidated outcome of all tested specimens. Infill Pattern: Photo 2 demonstrates how Slic3r alters the infill pattern as you adjust the extrusion width. Bottom View Stress Distribution: Image three showcases a bottom view of the post-test prototypes, illustrating the influence of varied infill patterns on stress distribution.
With this file you will be able to print Extrusion Width Testing of 3D Printed Specimens with your 3D printer. Click on the button and save the file on your computer to work, edit or customize your design. You can also find more 3D designs for printers on Extrusion Width Testing of 3D Printed Specimens.
