Extrusion Width Testing of 3D Printed Specimens
myminifactory
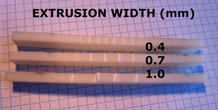
I'm eager to share an experiment I conducted and get feedback from the community to better grasp the outcomes. I ran mechanical tests on 3D printed specimens with different extrusion widths to see how it would affect their strength. The results were adjusted to account for the increased strength of heavier parts, allowing a fair comparison of all specimens tested. This was achieved by dividing the measured ultimate strength by the part's mass. The featured graph showcases the outcome of this experiment. Initially, I anticipated a more predictable pattern than what emerged. Based on my current understanding, I suspect that the Slic3r program's extrusion width function is more intricate than I had initially thought. For now, my conclusion and recommendation are to stick with the default extrusion width setting for maximum part strength. The attached PDF file provides a detailed explanation of the testing procedure and results. I'd love to hear about your personal experiences with varying extrusion widths!
With this file you will be able to print Extrusion Width Testing of 3D Printed Specimens with your 3D printer. Click on the button and save the file on your computer to work, edit or customize your design. You can also find more 3D designs for printers on Extrusion Width Testing of 3D Printed Specimens.
