ExtruDraw Extrusion-based Plotter
prusaprinters
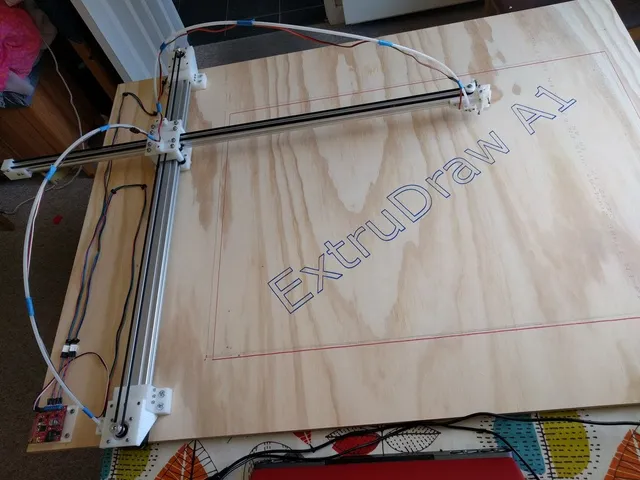
A plotter/drawing machine that uses 20x40mm and 20x20mm aluminium extrusion for both structure and linear guides.Note: I've kept this model up in case it's useful for anyone but if you think you want to make a plotter like this I have a new design that's much better. I'd strongly recommend you look at this new design instead of this one, it's better: https://www.printables.com/model/734327-extruh-pen-plotter=====I've tested the design up to A1 but it's probably best A3 or A2 size - after testing in A1 size I've now cut it down to a bit bigger than A3 size (old Ikea kitchen cupboard shelf). Also: you can learn from my experience & DON'T USE A PLYWOOD BACKPLATE, it's too uneven and has caused me problems - go with MDF instead.I use EiBotBoard drive electronics because I have an EggBot, you may use this or any other system to drive 2x NEMA 17 stepper motors and one 9g servo. There is an EiBotBoard alternative linked below if you want to use that system, there are other Arduino-based options but I haven't used them. I prefer the EiBotBoard driver because the Inkscape driver plugin that Evil Mad Scientist created for their AxiDraw will work with it with a little re-configuration and I find this to be very intuitive and flexible.I've added the OpenScad file now that it's mostly working, it should be parametric but I really wouldn't trust this. Near the top of the file there are two sections for assembly and printing; uncomment what you want from each as you want it. Each separate part is a separate module. Common variables are right at the top with some comments. It's probably not very easy to read - sorry about that.These files are not quite the ones I printed for the A1 machine, many are slightly changed (and hopefully improved e.g. hole in the upper part of the carriage to make feeding belts through less of a pain than I had to suffer through).The latest version of the machine has metal pulleys for the steppers, central belt guides and the return pulley at the pen end. Printed pulleys worked OK but I think that metal versions are more accurate and are quite cheap so I've removed the printable pulleys from the files - they are still in the OpenScad file if you want to print them but you'll need to render them yourself.I have recently improved the pen lift and as this is much, much better than the previous version so I've updated the files to include this version.Print SettingsPrinter:mini KosselRafts:NoSupports:NoResolution:0.2mm (0.3 for large parts if desired)Infill:Strength needed: ~20% & 3+ perimeters for the main partsNotes:Small parts can be printed as you wish, larger parts & especially the ends and carriages need to be strong and stiff. I used rectilinear & 3D honeycomb infill mostly but as long as it's strong choose what you want. However I'd recommend at least three perimeters for larger parts.PLA works well.You need to print things with a "_V2" at the end:2x endBase & endStepperMount8x bearingWashers4x cableMgr...and 1x of everything else with a at the end (assuming I didn't miss any files).Don't print the pen holder basic STL file, that's used in OpenScad to make the final pen holder.Post-PrintingParts neededSocket cap screws needed for construction (M5 and M3), stainless steel is probably bestYou will need 8x M5x70mm for the central assembly with nuts (ideally lock nuts but this is not mandatory)For the rest of the construction you will need an assortment of M3 socket-cap screws in 6mm, 8mm, 12mm, 16mm, 20mm shaft lengths - if you don't have these already it's probably best to buy a pack with these lengths.You will need some M3 nuts also. Many parts require holes to be tapped so a 2.5mm drill bit and M3 tap is required, these don't have to be expensive if you don't already have them as it's only for plastic.You will need 2x 20-tooth GT2 metal drive pulleys with (normally) 5mm bore to fit steppers.You will need GT2 timing belt, I bought 10m and had plenty for an A1 machine.You will need to buy aluminium extrusion however as well as using it for the main rails the new pen lift uses ~70mm of 20x20 as a vertical movement guide so this will reduce the length of the pen arm if you cut this off what you buy - for what was originally an A1 machine I bought:100cm of 20x20mm extrusion80cm of 20x40mm extrusion You will need 11x 15mm diameter v slot rollers - 8x for the central slide bearings and 3x for the pen lift (like this http://ooznest.co.uk/V-Slot/Wheels/Mini-V-Wheel) with 5mm ID. I've also bought wheels on Amazon (UK link: https://www.amazon.co.uk/V-Slot-V-Wheel-Xtreme-Delrin-Printer/dp/B07KKG4RM7/ref=sr\_1\_5?ie=UTF8&qid=1547817008&sr=8-5&keywords=mini+delrin+wheel)Get 5x 3mm ID smooth pulleys for the central pulleys and the return pulley; the return pulley can be toothed but smooth works. Drive pulleys must be toothed with lock grubscrews, 20 tooth is ideal and the machine is designed for this size.NotesThe cable management solution I chose was based on some stiff 5mm OD tubing I had lying around, you may choose a different option if you don't have or can't find that. There are holes provided in some parts to mount these cable management fixings, if you use these carefully & slowly drill & tap holes where required (don't go fast and melt things, the bolts won't bite).Because I originally used an EiBotBoard (which is excellent, but expensive & somewhat hard to find) and the plotter has the same kinematics as the AxiDraw I use the AxiDraw Inkscape extension to drive the plotter.The Simplest Way to get your plotter working with EiBotBoards (or equivalent) is to make changes to "axidraw_conf.py". I decided to alter the settings for the AxiDraw V3 XLX for my A1 machine (in inches because 'murica):x_travel_V3XLX = 25.75y_travel_V3XLX= 34.33NativeResFactor = 1016.0 # for 20t metal pulleysNativeResFactor = 850.2 # for 24t printed pulleysI didn't change anything else (although I think you should change MaxStepDist_LR & MaxStepDist_HR)The Hard WayIt is possible to add ExtruDraw as an option in the drop down list but this requires bigger changes:copy the lines above in the "axidraw_conf.py" file, change the names to something like "x_travel_ExtruDraw" & "y_travel_ExtruDraw" with the correct dimensions for your machinein the "axidraw.inx" file find the line containing "<_option value="3">AxiDraw V3 XLX", copy and paste it changing the value of option to 4 and the name to "ExtruDraw"in the "axidraw.py" file under "def update_options(self):" copy/paste the block marked "elif self.options.model == 3:" including the two indented lines immediately below and change the model number to "4" and the label from "x_travel_V3XLX" to "x_travel_ExtruDraw", do the same for the y travel After this you should be able to choose ExtruDraw in the dropdown list.Please make backups of the files that you alter so you can restore them if things break and,unless you feel confident editing Python and XML files please use the simplest option for getting your ExtruDraw working.If you don't have an EiBotBoard I think that there is an emulator for it that should run on an Arduino but I've never tested it, other solutions are possible & there should be many examples on Thingiverse.I have however found a drop-in EiBotBoard replacement that is quite cheap, I bought one and it does work. I will keep this board on the plotter so that the EiBotBoard can go back on the Eggbot. I bought this: https://www.aliexpress.com/item/EiBotBoard-board-eggbot-drawing-machine-main-control-board/32789757886.htmlIt arrived in a couple of weeks and I'm ashamed to say the way that the black circuit board coordinates with my white printed parts and black bearings, belts and wheels pleases me quite a lot :)The new pen lift has an optional spring mount that you can use to push the pen down if gravity isn't enough to push your pen down after a lift. If your pen doesn't stick up then you don't need this.How I Designed ThisCADAll parts designed in OpenSCAD, I've uploaded it - good luck understanding it, don't trust that changes to parameters such as rail size, pulley diameter or anything important will be handled properly parametrically, there are probably some "magic numbers" somewhere.If you uncomment the assembly section at the top and preview with F5 it will show how things ought to be arranged.The printing section lets you re-create the files if you need to, uncomment what you need and use F6 to render.Video Assembly WalkthroughCategory: Art Tools
With this file you will be able to print ExtruDraw Extrusion-based Plotter with your 3D printer. Click on the button and save the file on your computer to work, edit or customize your design. You can also find more 3D designs for printers on ExtruDraw Extrusion-based Plotter.