Extruder BIQU H2 + Volcano Hotend Mount for Artillery Sidewinder / Genius
prusaprinters
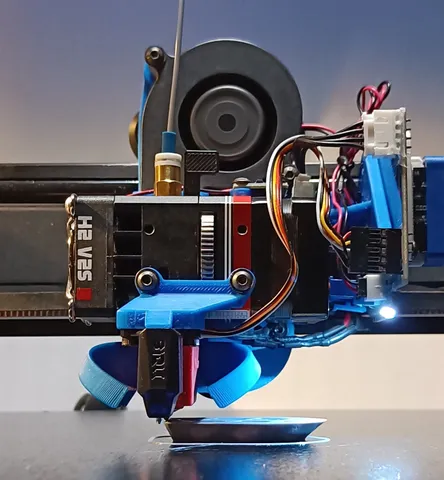
See my improved model here:https://www.printables.com/de/model/962260-biqu-h2-extruder-adapter-optional-on-linear-railsCaution, it seems similar, but its incompatible. Mount Plate with modular FanDuct for Artillery Sidewinder X2 for BIQU H2 Direct ExtruderNew Version 3.1 My recommendation is to use this modular Backplate V3.1 with FanDuct "Bite" V1.0 (uses the Interface V1.1) The FanDuct itself is modular, it give you the option to support all H2 Extruder variants and all Nozzles (V6, Revo, Volcano,Light...) - design your own!The FanDuct has to be download separate. If you like to design your own a Step File with the plug-able interface is provided. Upload it and share with the communityThe Basic FanDuct "Blade" for Volcano Nozzle can found here: https://www.printables.com/de/model/676017/The Flow and Space optimized, two side FanDuct "Bite" for Volcano Nozzle: https://www.printables.com/de/model/706196 SupportsExtruder BIQU H2 V2S with your Volcano Hotend (or the proprietary Lite)The volcano hotend should fit to H2 or H2 V2S with native V6 HotendH2 V2S Lite has nearly the same height, so it could also work (not tested)I don't know if the water cooled H2 or the Revo Versions work or if the Volcano Hotend can be also mounted to the H2 V2S LiteThe modular version supports all nozzle and heat block variants as long as you get or design a fanduct for it (share if you do so)Antlabs BL Touch V3.1BIQU Micro Probe V1/V2ADXL345 Mount for Sidewinder X2A 5015 Blower Fan (I use it with Sunon Maglev)Features V3.1Increased space towards heater blockfixed gap within the plugin mechanism -> Interface file v1.1. (interface v1.0 still works but not optimal)V3Modular Fan DuctAdd FanDuct Interface Step file for you to design and share your own FanDuctMoved Artillery PCB 2mm to the frontV2.1Modified Fan Duct, less artifactsV2Made the Extruder mount much more stable (results in more reliability and doubled max x-acceleration input shaper measurement (10000 mm/s², mzv)The nozzle has about 5mm to left/right/front/back of the heater bed. To not hit the x-axis stepper, it is moved 5mm upper instead.There is an additional hole on the bottom (should fit into Sidewinder X1 - but not tested. Feedback is welcome)Easy accessibility of the the lower screwV1 + V2About 30% less weight then the stock titan extruder with volcano hotendLess vibrations, higher speedGreat all Metal BIQU H2 DualGear extruderDrop-In Replacement for native Artillery Sidewinder X2No further changes to the hardwareMaybe compatible to X1, Genius Pro if they use the same back-plate (not tested)Reuse of Volcano Hotend (high flow) and Extruder CircuitPerfect centralized fan ducts, No airflow reductionFanDucts came from the back, so nothing disturbed your view to the nozzle tip printing.In theory, the air stream hits the heating bed just under the tip of the nozzleMount adapter for ADXL345 Acceleration Sensor (Perfect resonance compensation with Klipper)Mount Adapter for Antlabs BLTouch V3.1. This adapter is direct attached to the extruder, so for another type, someone can easily design another variantPerfect centralized in front of the Nozzle (Offset X,Y: 0,-26)Easy to Print (use heat stable material like ABS or ASA)Known drawbackSorry I have to say I found no other way. You have to extend the cable length of the hotend heater or (more secure) buy a replacement with slightly longer cables.If you are not happy with my decision to place the BL Touch direct in front of the nozzle, or do not like the BLTouch, you have to design your own touch sensor adapter :-) Feel free to post it here!Additional thingsM3 Screws3x M3x8 to mount on the Artillery back-plate2x M3x8 to mount on the Artillery Circuit2x M3x8 to mount the BIQU H2 V2S Extruder2x M3x18 to mount the 5015 Blower Fan2x M3x8 for mount the BL Touch or BIQU Micro Probe2x M3x8 for mount the ADXL345M3 Brass Threads Knurled Nuts:4x M3x4x5 for 5015 Blower + Artillery Circuit Board2x M3x4x5 for BL Touch MountM3 Spacer recommendedInstallationPrint the parts with ABS/ASA or similar heat resistant materialsGet the Screws and Knurled NutsMelt the 2 for the blower fan and the other 2 for the circuit electronics into the Extruder Mount. Melt also the 2 into the probe mount adapter if you use itExtend or replace the hotend heater cable by 2 or more cmReplace the V6 Hotend of the BIQU H2 Extruder by your Volcano Hotend (or use a new one)Remove the nozzle (heated up) form your titan extruderUnscrew and screwing the hotend to your new extruderAdd the nozzle to the new extruderScrew the H2 Extruder on the mount-plate (from behind, see pictures)Screw the Mount Plate on your Artillery SWX2 (the screw below right is a little cumbersome, take your time)Screw your fan on the mount-plateScrew your BL Touch or your BIQU Micro Probe on the ExtruderAttach all the cables on the artillery circuitScrew the artillery circuit to the mount-plate on the rightOptional: Print and prepare the cable clamp.Stick some sealing tape or foam to the mount behind the flat ribbon cable (like original)Screw it on the back of the circuit board together with the circuit boardOptional: Screw the ADXL adapter plate on the extruder topDo all your hardware checks, software calibration and adaptions. Some more words about that will come to my https://blog.freakydu.de blog.Things to improveMount the Artillery circuit electronic directly to the Stepper Motor insteadMake a own circuit electronic together with well positioned neopixel LEDs Have fun.I would be very happy to see your makes of that!And feel free to comment.Like it?Buy me a coffee
With this file you will be able to print Extruder BIQU H2 + Volcano Hotend Mount for Artillery Sidewinder / Genius with your 3D printer. Click on the button and save the file on your computer to work, edit or customize your design. You can also find more 3D designs for printers on Extruder BIQU H2 + Volcano Hotend Mount for Artillery Sidewinder / Genius.