Extractor fan housing for Ikea Lack enclosure
prusaprinters
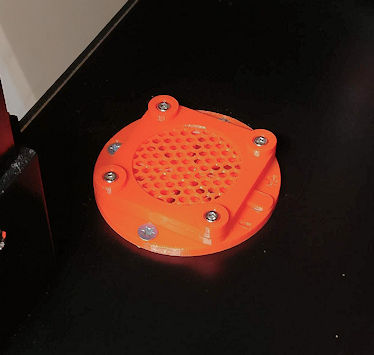
<p>Extractor fan housing that passes through the base of an Ikea Lack enclosure and fits 40mm fans (files provided for fans 10mm thick and 20mm thick).</p> <p>The fan has a grille on top to prevent most debris falling in, and a slider to adjust the air flow rate. The fan fits in underneath, and the housing terminates in a tube to fit a 50mm hose.</p> <h3>Print instructions</h3><p>Print the file appropriate for your fan (10mm thick or 20mm thick).<br/> Place the fan adjuster part onto the flat surface of the fan main body, locating the adjuster's peg in the hole.<br/> Line up the adjuster's handle between the + and - marks on the body.<br/> Place the fan top over the adjuster, locating the wedge-shaped slot over the handle.<br/> Place the fan grille over the fan top. Secure through the four holes with M3x10 socket screws.<br/> Decide where in your enclosure the fan will be (ensure proper clearance on top and bottom surfaces). Drill a single small hole (~5mm diameter) through the centre point of the desired fan location, through that side and out the other, ensuring it is as close to vertical as possible.<br/> Using a 51mm hole saw, cut a hole downwards through the top surface, and upwards through the bottom surface. The discs may need pulling out if they remain stuck to the cardboard filler.<br/> Push the cardboard filler to the sides to clear the hole all the way through, and insert the fan body through the top ensuring the bottom section protrudes out of the lower hole.<br/> Secure the top of the body to the table surface using 4 x countersunk screws approximately 13mm (½") long by 7mm (¼") diameter. They should be sized such that they do not protrude above the screw hole and obstruct the lever's movement.<br/> Ensuring proper orientation of the fan to pull air through (Noctua fans for example have an arrow indicating air flow direction), place the fan in the square slot underneath and fix in place with four socket screws (M3x20 for a 10mm thick fan, M3x30 for a 20mm thick fan).<br/> Clip the fan bottom underneath and secure with four M3x10 socket screws.<br/> Attach a hose to the end of the fan bottom with whatever method you see fit (cable ties, hose clips, etc.) and connect your fan to an appropriate power source.<br/> Use the lever to adjust air flow so you have adequate ventilation without losing too much temperature in your enclosure.</p>
With this file you will be able to print Extractor fan housing for Ikea Lack enclosure with your 3D printer. Click on the button and save the file on your computer to work, edit or customize your design. You can also find more 3D designs for printers on Extractor fan housing for Ikea Lack enclosure.