Experimental Prusa X-carriage with auto tightening belt
thingiverse
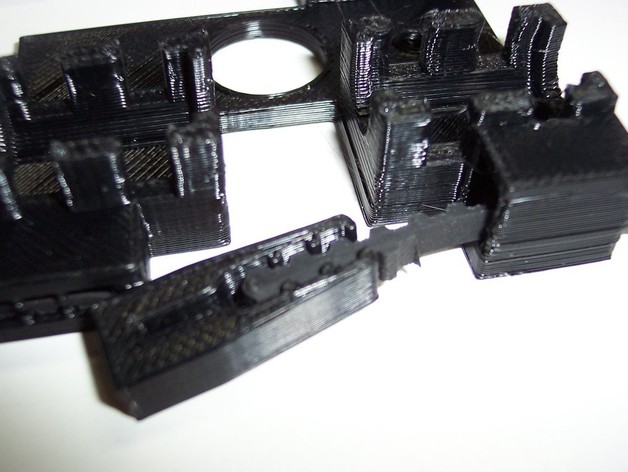
This user frequently changes Prusa's hot ends and loves Greg's X carriage but finds it necessary to retighten belts often. They were inspired by a Thingiverse design (http://www.thingiverse.com/thing:16730) to incorporate its concept into the X carriage while reducing hardware parts count. The result is an experiment that uses a Drop Clamp idea, with one side fixed on the X carriage and the other using self-tightening principles. An additional screw or bolt hole (M4 or 6-32) can be used if more tension is required. This design utilizes a LM8UU bearing holder from another Thingiverse creation (http://www.thingiverse.com/thing:15219). While this isn't a finished product, the user shares it with the community in hopes of inspiring others to build upon the concept and further reduce hardware count. Printing instructions include 25% infill and 3 shells at 0.5mm. The single strand raft between the jaws should be removed before cleaning up with sandpaper, a knife, or an emery board file. Bending the belt smooth side in, insert it into one jaw fixed to the X carriage, then feed the other end through the box and bend it again. Insert this bent end into the floating jaw for clamping. If the tension is right, no metal hardware is required for belt holding, reducing 4 M3 nuts, bolts, and washers from the BOM. However, a screw/bolt tensioning system was added as a backup due to discrepancies between reality and 3D CAD designs. The Google SketchUp file is included for others to modify and play with.
With this file you will be able to print Experimental Prusa X-carriage with auto tightening belt with your 3D printer. Click on the button and save the file on your computer to work, edit or customize your design. You can also find more 3D designs for printers on Experimental Prusa X-carriage with auto tightening belt.