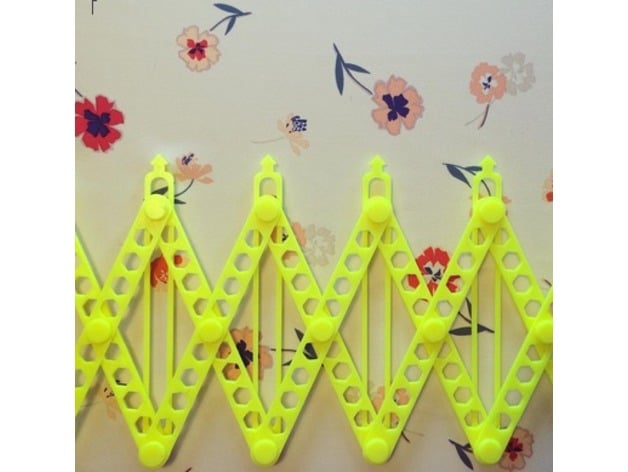
Expanding Sewing Gauge (Simflex Inspired) for Measuring Pleats and Button Holes
thingiverse
This is an innovative gauge design that showcases precision engineering. It always displays even spacing between its markers, making it ideal for marking buttonholes, pleats, or other repeating patterns. The number of points on the gauge can be customized to suit specific needs, with 8 or 10 being common choices. All components are printed separately and then snapped together seamlessly - no additional assembly required. Sharing photos of completed projects is encouraged, as they provide valuable insights into how print settings affect design performance. Print Settings Printer Brand: Wanhao Printer: Wanhao Duplicator i3 V2 Rafts: No Supports: No Resolution: 0.32 layers (optimized for faster printing) Infill: 60% Notes: Testing has been conducted on a printer using layer heights of around 0.3mm, with 50 or 60% infill recommended for optimal strength. If objects have been rotated in software, place them flat side down on the print bed. Post-Printing Instructions - Assembly (1) Determine the number of points needed (X) and print 'arm three' X times. (2) Print the 9mm connector set twice as many times (X multiplied by 2). (3) Print 'arm one' X times minus one. (4) Print one 4mm connector peg for each 'arm one'. (5) Print 'arm two' X times minus one. (6) Print four of the 3mm washers. For an 8-point gauge, the parts list will be: 8x arm three 16x 9mm connector set 7x arm one 7x 4mm connector peg 7x arm two 4x 3mm washers Assembly: The push-fit connectors may require a bit of effort to fit into their holes on the arms - this is normal. Rotate them a few times to secure them before moving on. Insert the octagonal peg parts of the connectors gently, using pliers, a press, or gentle taps with a hammer. (1) First set of three arms: Take an arm three, an arm one, two 3mm washers, and a 9mm connector set. (1a) Connecting arms three and one: Arm three goes at the bottom. Arm one goes on top, with the round peg facing up. Place one of the round holes of arm one over the round hole on arm three. Put a 3mm washer on top and connect with a 9mm connector set. (1b) Adding arm two: Press the central round hole of arm two onto the round peg of arm one, then connect with a 4mm peg. Place an end circular hole of arm two over the slot in arm three and use a 3mm washer to secure it. Connect with a 9mm connector set. (2) Intermediate sets of three arms: Use this procedure for all arms except the beginning and end sets, which require washers. (2a) Connecting arms one and two: Connect a set of arms one and two using their central holes and pegs, then add a 4mm peg connector. (2b) Connecting arm three to new arm one and previous arm two: Line up the circular hole of arm three under a circular hole of arm one. Place the free end of arm two from the previous set on top and connect with a 9mm connector set. (2c) Connecting arm three to new arm two and previous arm one: Line up the slot in arm three under the free circular hole in arm one from the previous set. Place a circular hole of arm two on top and connect with a 9mm connector set. (3) Adding the end arm (the extra arm three): Congratulations, you're almost done! You now only need to add the last arm three to complete your gauge. (3a) Connecting arm three to the free end of the previous arm two: Place your last arm three on the bottom and line up a 3mm washer over the round hole. Line the free end of the previous arm two over the washer, then connect with a 9mm connector set. (3b) Connecting the end arm three to the previous arm one: Line up the slot in arm three under the free circular hole in the previous arm one and place a washer on top. Connect with a 9mm connector set. Your gauge is now complete! Feel free to share your project and add comments.
With this file you will be able to print Expanding Sewing Gauge (Simflex Inspired) for Measuring Pleats and Button Holes with your 3D printer. Click on the button and save the file on your computer to work, edit or customize your design. You can also find more 3D designs for printers on Expanding Sewing Gauge (Simflex Inspired) for Measuring Pleats and Button Holes.
