Everyday Astronaut 3D coat of arms
prusaprinters
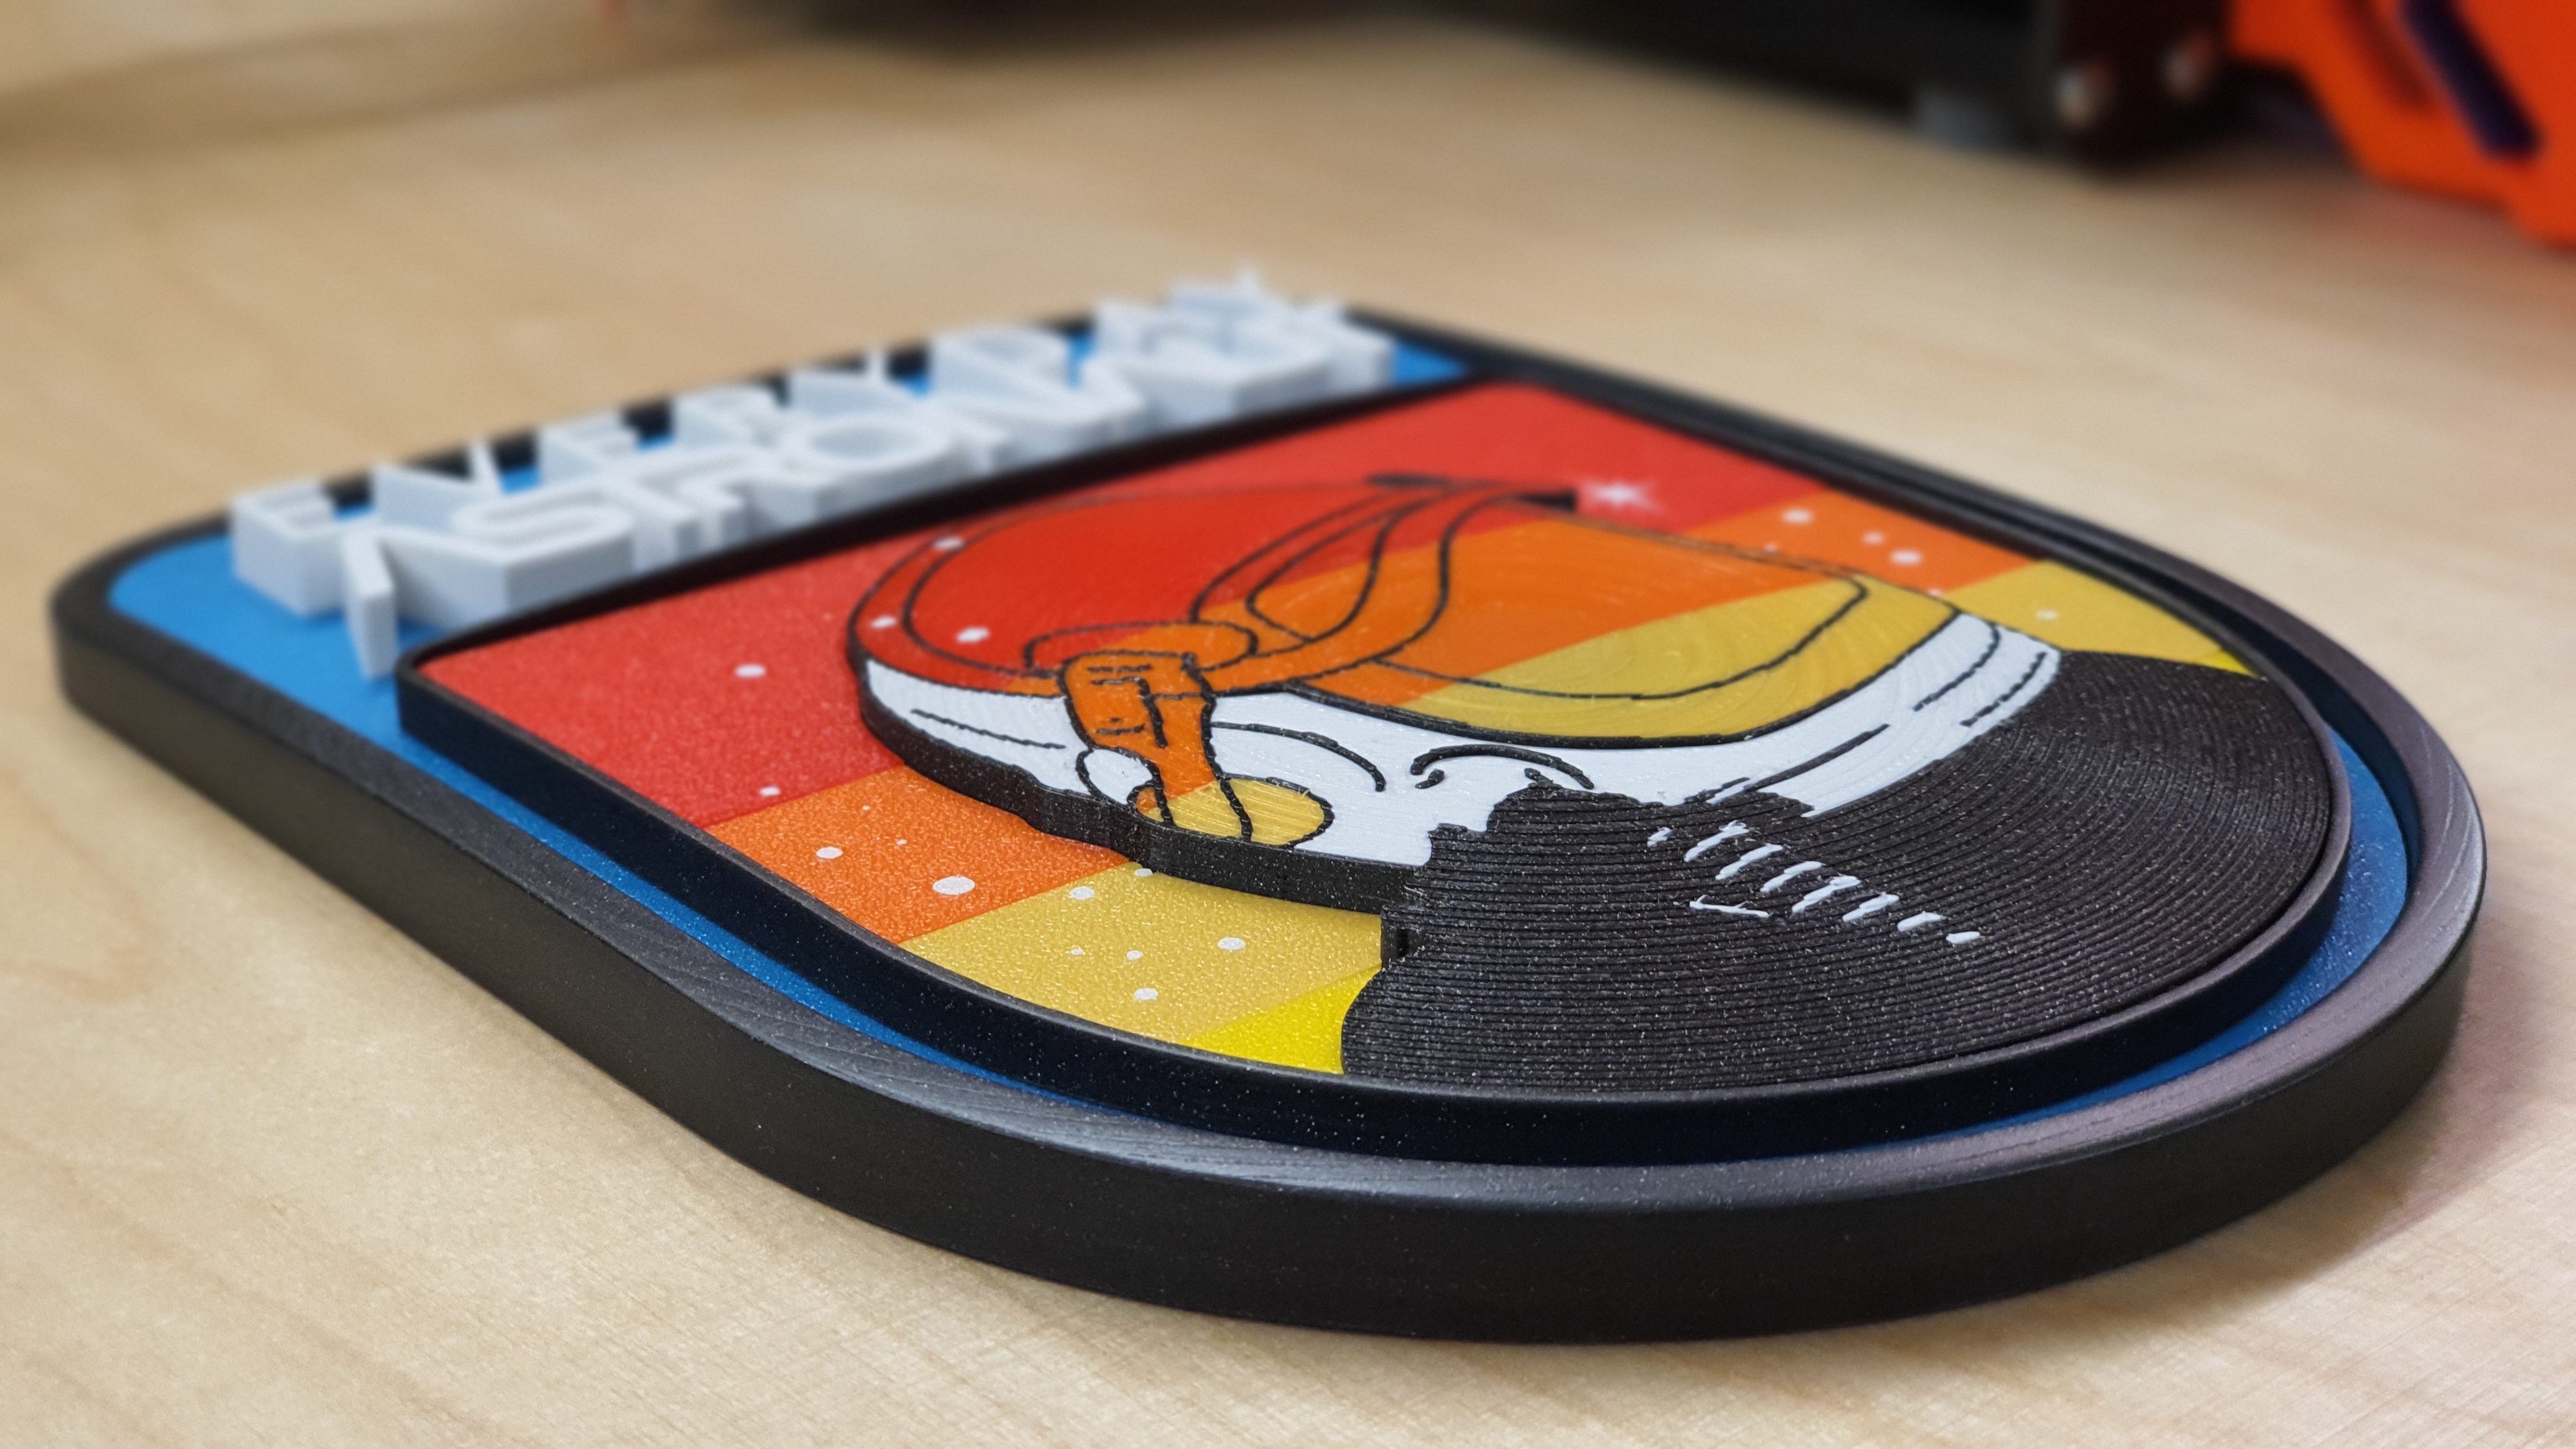
<p>Hi</p> <p>As a big thanks to <a href="https://www.youtube.com/channel/UC6uKrU_WqJ1R2HMTY3LIx5Q" title="Everyday Astronaut">Everyday Astronaut </a> for the many interesting videos to us people who love space, I created his logo as a kind of 3D coat of arms.</p> <p>Is one of the most ambitious and complex projects I have done so far. I have not only used the powder-coated-bed and the top-down method, I also used 5 colour printing, sanding, painting and a lot of gluing.</p> <p>I sketched the whole thing from a picture of @everydayastronaut and built the crest bit by bit. I made the whole construction in AutoCAD. The renderings were done using Fusion 360.</p> <p><strong> Color's </strong></p> <p>black= Prusa Galaxy Black<br/> white= DasFilament.de Weiss<br/> blue= DasFilament.de Toms3D Infinity Blue<br/> red= DasFilament.de Feuerrot<br/> orange= DasFilament.de Reinorange<br/> yellow ( bottom ) = DasFilament.de Sonnengelb<br/> yellow2 ( near orange) = Amazon.de FilamentWerk Neon Hell-Orange</p> <p><strong>How I designed it? Scoll down!</strong></p> <p>I will make a post for a <a href="https://www.prusaprinters.org/prints/18125-stand-for-everyday-astronauts-3d-coa">suitable stand</a> for the coat of arms the next days.</p> <p>It's finally printed on my Prusa i3 MK3 MMU2 printer. Many thanks to @josefprusa for this great machine!</p> <p>Take a look at the development process on Instagram:<br/> <a href="https://www.instagram.com/explore/tags/everydayastronaut_coatofarms">https://www.instagram.com/explore/tags/everydayastronaut_coatofarms</a></p> <p><strong>Happy printing</strong></p> <p>MFG</p> <p>Chris</p> <p><em>Follow me on...</em><br/> <img alt="" src="https://www.prusaprinters.org/assets/favicons/favicon-16x16.png"/> <a href="https://www.prusaprinters.org/social/391-schiffer-softde">prusaprinters.org</a><br/> <img alt="" src="https://cdn.thingiverse.com/site/img/favicons/favicon-16x16.png"/> <a href="https://www.thingiverse.com/schiffer-soft">thingiverse</a><br/> <img alt="" src="http://schiffer-soft.de/api/instagram/insta16x16.png"/> <a href="https://www.instagram.com/schiffer_soft">Instagram</a></p> <p>If you like it ;) - Thx for me!<br/> <img alt="" src="http://schiffer-soft.de/api/paypal/paypal16x16.png"/> <a href="https://www.paypal.me/schiffersoft">www.paypal.me/schiffersoft</a></p> <h3>Print instructions</h3><h6>#</h6> <p><h3>How I Designed This</h3></p> <h6>#</h6> <p><strong>Step 1. Find a good picture of @everydayastronauts Crest</strong></p> <p>Import it as an image into Autocad. After that the whole contours are traced by hand. In my opinion this works only by hand.</p> <p><img alt="" src="https://media.prusaprinters.org/thumbs/inside/500x500/media/prints/16879/images/162044_03a57859-6088-4721-a786-c37d3ee4cdbf/bild-4.jpg#_ga=2.96111317.89858408.1578848567-962678091.1538851090"/></p> <p><strong>Step 2. Trace the fonts in the image</strong></p> <p>Unfortunately, most fonts in logos are highly customized. Here everything has to be done by hand.</p> <p><img alt="" src="https://media.prusaprinters.org/thumbs/inside/500x500/media/prints/16879/images/161857_6336b5c0-e9b9-4969-a4cf-376aa321b65b/bild-2.jpg#_ga=2.141902203.89858408.1578848567-962678091.1538851090"/></p> <p><strong>Step 3. Divide objekts</strong></p> <p>Now we divide the individual objects that we want to place at different heights. It's best to leave a frame around each one, so you always have a reference to put everything together later.</p> <p><img alt="" src="https://media.prusaprinters.org/thumbs/inside/500x500/media/prints/16879/images/161994_7e9c2901-21d3-4fb0-97bc-ca55d3f3ba11/bild-5.jpg#_ga=2.162742645.89858408.1578848567-962678091.1538851090"/></p> <p><strong>Step 4. Extrude objekts</strong></p> <p>Start extruding the 2D lines. Think about how high the single object will be and how thick the whole object should be. You can also start to define colors now, so that the elements can be separated better afterwards. Then start in a main frame ( mine is the topmost one in the picture ) to put the single parts together.</p> <p><img alt="" src="https://media.prusaprinters.org/thumbs/inside/500x500/media/prints/16879/images/161858_cfc3d66f-5ab9-4dc7-a1ea-601776a3f876/bild-9.jpg#_ga=2.162742645.89858408.1578848567-962678091.1538851090"/></p> <p><strong>Step 5. Extrude the 5 color head</strong></p> <p>Now the head can also be extruded. Here you have to make sure that the contours are completely clean so that the 5 colour print works properly.</p> <p><img alt="" src="https://media.prusaprinters.org/thumbs/inside/500x500/media/prints/16879/images/161859_0c9511e1-1e12-4bdf-a443-c48b48d8050e/bild-12.jpg#_ga=2.128289477.89858408.1578848567-962678091.1538851090"/><br/> <img alt="" src="https://media.prusaprinters.org/thumbs/inside/500x500/media/prints/16879/images/162015_659ec395-5492-428e-b52b-cd869b44bb8b/bild-15.jpg#_ga=2.128289477.89858408.1578848567-962678091.1538851090"/></p> <p><strong>Step 6. Produce curvatures</strong></p> <p>So that the outer black frame and the Kopt fes coat of arms are somewhat curved I always draw a large ball (much larger than the coat of arms) and cut this out of a rectangle, which has the size of the frame. Here in the picture it is the pink rectangular body left above.<br/> With this the coat of arms parts can be cut now.</p> <p><img alt="" src="https://media.prusaprinters.org/thumbs/inside/500x500/media/prints/16879/images/162016_2a538056-edc8-49a3-88e1-0ee7da933e83/bild-11.jpg#_ga=2.94732885.89858408.1578848567-962678091.1538851090"/><br/> <img alt="" src="https://media.prusaprinters.org/thumbs/inside/500x500/media/prints/16879/images/162019_0e9220f7-9134-4f26-966d-6d77ea04edc4/bild-14.jpg#_ga=2.94732885.89858408.1578848567-962678091.1538851090"/></p> <p><strong>Step 7. Put all togehter</strong></p> <p>Now we can put everything together in the main frame. Looks pretty good already, huh?</p> <p><img alt="" src="https://media.prusaprinters.org/thumbs/inside/500x500/media/prints/16879/images/161862_e80babb3-51b2-40d1-a8e8-9fb2edb0ea0d/bild-10.jpg#_ga=2.164372982.89858408.1578848567-962678091.1538851090"/><br/> <img alt="" src="https://media.prusaprinters.org/thumbs/inside/500x500/media/prints/16879/images/161863_5a69339c-94b2-4ea6-9110-c450fe4f6651/bild-16.jpg#_ga=2.164372982.89858408.1578848567-962678091.1538851090"/></p> <p><strong>Step 8. Export to Fusion 360</strong></p> <p>Now I have saved the Crest as *.dwg and import it into Fusion 360.<br/> Here we can do some magic with the renderer</p> <p><img alt="" src="https://media.prusaprinters.org/thumbs/inside/500x500/media/prints/16879/images/162049_6a975b88-4497-4d2a-8bf3-5b752a8dbcee/91d042c8-83ac-4120-a502-994277a3c024.jpeg#_ga=2.205685082.89858408.1578848567-962678091.1538851090"/><br/> <img alt="" src="https://media.prusaprinters.org/thumbs/inside/500x500/media/prints/16879/images/161865_0fcbce1a-9b62-4910-84ef-96b5142a54ef/747721e2-3514-4b5a-8f44-40b833a99b88.jpeg#_ga=2.205685082.89858408.1578848567-962678091.1538851090"/><br/> <img alt="" src="https://media.prusaprinters.org/thumbs/inside/500x500/media/prints/16879/images/161864_8733ba11-c0e5-400a-bc9b-4a5d3fd60769/everydayastronaut7_2019-oct-14_09-12-38pm-000_cus.png#_ga=2.205685082.89858408.1578848567-962678091.1538851090"/></p> <p><strong>Step 9. Where do we go from here?</strong></p> <p>Now we are done with drawing and rendering. We can now preparing for printing and then 3D print the thing.</p> <p>I will continue writing here the next days. So stay tuned!<br/> If u want follow me<br/> <a href="https://www.prusaprinters.org/social/391-schiffer-softde">prusaprinters.org</a><br/> <a href="https://www.thingiverse.com/schiffer-soft">thingiverse</a><br/> <a href="https://www.instagram.com/schiffer_soft/">Instagram</a></p> <p><strong><em>Happy printing</em></strong></p> <p>MFG</p> <p>Chris</p>
With this file you will be able to print Everyday Astronaut 3D coat of arms with your 3D printer. Click on the button and save the file on your computer to work, edit or customize your design. You can also find more 3D designs for printers on Everyday Astronaut 3D coat of arms.