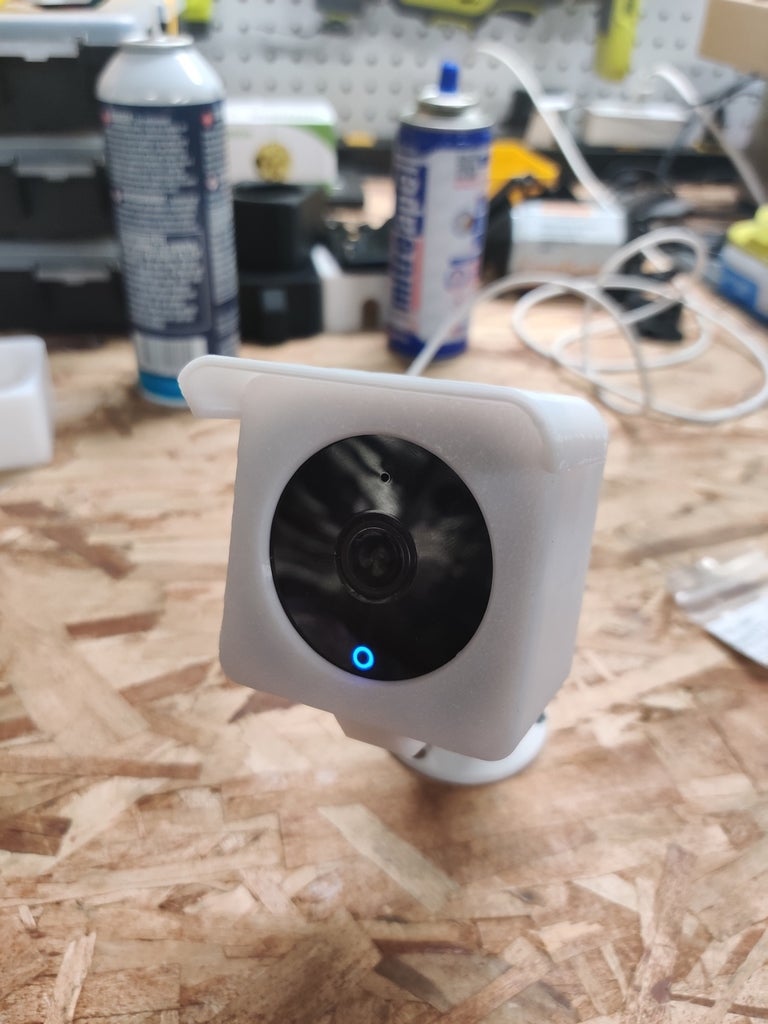
eufy 2K Indoor Cam Enclosure for Outdoor
prusaprinters
<p>I recently purchased the Eufy off amazon because it was very cheap, I have the YI Home outdoor cameras but they are not 2k. Since the Eufy camera was meant for indoors, I designed an enclosure to be used outdoors.</p><p>There are (2) variations of the design for the Eufy Security 2K Indoor Cam<br><a href="https://amzn.to/3mF0wCu">https://amzn.to/3mF0wCu</a> (#ad)</p><p><strong>Update: 06/07/2022</strong> - Corrected thin wall on "Eufy2kCamera_StockMount_Backplate_Reversed_v3.stl", revised to v4.</p><p><strong>Update: 01/07/2021</strong> - Corrected model "Eufy2kCamera_StockMount_Backplate_v3.stl"</p><p><strong>Update: 01/06/2021</strong> - Added both Stock Mount & 3rd Party models to support ceiling mounted when the camera is mounted upside down. If you are planning to mount from the ceiling, use the "reversed" models.<br><strong>Update: 01/06/2021</strong> - Added chamfers to the sun visor models to be printed flat and not vertical.<br> </p><p><strong>Stock Mount</strong> - These are to be used with the mount/stand that comes with the camera.<br>1 x Eufy2kCamera_StockMount_Enclosure_v3.stl<br>1 x Eufy2kCamera_StockMount_Backplate_v3.stl<br>1 x Eufy2kCamera_StockMount_Sunvisor_v3.stl (optional)<br>1 x Eufy2kCamera_StockMount_Sunvisor_Extended_v3.stl (optional)</p><p><strong>Ceiling Mounted - Reversed Models</strong><br>1 x Eufy2kCamera_StockMount_Backplate_Reversed_v3.stl<br>1 x Eufy2kCamera_StockMount_Sunvisor_Extended_Reversed_v3.stl (optional)<br>1 x Eufy2kCamera_StockMount_Sunvisor_Reversed_v3.stl (optional)</p><p><strong>3rd Party Mount</strong> - 1/4 Thread - These are to be used with anything 3rd party security, some additional hardware is required. See Note Below.</p><p>1 x Eufy2kCamera_3rdPartyMount_Enclosure_v3.stl<br>1 x Eufy2kCamera_3rdPartyMount_Backplate_v3.stl<br>1 x Eufy2kCamera_3rdPartyMount_Sunvisior_v3.stl (optional)<br>1 x Eufy2kCamera_3rdPartyMount_Sunvisior_Extended_v3.stl (optional)</p><p><strong>Ceiling Mounted - Reversed Models</strong><br>1 x Eufy2kCamera_3rdPartyMount_Backplate_Reversed_v3.stl<br>1 x Eufy2kCamera_3rdPartyMount_Sunvisior_Reversed_Extended_v3.stl (optional)<br>1 x Eufy2kCamera_3rdPartyMount_Sunvisior_Reversed_v3.stl (optional)</p><h3>Hardware required:</h3><p>4 x M3x10mm screws<br>4 x 3x5mm(L)-5.4mm(OD) Metric Threaded Brass Knurl Round Insert Nuts <a href="https://amzn.to/3kJ85HB">https://amzn.to/3kJ85HB</a> (#ad)</p><h3>Hardware required for 3rd party mount.</h3><p>1 x Threaded Insert, 1/4 inches-20 x 6mm L x 8mm OD Female Thread<br><a href="https://amzn.to/3oIH35l">https://amzn.to/3oIH35l</a> (#ad)</p><p>3rd Party Outdoor Mounts I used.<br><a href="https://amzn.to/3jQFbnP">https://amzn.to/3jQFbnP</a> (#ad) - 4 Pack Indoor/Outdoor Security Camera Wall Mount</p><p>26ft USB cable that worked with this enclosure if needed.<br><a href="https://amzn.to/3p40SV5">https://amzn.to/3p40SV5</a> (#ad)</p><p>Notes are below with the images, you'll need to heat up the push fittings to insert into the plastic parts for the mount.</p><p><strong>Notes: </strong></p><p>No support is needed, brim might be needed to hold down the sun visor print.<br>If using the 3rd party mount, see notes to adjust the Prusa slicer setting to add more perimeters to the backplate.</p><h3>Post-Printing</h3><p><strong>Slicer Settings</strong></p><p>If you want to use the 3rd party mount, I would add more perimeters to the push thread hole. That way when you heat the push fitting up it can bond with the plastic. See the settings below.</p><p>Create a cylinder shape, and change it to a part modifier. Add the layer and perimeters option, and modify it to 4 or 5 perimeters.</p><p><strong>Example of perimeters around the push fitting hole.</strong></p><ol><li>Add heat to the threaded Insert with a soldering iron for the backplate and enclosure.<br>The backplate uses the 1/4 thread insert and the enclosure uses the M3 threaded insert.<ol><li>Attach 4 x M3 x 10mm screws to secure the backplate.</li></ol></li></ol><figure class="image"><img src="https://cdn.thingiverse.com/assets/e2/84/b4/78/83/PrusaSlicerCyclinder.PNG"></figure><figure class="image"><img src="https://cdn.thingiverse.com/assets/16/8d/71/94/3a/PrusaSlicerCyclinderSettings.PNG"></figure><figure class="image"><img src="https://cdn.thingiverse.com/assets/7e/e9/13/6d/38/PrusaSlicerCyclinderSettingsPerimeters.PNG"></figure><ol><li>Add heat to the threaded Insert with a soldering iron for the backplate and enclosure.<br>The backplate uses the 1/4 thread insert and the enclosure uses the M3 threaded insert.</li></ol><p><img class="image_resized" style="width:50%;" src="https://cdn.thingiverse.com/assets/3d/66/a4/a8/e3/IMG_20201031_100521_2.jpg"></p><p><img class="image_resized" style="width:50%;" src="https://cdn.thingiverse.com/assets/99/02/ee/e0/8b/IMG_20201030_085302_3.jpg"></p><p><img class="image_resized" style="width:50%;" src="https://cdn.thingiverse.com/assets/2b/28/94/e6/e5/IMG_20201030_085302_10.jpg"></p><ol><li>Attach 4 x M3 x 10mm screws to secure the backplate.</li></ol>
With this file you will be able to print eufy 2K Indoor Cam Enclosure for Outdoor with your 3D printer. Click on the button and save the file on your computer to work, edit or customize your design. You can also find more 3D designs for printers on eufy 2K Indoor Cam Enclosure for Outdoor.
