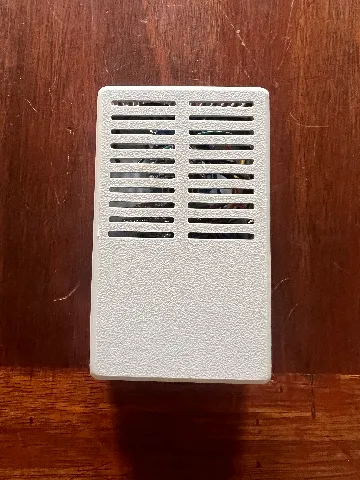
ESPHome Air Quality Monitor
prusaprinters
This is an enclosure I made for my Air Quality Monitor. Here's the OnShape link in case you want to modify!https://cad.onshape.com/documents/e077a48dd29e5c5f59e102fb/w/c667a9e984e472cebff6c660/e/79d2625afb179b8dd761b8a4 Print SettingsI printed with 0.4mm nozzle on a Bambu A1 Mini 0.12mm Fine setting. I am a 3D printing beginner so apply your own judgement! Bill of materialsYou will need:Soldering kitA PMS5003 sensor, for PM measurement (AliExpress)The enclosure was designed with the PMS5003 dimensions in mind, but the software works with any PMSX003 device, adapt the enclosure as necessaryBME680 sensor for all the rest (AliExpress)ESP8266, specifically D1 Mini Qwiic cable for I2C to simplify setup (only if your ESP8266 has it) (AliExpress)If not, spare wires (you can use extras from the PMS5003) + Heat shrink to make a piggybackI like this particular model of the D1 mini: (AliExpress)4 5x2mm magnetsCyanoacrylate glue or hot glue3D Printed enclosure (This!)Optional: 2 M2x4mm screw to screw the BME680 chip into the enclosureBuildingConnecting the PMS5003 PMS5003 uses UART to communicate. Do NOT use the board labeled TX/RX pins, we will use custom pins for that. Double-check your ESP8266 pins since they may be laid out in different spots, but the labels remain the same.- PIN1: Solder to 5V- PIN2: If using Qwiic, connect PIN2 straight to GND, otherwise see note below.- PIN3: GPIO0 / D3- PIN4: GPIO14 / D5 (Reminder, RX in the sensor goes to TX in the software definition)- PIN5: GPIO12 / D6 (Vice versa)Pins 6, 7 and 8 are disconnected. Harvest the wires if you need them.NOTE: If you are not using the qwiic connection, you will need to create a piggyback cable for the GND pin: connect PIN2 from PMS5003 and GND from BME680 into a single wire, solder the wire into GND. Make sure to use heat shrink tubing.Connecting the BME680If you are using the Qwiic cable that will be just connecting the cables in order, otherwise:- VCC: Solder to 3v3- GND: Use piggyback- SCL: SCL / D1- SDA: SDA / D2FlashingI am going to assume you know how to use ESPHome. If not go to https://esphome.io/ and read the documentation. Download the following configuration and change it to suit your needs. Please change the networking parts, the rest are good defaults if you followed me exactly.Gist linkBefore assembling, this is a good time to bench test. Check if you are seeing data coming from both the BME680 and the PMS5003: [10:46:46][D][pmsx003:234]: Got PM1.0 Concentration: 3 µg/m^3, PM2.5 Concentration 4 µg/m^3, PM10.0 Concentration: 5 µg/m^3 [10:46:46][D][sensor:093]: 'Particulate Matter <1.0µm Concentration': Sending state 3.00000 µg/m³ with 0 decimals of accuracy [10:46:46][D][sensor:093]: 'Particulate Matter <2.5µm Concentration': Sending state 4.00000 µg/m³ with 0 decimals of accuracy [10:46:46][D][sensor:093]: 'Particulate Matter <10.0µm Concentration': Sending state 5.00000 µg/m³ with 0 decimals of accuracy [10:46:51][D][sensor:093]: 'IAQ': Sending state 25.00000 IAQ with 0 decimals of accuracy [10:46:51][D][sensor:093]: 'CO2 Equivalent': Sending state 500.00000 ppm with 1 decimals of accuracy [10:46:51][D][sensor:093]: 'Breath VOC Equivalent': Sending state 0.50000 ppm with 1 decimals of accuracy [10:46:51][D][sensor:093]: 'Pressure': Sending state 1018.60999 hPa with 1 decimals of accuracy [10:46:51][D][sensor:093]: 'Gas Resistance': Sending state 393342.00000 Ω with 0 decimals of accuracy [10:46:51][D][sensor:093]: 'Temperature': Sending state 27.40199 °C with 1 decimals of accuracy [10:46:51][D][sensor:093]: 'Humidity': Sending state 43.51381 % with 1 decimals of accuracy AssemblingWith the 3D printed case (more instructions in the Printables page), mount the PMS5003 on the board. I used hot glue in the pins for it to stay put. Mount the BME680 with the M2x4 screws or hot glue, same for the ESP8266. I like to keep the BME680 chip farther from the cables so it is more exposed to air. See photo below for reference (this will look different due to my prototyping):Profit!
With this file you will be able to print ESPHome Air Quality Monitor with your 3D printer. Click on the button and save the file on your computer to work, edit or customize your design. You can also find more 3D designs for printers on ESPHome Air Quality Monitor.
