Es-Cage Cube (4 versions)
pinshape
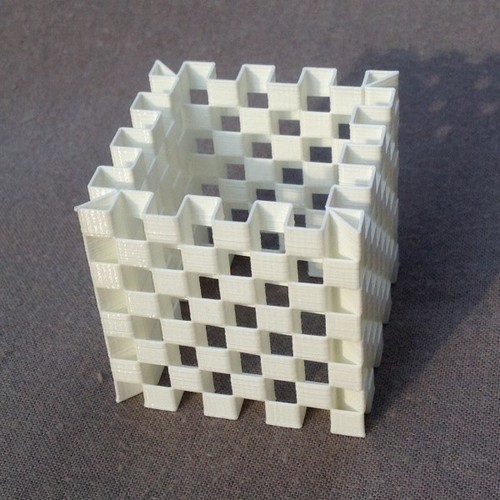
I developed an innovative technique called Es-Cage printing in January-February 2016, which you can learn more about at http://www.erikes.nl/ESstart.htm. When printed correctly, it's possible to stand on the finished product! To achieve this result, you must use the "Only Follow Mesh Surface" setting in Cura (located under Expert Settings). You can scale these models to any size and shape you like. For standard versions, print with normal settings for a single-shell hollow object. However, these models require 100% scaling, with a shell thickness of 0.5 mm (compatible with 0.4 mm nozzles) or scaled to 80% with a 0.4 mm shell. Note that the "skin" versions comprise eight stages with only vertical skins and no tops or bottoms. If this setting doesn't work in your slicer, try using the "stages" versions instead, which consist of eight separate solid (watertight) objects stacked on top of each other. Both "stages" and "skin" versions function well in Cura. Recommended print settings include shell thicknesses between 0.4 mm and 0.5 mm, nozzle sizes up to 0.4 mm, print speeds ranging from 35-40 mm/s, and layer heights between 0.15 mm and 0.25 mm. In Cura, set "FIX A" (combine everything) under Expert Settings. The "OFMS" method allows for printing without top or bottom layers, whereas the standard method permits printing with or without bottoms but always sets the slicer to print without tops and no fill. It's recommended to print Es-Cage models in a spiralized pattern. Learn more about this technique at http://www.erikes.nl/ESstart.htm
With this file you will be able to print Es-Cage Cube (4 versions) with your 3D printer. Click on the button and save the file on your computer to work, edit or customize your design. You can also find more 3D designs for printers on Es-Cage Cube (4 versions).