Ersatz/Reparatur-Zahnrad für Aktenvernichter/Schredder 10-47-30° 02
prusaprinters
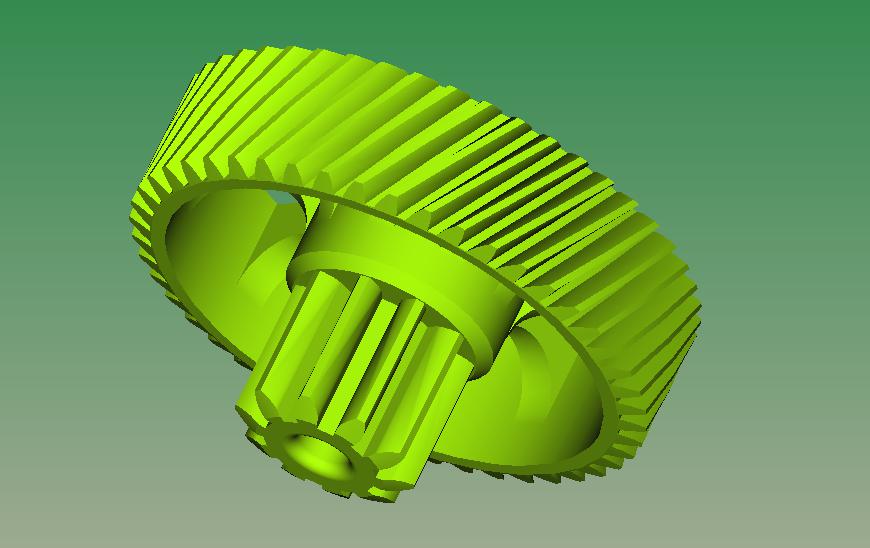
<h3> </h3><h3>Ersatz/Reparatur-Zahnrad Schredder 10-47-30° 02</h3><h3><br><strong>! Entleert Euren Schredder regelmäßig !</strong></h3><p><strong>denn wenn dieser zu voll ist, zieht er die Papierschnipsel mit den Messern (Walzen) an den äußeren Seiten wieder mit in das Gehäuse was zu enormen Klemmkräften führt.</strong></p><p>Dies dürfte auch der Grund für das defekte original Zahnrad bei mir gewesen sein.</p><p>Als Material empfehle ich PC (<i>Polycarbonat</i>) da dies sowohl eine hohe Festigkeit als auch eine gute Wärmebeständigkeit besitzt.</p><p><strong>Druckparamneter:</strong></p><p><strong>Schichthöhe ca. 0,3mm</strong> <i>(auch wenn feinere Schichten schöner aussehen, geht dies meist zu Lasten einer guten Verbindung der Schichten )</i></p><p><strong>Füllgrad möglichst hoch min. 60%</strong></p><p>Bild 8 zeigt mein gedrucktes aus Polycarbonate Bild 11 eingebaut <i>(sehr fest und wärmebeständig)</i></p><p> </p><p><i>PETG auch möglich, mein erstes war aus PETG hält aber nicht so lange, wärme-empfindlich!</i></p><p><strong>Abzuraten ist von:</strong><i><strong> </strong>PLA (nicht warm-fest / spröde / bruchempfindlich) sowie von ABS zu weich.</i></p><p><strong>Der in Bild 12 rot schraffierte Bereich sollte auch bei Verwendung von Polycarbonate bei längerem Betrieb überprüft werden auf das dieser nicht zu warm wird !!! Pause !!!</strong></p><p><i>(mit dem Handrücken)</i></p><figure class="image image_resized" style="width:28.86%;"><img src="https://media.prusaprinters.org/media/prints/68619/rich_content/8e6bdc8c-622f-4afb-841d-b55370c0b910/img_20210618_181630-.jpg#%7B%22uuid%22%3A%22862e3a2c-4713-4fe8-a718-baf1316405d2%22%2C%22w%22%3A1348%2C%22h%22%3A1372%7D"></figure><p>Ich habe inzwischen nach der Reparatur 8 Mülleimer mit einem Fassungsvermögen von ca. 10-12 Liter geschreddert.</p><p>Für die Demontage un Montage sollte man mit einem kleinen Kreuzschlitz-Schraubendreher auskommen. <i>(geschätzter Zeitaufwand für den Wechsel ca. 30 Min )</i></p><h3><strong>!!! WÄHREND DER DEMONTAGE UND MONTAGE BITTE UNBEDINGT DEN NETZSTECKER ZIEHEN UND KLEINE KINDER FERNHALTEN. IN DEM GETRIEBE ENTSTEHEN GROßE KRÄFTE DIE BEI GEÖFFNETEM GETRIEBE ZU VERLETZUNGEN FÜHREN KÖNNEN. !!!</strong></h3><p> </p><p>~~~~~~~~~~~~~~~~~~~~~~~~~~~~~~~~~~~~~~~~~~~~~~~~~~~~~~~~~~~~~~~~~~~~~~~~~~~~~~~~~~~~~~~~~~~~</p><p>Google translates:</p><p><strong>Replacement/repair gear shredder 10-47-30° 02</strong></p><p><strong>! Empty your shredder regularly!</strong><br>because if this is too full, it pulls the scraps of paper with the knives (rollers) on the outer sides back into the housing, which leads to enormous clamping forces.</p><p>This may also have been the reason for the defective original gear wheel in my case.<br>As a material, I recommend PC (polycarbonate) because it has both high strength and good heat resistance.</p><p>Print parameters:</p><p>Layer height approx. 0.3mm (even if finer layers look nicer, this is usually at the expense of a good connection between the layers)</p><p>Filling level as high as possible, min. 60%<br>Pic 8 shows my printed polycarbonate pic 11 installed (very strong and heat resistant)</p><p> </p><p>PETG also possible, my first one was made of PETG but doesn't last that long, sensitive to heat!</p><p>Not recommended: PLA (not heat-resistant / brittle / sensitive to breakage) and ABS too soft.<br>The area shaded red in Figure 12 should also be checked if polycarbonate is used over a longer period of time to ensure that it does not get too warm!!! Break !!!</p><p>(with the back of the hand)</p><figure class="image image_resized image-style-align-center" style="width:28.86%;"><img src="https://media.prusaprinters.org/media/prints/68619/rich_content/8e6bdc8c-622f-4afb-841d-b55370c0b910/img_20210618_181630-.jpg#%7B%22uuid%22%3A%22862e3a2c-4713-4fe8-a718-baf1316405d2%22%2C%22w%22%3A1348%2C%22h%22%3A1372%7D"></figure><p><br>Since the repair I have shredded 8 garbage cans with a capacity of approx. 10-12 liters.<br>A small Phillips screwdriver should be sufficient for disassembly and assembly. (estimated time required for the change approx. 30 minutes)</p><h3><strong>!!! DURING DISASSEMBLING AND ASSEMBLING, PLEASE BE SURE TO UNPLUG THE POWER PLUG AND KEEP SMALL CHILDREN AWAY.</strong><br><strong>GREAT FORCES ARE GENERATED IN THE TRANSMISSION THAT CAN LEAD TO INJURY WHEN THE TRANSMISSION IS OPEN. !!!</strong></h3>
With this file you will be able to print Ersatz/Reparatur-Zahnrad für Aktenvernichter/Schredder 10-47-30° 02 with your 3D printer. Click on the button and save the file on your computer to work, edit or customize your design. You can also find more 3D designs for printers on Ersatz/Reparatur-Zahnrad für Aktenvernichter/Schredder 10-47-30° 02.