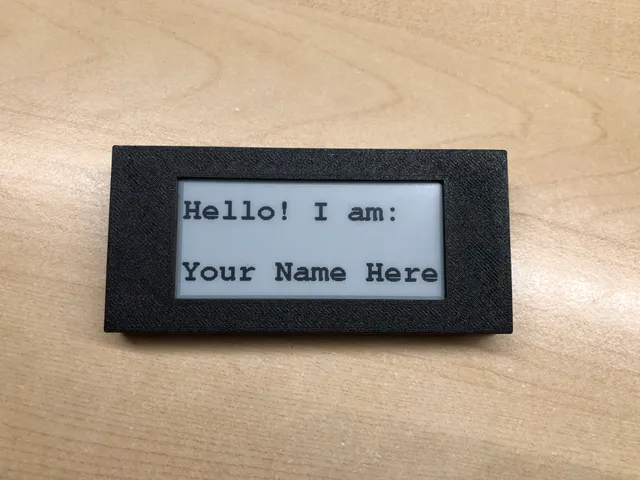
ePaper name tag
prusaprinters
ePaper display name tag with a 2.9" eInk display in offline mode held by 4 strong magnets to your clothing This case for a WaveShare 2.9" ePaper display comes with a small code to set 2 lines of text to it. With this code it can be used in offline mode as a name tag as shown. With a magnetic clip you can wear it on your clothing. Case:The ePaper display itself is mounted inside the case on 4 posts to which 4 rings fit it in placeThe actual real used display area is shown to the user only. The borders and the circuit parts of the display are completely hiddenThe lid is clicked on the back of the case that also works as a holder with 2 magnets2 more magnets are mounted to a small clip that works as the other part of the holder to the lid The weight of the case alone is 23g only Parts:4x round magnets 6x3mm 1x ESP32 Lolin321x Waveshare 2.9" epaper display Programming the display:The display was programmed before it was stored in the case, but it can later be reprogrammed inside the case with the usual cable that comes with these devices.The display does not need any power after it was programmed. It keeps the set textThe Lolin32 was used with the in the table below named wiringThe Arduino code to set the name can be found on my GitHub repositoryYou will need 1 additional library “GxEPD” which you can download in Arduino IDE using the library manager. It will ask you to download 2 additional libraries which should be acceptedIn the code change the 2 lines on the top to set the shown text and name Wiring the ESP32 to the display:ePaper Display pinESP32 Lolin32 pinColourBUSY4purpleRST16whiteDC17greenCS5orangeCLK18yellowDIN23blueGNDGNDblack or brownVCC3V3red or grey Printing instructions:0.2 speed profileNo supports or brim usedThe 4 rings were set to 100% infillMounting the magnets:The used magnets are pretty strong and therefore the 4 rings that hold them in place are set really tight to 6.00mm as well. In a first test with 6.10mm holes the magnets flew out of these holes after some usage. Because the new used hole size is the same as the magnets diameter, they need to be pressed into the holes harder. I put the lid and the clip piece on a table and then first located the orientation of the magnet sides so that they pull at each other. After the orientation was clear I snapped one magnet to the printers trusty side cutters and with that I pressed the magnet into the part. It is needed check the magnet orientation again, because you will not get them out of the part again without destroying it. No glue was needed on the model.Ideas:Room name tag displays: Using bigger ePaper displays with this solution could become an easy naming system for rooms in an office, where you can change the names more easy without to cut out paper labels again and again when employee names change. Together with a centralised web management part this would be a cool solution…Removing the back lid and some parts from the cases edge would allow to reach the port for the Display better. With that such name tags could be used on the fly at an entrance of a meeting or something like that…The 4 rings that fix the ePaper to the front of the case could be bind together to become part of the magnet holder of the case. This would reduce the weight even more, but that is something for a 2nd version is guess… Happy printing :)
With this file you will be able to print ePaper name tag with your 3D printer. Click on the button and save the file on your computer to work, edit or customize your design. You can also find more 3D designs for printers on ePaper name tag.
