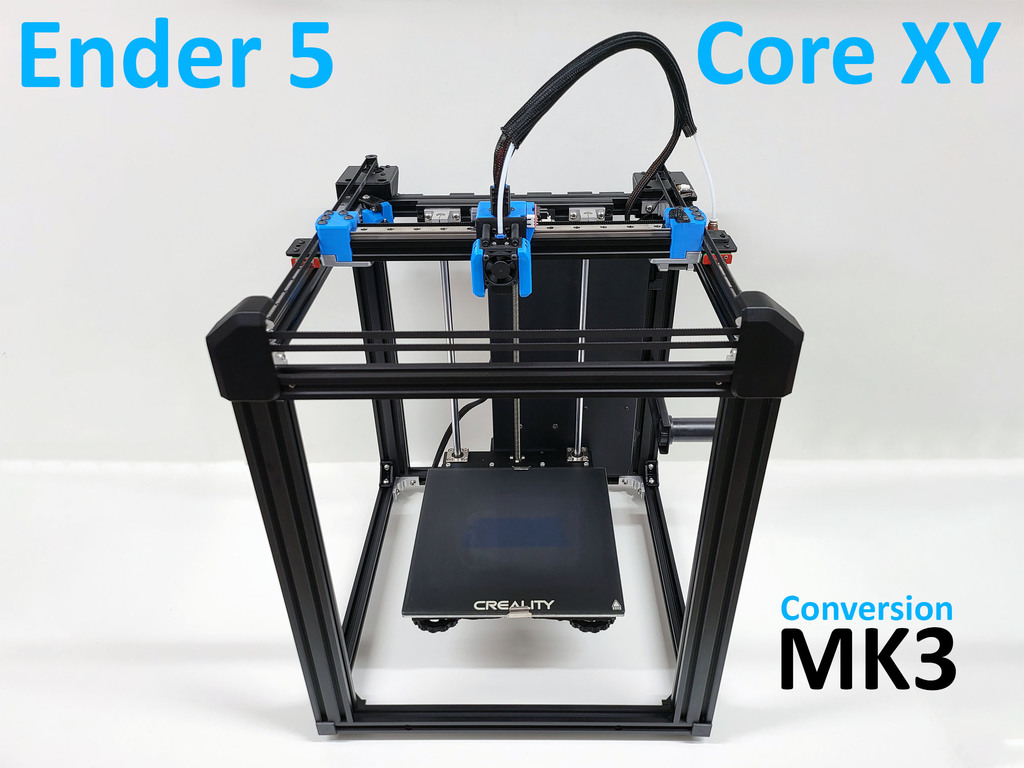
Ender 5 Core XY with Linear Rails MK3
prusaprinters
<p>This is my third Core XY conversion kit for the Ender 5 with Linear rails.</p> <p>Previous versions here, updates at the bottom of the page.</p> <p>MK2: <a href="https://www.thingiverse.com/thing:4777606">https://www.thingiverse.com/thing:4777606</a></p> <p>Mk1: <a href="https://www.thingiverse.com/thing:4650517">https://www.thingiverse.com/thing:4650517</a></p> <p>As per the previous versions a big shout out to barnabyQ for his Ender 5 Pro 3D model over on Grabcad. This made things so much easier.</p> <p>This version resumes some of the simplicity of the MK1 thing but adds rigidity and strength for those that want to push the Ender 5 with Klipper and the likes. The core of the design is a hybrid part aluminium, part 3D printed XY joiner. Using an inexpensive off the shelf Idler Mounting Plate part (with some small amount of fabrication) allows the joiner to be quite small but very robust.</p> <p>I have also reintroduced a 2020 X gantry to beef up the rigidity and reduce any racking or movement of the assembly. This may add a slight amount of weight but will reduce some of the resonance and variation due to the belts not being parallel. The 2020 extrusion which is cross fixed with 2 x 25mm M5 bolts also acts as a stop to stop any compression of the assembly by the tension of the belts. Test are showing that this is making a really big difference when printing at speed with Klipper.</p> <p>I have included a new belt tensioning system using Belt Tensioning Blocks which is much easier to assemble & install.</p> <p>Like the MK1 version there is now a basic mounting block which allows more personalisation of the Hot End assembly.</p> <p>I have also included Pre designed mounts for a Bowden set up and direct drive configurations using either a Sherpa Mini or an Orbiter Direct Drive. All versions have variations for either a Dragonfly or Dragon Hot End.</p> <p>I have also re sited the Electronics Console to the rear of the frame which has revolutionised the overall wire management in one fell swoop. Thanks to killajoedotcom for the heads up on that idea, all credit to him for this realisation.</p> <p>The MK3 design will allow for a build volume of approximately 230 mm on X, full 235 mm on Y and slightly more than stock on Z dependant on Hot End design adopted.</p> <p>Various Test\progress Videos at the following links:</p> <p> <figure class="media"> <oembed url="https://www.youtube.com/watch?v=MmrGHgmg3PM"></oembed> </figure> </p> <p> <figure class="media"> <oembed url="https://www.youtube.com/watch?v=uYPVattYyPA"></oembed> </figure> </p> <p> <figure class="media"> <oembed url="https://www.youtube.com/watch?v=xJUX0GJFEA8"></oembed> </figure> </p> <p> <figure class="media"> <oembed url="https://www.youtube.com/watch?v=fhZTwQc_9Uo"></oembed> </figure> </p> <p>Installation</p> <p>I have included Installation guides for the Motion System, Re siting the Electronics Enclosure, Pre Designed Hot End Assemblies and a general BOM with part references.</p> <p>You may need to use an additional 5 volt pin out to supply power for the X Axis Optical End Stop. The uploaded image is just an example, please check your own equipment & documentation carefully before connecting the End Stop to the pins on your board and make sure all three connections to the optical end stop are correct prior to power up..</p> <p>I have also added some additional corner brackets to the lower nodes of the frame to add rigidity in lieu of the Electronics Enclosure moving to the rear of the frame.</p> <p>Step files for all parts are also published for personal customisation.</p> <p>There is an adapter kit for my Manta Mk2 Cooling system here: <a href="https://www.thingiverse.com/thing:5178371">https://www.thingiverse.com/thing:5178371</a></p> <p>Printing</p> <p>1.The majority of parts are printed without supports but where necessary I have included integrated supports & sacrificial layers to hopefully make this easier to implement. I have also uploaded step files of all the parts if you would prefer to print with your own custom supports. Please refer to the Installation guides for post printing part preparation.</p> <p>2.Printed with Hatchbox Light Blue, Silver and Black ABS, the best ABS I have ever used, I just wish it was more readily available this side of the pond. Minimum 3 perimeters with 30% infill. Majority printed on my wonderful Voron 0 build.</p> <p>Update:21_12_21</p> <p>1.Uploaded revised Y End Stop Mount & Flag to allow full use of Y Axis build volume.</p> <p>2.Included a 3D printed rear Electronic Enclosure Panel to aid Wi-Fi reception if using Klipper. The design also includes a hinged access panel to make Raspberry PI maintenance easier without removing the whole rear panel. Adds an additional 7mm in internal depth to help wire management.</p> <p>Update: 28_12_21</p> <p>1.Uploaded a revised Upper Enclosure Panel V1_2 which includes a cut out for a Bowden Filament Feed to the rear when using a direct drive system.</p> <p>2.Revised the WM cap for the Sherpa Mini assembly.</p> <p>3.Uploaded 2 x Filament Tube clamps (one angled\one straight)to fasten the tube at the rear of the frame.</p> <p>Update: 29_12_21</p> <p>1.Updated the zip file with all things to current versions and additions.</p> <p>Update: 05_01_22</p> <ol> <li>Noticed the Electronics Enclosure Door Upper Panel was not in the correct printing orientation so I have reuploaded correctly to version 1_3.</li> </ol> <p>Update: 27\03\22</p> <ol> <li>Uploaded revised Orbiter V1.5 mounts for the Dragon & Dragonfly. The original uploaded versions had errors with the fixing locations.</li> </ol> Category: 3D Printer Parts
With this file you will be able to print Ender 5 Core XY with Linear Rails MK3 with your 3D printer. Click on the button and save the file on your computer to work, edit or customize your design. You can also find more 3D designs for printers on Ender 5 Core XY with Linear Rails MK3.
