Ender 3 - Z-Axis Stepper Damper Adapter
prusaprinters
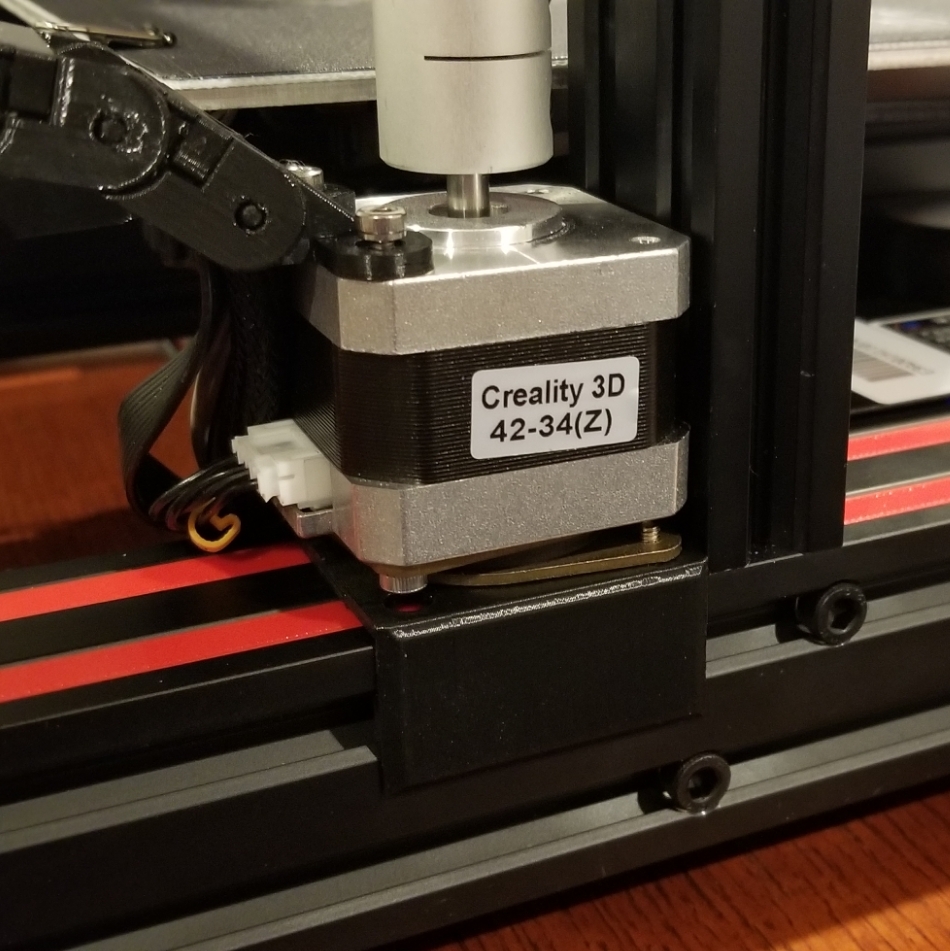
<p>After installing a BLTouch on my printer, the bed leveling process highlighted its need for a z-axis stepper damper. I searched around, and was not satisfied with anything I found. So, I created a model of my own. The only downside of this, is that it requires a couple screws that are not found in common screw sets.</p><p><strong>Updates</strong>:</p><p><strong>2019-03-26</strong> - Added version that plays well with the Ender 3 Pro</p><p>Also, check out these other mods that dramatically reduce the sound of your Ender 3</p><ul><li><a href="https://www.printables.com/model/187665-ender-3-x-axis-stepper-damper-adapter">X-Axis Stepper Damper</a></li><li><a href="https://www.printables.com/model/187667-ender-3-y-axis-stepper-damper-v2">Y-Axis Stepper Damper</a></li><li><a href="https://www.printables.com/model/187670-ender-3-low-profile-feet">Low Profile Feet</a></li></ul><p>Enjoy the silence...</p><h3>Print Settings</h3><p><strong>Resolution:</strong></p><p>0.2</p><p><strong>Infill: </strong></p><p>30</p><p><strong>Notes:</strong></p><p>3 x wall thickness</p><h3>Post-Printing</h3><p>Required:</p><ul><li>1 x NEMA 17 Stepper motor damper</li><li>2 x M3*30mm screws</li><li>2 x M3*6mm <a href="https://www.aliexpress.com/item/50pcs-M3-6-8-10-12-16-20-25-30-mm-flat-head-countersunk-head-black/32966886940.html">flat head screws</a></li></ul><p>Steps:</p><ol><li>Power down printer</li><li>Remove wires from z-axis stepper</li><li>Remove 4040 aluminum extrusion end cap</li><li>Slide the printed mount onto the end to test the fit</li></ol><p>(slide on and off until it doesn't stick) 5. Screw the stepper damper onto the printer mount with 2 x M3*6mm flat head screws 6. Remove the z-axis stepper damper from the printer (discard screws and original mount) 7. Remove 2 of the bottom screws from the stepper</p><p>(these should coincide with the empty stepper damper mounting holes) 8. Attach the stepper damper to the stepper motor</p><p>(I used a folder over piece of paper to ensure there was a small gap between the motor and the end of the printed mount) 9. Slide the motor all the way onto the 4040 frame</p><p>(notice that there is a small gap between the motor and the vertical 2040 frame) 10. Reattach wires and z-axis lead screw adapter and 4040 end cap</p><p>Optional:<i>(to ensure no binding)</i></p><ol><li>Loosen brass adapter that connects z-axis lead screw to x-axis/extruder assembly</li><li>Loosen bolts holding top crossbar to the vertical rail</li><li>Lower x-axis assembly to lowest point by manually turning lead screw</li><li>Tighten screws on brass adapter</li><li>Raise x-axis assembly to highest point by manually turning lead screw</li><li>Tighten bolts on top crossbar</li></ol><p> </p><p>Category: 3D Printer Parts</p>
With this file you will be able to print Ender 3 - Z-Axis Stepper Damper Adapter with your 3D printer. Click on the button and save the file on your computer to work, edit or customize your design. You can also find more 3D designs for printers on Ender 3 - Z-Axis Stepper Damper Adapter.