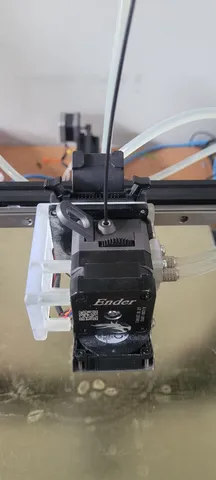
Ender 3 Sprite extruder mount with Klack Ender
prusaprinters
For this setup you will need an Ender3 with an X-axis MGN-12H linear rail setup. Also you will need a Creality water-cooled hot end setup for the sprite extruder. You will then have to print and setup the klack-ender system made by kevinakasam. I have put almost a weeks worth of testing and designing into this. the main mount is a little rough around the edges I will clean it up a bit so it doesn't looks a hacked together part with sharp edges and cutouts everywhere. I am going to apologize for that early lol. This is a highly customized mount for a Creality sprite extruder. This will require a water cooling kit for the hot end as you need to remove the hot end cooling fan for this to work. there are 4 parts to this. the first part if the main mount for the extruder itself. this mount includes a block on the bottom for a klicky probe to to attach I mainly designed this for KevinAKASam's klack ender system. I would very highly recommend this get printed in resin as im not sure some of the wire passageways will get properly printed on an FDM printer, same thing with the tapped holes that I added in there as well. The second part is the left side extruder mount reinforcing block. You don't really need this but the extruder will sag really bad on the left side due to the weight hanging off the mount. I tried making a stiffer bracket, it worked but it looked like garbage. to install you first need to remove the side cooling fan off of the extruder. You then will have to modify the cooling shroud by cutting off the side shroud where the cr-touch/bltouch would mount to that your just left with a flat plastic piece that acts as a spacer for the PCB and mount. I will work on a setup so that there is no modification neccassary just a delete so you can keep the original shroud. I will add onto this once that is finished. Once that is done you bolt the side mount onto the main mount with some M3 screws then bolt the extruder to the side mount with some additional M3 screws. This will remove any sag in the system. The third part of the replacement X axis cover. This could probably be printed on FDM due to the low tolerance. This is so that the the side mount doesn't bump into the original x axis switch bracket. You could probably get away with using stall detection as a limit switch but i prefer a physical switch. to install this you just remove the bracket where the X axis limit switch is located. Then remove the limit switch and install onto the new printed mount. Then install the new bracket where the original bracket was and you will be goodthe fourth and final part I added due to the force being exerted on the belt lips. These were being pulled out and when you apply heat to the mount and would stretch and deform and eventually the belt would just fall out. So i added a rear reinforcing bracket to hopefully prevent the stretching. This bolts onto the rear where the belt slides into the lips. they attach to the main mount with M3 screws. you may be able to get away with not using this if printing with a high temp resistant material also my last revision added a slot in the lips where the belt can sit so it doesn't slide out but you will probably still be battling deformation.
With this file you will be able to print Ender 3 Sprite extruder mount with Klack Ender with your 3D printer. Click on the button and save the file on your computer to work, edit or customize your design. You can also find more 3D designs for printers on Ender 3 Sprite extruder mount with Klack Ender.
