Ender 3 Series Mainboard Enclosure(s)
prusaprinters
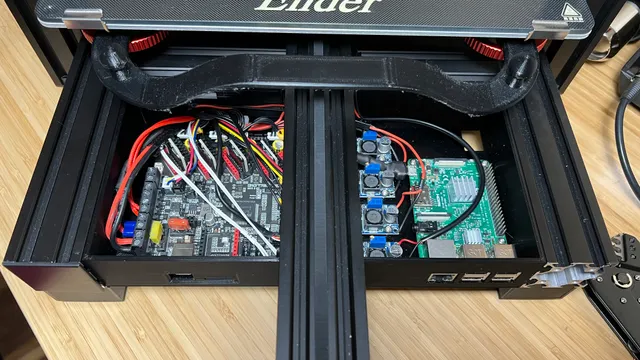
Summary:This build will allow you to mount a mainboard, 4 buck converters and a Raspberry Pi in an Ender 3 Series FDM Printer. See below for additional information or check the “files” section for combinations. If you choose to print each side independently, you can upgrade as needed. For example, if you print a combination that supports an SKR3EZ and RPI3B+, then upgrade to an RPI4B, you can print the right side for the new RPI. Leaving the left side as is, so there is no need to remount or rewire the mainboard. If you make this model, please upload a picture of your make to the comment section. If you like this model, please give it a like.If you would like to see other control board, Raspberry Pi or buck converter compatibility, please let me know in the comments. I am more than happy to update the models. Compatible Mainboards:If your mainboard is not supported, please let me know and I will add a version for you.Creality v4.2.2Creality v4.2.7SKR 3 EZSKR Mini E3 (Same screw placement as Creality v4.x mainboards. Use one of the "E3_Chassis_Creality4.X_…" models.)SKR v1.4 TurboOctopus Pro (Located in the “custom variation” folder)Compatible Buck Converters:4 x LM2596 Buck ConvertersCompatible Raspberry Pi(s) for Octoprint or KlipperRaspberry Pi 3A+Raspberry Pi 3B/B+Raspberry Pi 4BRaspberry Pi 5 (Mounts that are for the Raspberry Pi 4B should work for the Raspberry Pi 5. Compatibility: This model is designed specifically for Ender 3 series printers; however, it may be suitable for other printers with similar dimensions. If you have a different printer model or require custom modifications, please don't hesitate to contact me. I'm more than happy to tailor the design to your needs. Modifications: If this model doesn't perfectly suit your requirements, let me know! I'm open to making adjustments to ensure it fits your setup seamlessly. Print Settings:Rafts: NoSupports: For Full Chassis: Yes. They should be set to 80°. This will isolate supports to the openings. For Half Chassis: Yes. More support may be needed as the rail connects are a bit different. This is dependent upon your printer tuning.For Covers: NoneResolution: 0.2mmInfill: 15%+ Notes:All screw mounts are designed to fit 2.5mm x 5mm screws OR 3mm x 5mm screws. 3mm screws are what I prefer because I do not like the idea of them vibrating out of place. They required more pressure to screw in, but seem to hold securely. If the main extrusion frame is the same dimensions, this should work for other printers. The purple/grey printer is an Ender 3 Pro with an SKR Mini E3 v3.0. For the “E3_Chassis_x” models: Set "support overhang angle" to a value of 80° or higher.For the fan/vent covers: Make sure the top is facing down and disable support structures. The half chassis prints should fit together fairly snug.I have not tested the SKR v1.4 Turbo build as I do not have that mainboard. Please post your make and let me know if there are any issues. Important: With my Ender 3 Pro, the fan covers were too tall. This was caused from the bed plate being installed with the bolts facing down. To remedy this, I had to turn them around. Below is the procedure, should you need to do the same. After this modification, you should have a similar setup to this one.Remove the bed completely. (Be careful around the bed heater wires. You do not want to damage them).Loosen the Y Axis tension. Disconnect belt from bed plate.Loosen or remove the Y Axis tensioner enough to slide the bedplate off.Remove the one nut from the bed plate and take the bolt out.Place the bearing on the bolt.Place the eccentric nut or washer on the bolt. Depending on which one you removed first.Coming from under the bed plate, insert the loaded bolt into the hole you removed it from.Screw the nut on the other side to secure it.Repeat steps 5 - 9, as needed.Slide the bedplate assembly back on the 4040-extrusion rail.Adjust the wheel tension to allow smooth movement of the bedplate on the rail.Reattach the Y Axis belt.Reattach and/or tighten the Y axis tensioner.Reattach bed to bedplate.Be sure to tram the bed and reconfigure your z offset before printing. Improvement Plan(s):As a solo creator, I'm dedicated to refining and expanding my designs based on user feedback and evolving needs. Here's what's in the pipeline:Raspberry Pi 5 versions for all models (coming soon!)Mount for Circular Metal Aviation ConnectorDeeper for easier cable management.(Maybe) Add opening for SPST toggle switch for fans, lights or whatever you want to control. Requested Improvement(s):I highly value your input! Currently, I'm working on the following requested modifications:Bigtreetech Relay v1.2 mount Additional Models: Ender riser feet with 4040 cover built-in - LINKPSU Relocation - LINKX-Axis tensioner with Pi Camera Mount - LINKQR Covers - LINK If you have additional suggestions or specific enhancements in mind, please don't hesitate to let me know. Your feedback helps me tailor my designs to better suit your needs. Contact me with your suggestions! Support the Creator: If you find this model useful, consider supporting me on BuyMeACoffee.com. Your support helps me continue creating and sharing designs with the community. Versioning: v1.00Original remixv1.01Reduced material needed for the side rails.v1.02Added 45° angles to reduce support structure needs.Cleaned up v-slot requirements to reduce support structure need.v1.03Modified chassis vents to 45° angles to speed up lower layer creation.Cleaned up the USB and SD port openings for the SKR 3 EZ. v1.04Removed the need to supports around the exterior. This should speed up print time without compromising integrity when mounted in printer.Corrected MicroSD card opening dimensions.v1.05Moved mounting stand-offs for the SKR 3 EZ forward 2mm.Added zip tie points to a separate version on the chassis.Removed some material needed to internal support.v1.06Added support for Creality v4.x mainboards.Removed top 4040 rail track. Added RPI4B versions of each chassis.v1.07Added support for SKR v1.4 Turbo mainboard.Added individual sides with greater rail mounting support.v1.08Added support for the Raspberry Pi 3A+v1.09Added folder for Ender 3 models that have a 2040 z-axis.Modified “E3_Chassis_Creality4.X_RPI3B+_Bucks” to work with the 2040 z-axis.Added folder for vent & fan covers for Ender 3 models that have a 2040 z-axis.Added VF_40mm_z_axis_Fan_Cover.stlAdded VF_z_axis_VentCover.stlAdded VF_80mm_z_axis_Fan_Cover.stlAdded VF_92mm_z_axis_Fan_Cover.stlAdded VF_40mm_x_20mm_z_axis_Fan_Cover.stlNOTE: I do not have an Ender printer with a 2040 z-axis and cannot test these files. If you print them and something is wrong, please let me know and I will fix it. v1.10Added E3_Chassis_2040_z_axis_Creality4.X_RPI4B_Bucks.stlAdded E3_Chassis_2040_z_axis_SKR3EZ_RPI4B_Bucks.stlNOTE: I do not have an Ender printer with a 2040 z-axis and cannot test these files. If you print them and something is wrong, please let me know and I will fix it. v1.11E3_Chassis_Manta_M5P_Bucks.stlThis model supports the BIGTREETECH Manta M5P. v1.12Added Chassis_Right_BTT_Relay_v1.2_BTT_UPS_dual_buck_@EricDrop_2040537.stlThis is a custom right-side only chassis that accommodates a BTT relay v1.2 and a BTT 24v UPS, two buck converters and mounts with screws.v1.13Added Ender3_Chassis_OctopusPro_RPI4_@stablestud_2141317.stlThis model will support a BIGTREETECH Octopus Pro (no chassis panel access) and a Raspberry Pi 4/5.v1.14Added E3MaxNeo_Chassis_SKR3EZ_Bucks_Left_@EricDrop_2040537.stlThis is a custom left-side only chassis that accommodates a BTT SKR3EZ and mounts with screws.Added Ender3_Chassis_OctopusPro_RPI3B+_@stablestud_2141317.stlThis model will support a BIGTREETECH Octopus Pro (no chassis panel access) and a Raspberry Pi 3B+. NOTICE:I am not liable for any damages to the machine. Prior to starting, disconnect the machine from the electricity source. I am not responsible for injuries caused by electric shock. Proceed with caution at your own discretion.
With this file you will be able to print Ender 3 Series Mainboard Enclosure(s) with your 3D printer. Click on the button and save the file on your computer to work, edit or customize your design. You can also find more 3D designs for printers on Ender 3 Series Mainboard Enclosure(s).