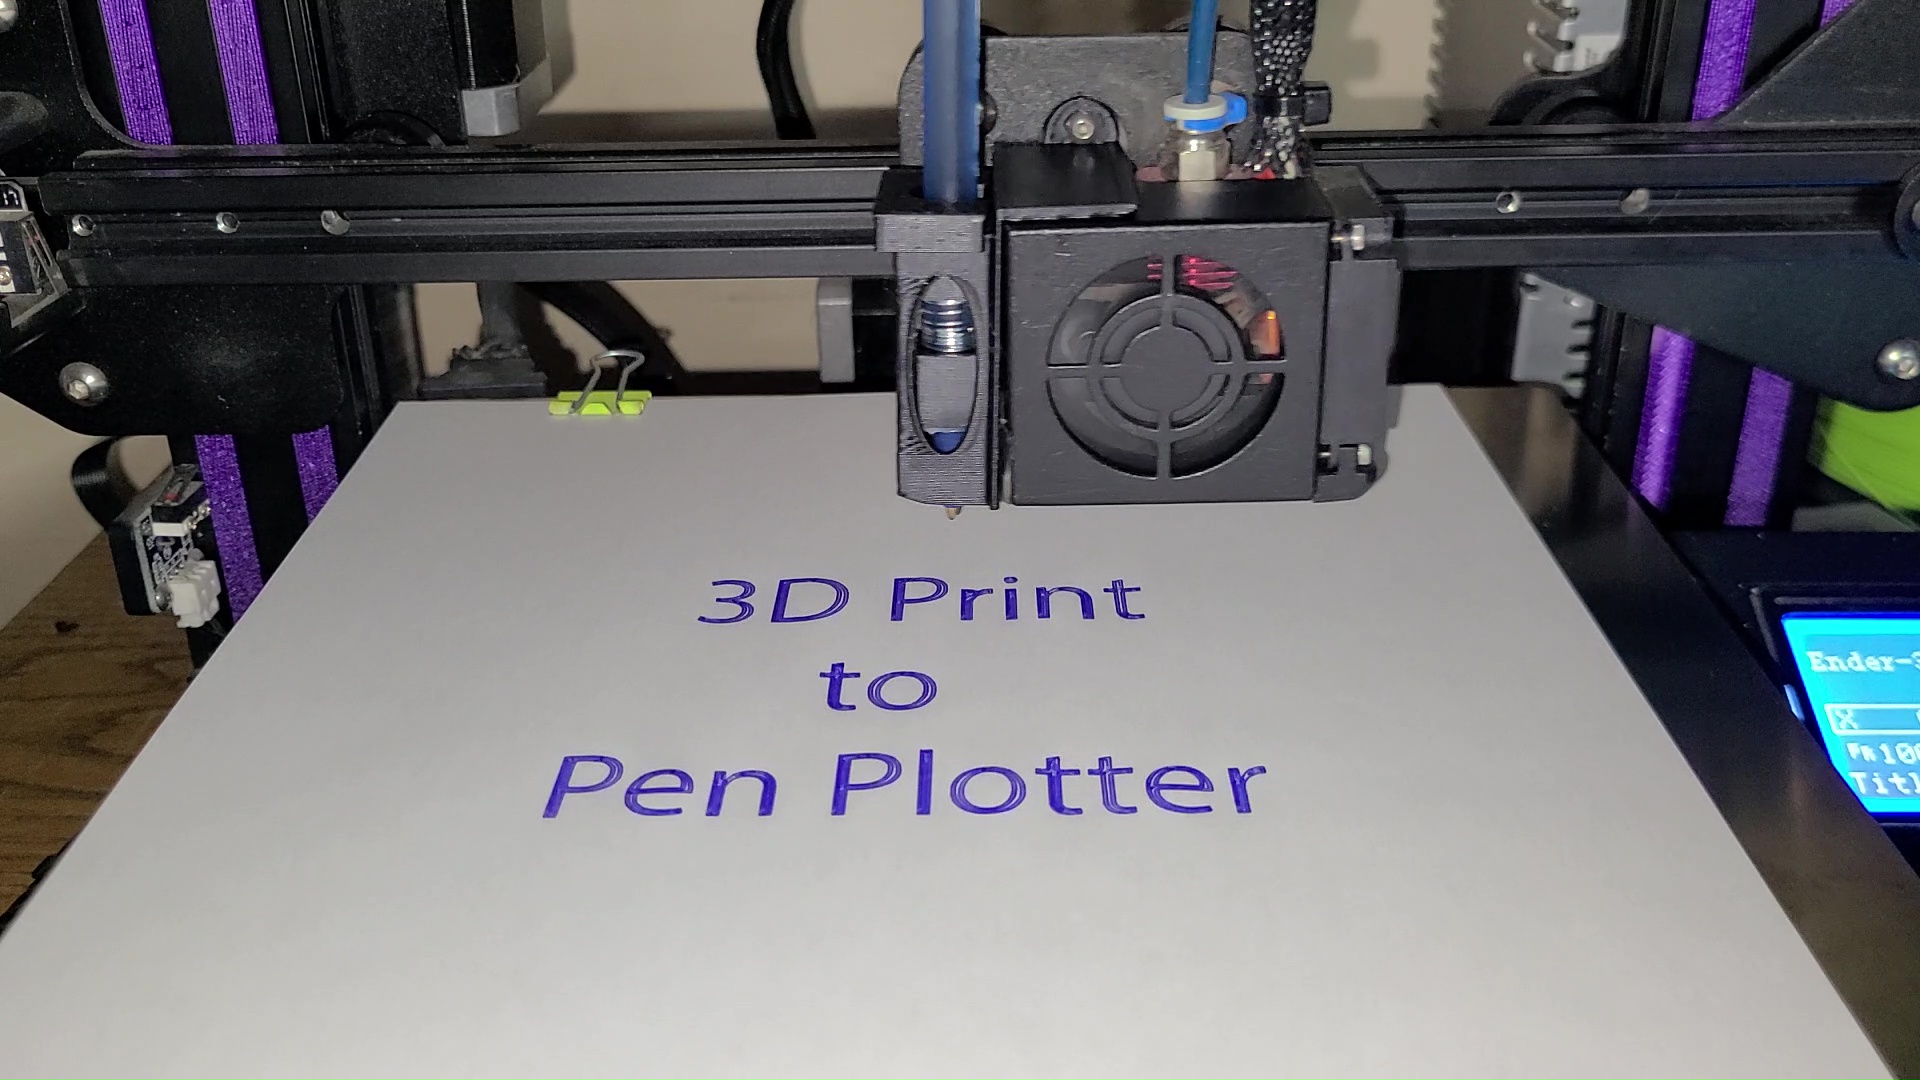
Ender 3 Pen Plotter Mod
prusaprinters
<p>I designed this to attach to my Ender 3 fan shroud.<br><br>Required Items:</p><p>1: Standard Bic ball point pen or your color choice. Make sure it's 8mm in diameter.<br>2: 3\8'' ID x 3\4'' compression spring ( Lowes, Ace hardware, Harbor Freight (200pc box)<br><br>Required Printed pieces printed .24layer , 2 wall, 100% infill. ( i used .6nozzle)</p><p>1 : Pen Mount (support needed)<br>1 : Top<br>2 : Guides<br><br>The mount is thin enough to not need longer screws, so you can use the ones holding the stock fan shroud. I used a small piece of double-sided adhesive tape between the mount and shroud on the vertical side towards the bottom.<br><br>Next, the pen. Slide one of the guides over the pen. you will need to glue the guide to the pen 20mm from the tip. <br><br>Slide 2 springs onto the pen, make sure they slide pretty smoothly.<br><br>Slide the second guide onto the pen. This will not be glued. This acts as a compressor and stopper for the spring to preload tension.<br><br>Watch this to load Pen into holder <a href="https://youtu.be/mSTqH0C04Fg">https://youtu.be/mSTqH0C04Fg</a><br><br>The guides keep the springs compressed, the pen as vertical as possible with little to no movement. The base of the mount where the tip protrudes is tapered to snugly hold the tip of the pen.<br><br>Now for slicer settings.<br><br>Add a new Printer profile and Name is whatever you want. I did “ Ender 3 Plotter ”<br><br>Next You'll need to set an offset for the position of the pen tip relative to the nozzle tip. Here are my settings doe Ender 3 V1, double check if you have a variant Ender with a different shroud.<br><br>; Ender 3 Custom Start G-code<br>G92 E0 ; Reset Extruder<br>G28 ; Home all axes<br>G1 Z10.0 F3000 ; Move Z Axis up to clear pen above bed<br>G1 X40 Y30 Z10. F5000.0 ; Move Extruder to Center Pen Tip at Origin<br>G92 X0 Y0 ; Sets Origin offset to Pen Tip</p><p>; Ender 3 Custom End G-code<br>G91 ;Relative positioning<br>G1 Z10 ;Raise Z more<br>G90 ;Absolute positioning<br>G1 X10 Y200 F1000 ; prepare for part removal<br>M84 X Y E ;Disable all steppers but Z</p><p> </p><p>Next are crucial slicer settings:</p><p>Print Temp : 0c<br>Bed Temp : 0c<br>Line width : .7mm (width of ink line, but you can vary it for different results)<br>Layer Height : .5mm ( this will compress the pen by 1mm ensuring enough pressure to draw)<br>Walls : 1 (for outlines) 2 or more depending on width of image to draw<br>Infill : 100%<br>Retractions : On<br> Z-Hop when Retracted : ON<br> Z-Hop Height : 1.5mm ( to ensure pen comes off paper)<br>Cooling : Off<br>Build Plate Adhesion: NONE<br><br>These are MY settings on MY printer. It shouldn't deviate too much on yours, but always use manual axis movement to check clearance to bed and distance from your HOME to begin point of the pen tip.<br><br>Because the most paper is 8.5'' x 11'' and our bed is smaller, you're limited to 9.25'' x 8.5'' here. Cut your paper accordingly. Use clips to hold paper down.</p><p>There are lots of software solutions to creating JPGs or you can google search what you want.<br><br>I use this site <a href="https://anyconv.com/jpg-to-stl-converter/">https://anyconv.com/jpg-to-stl-converter/</a> to convert JPG to STL 3D models.<br><br>After you create your STL and import it into slicer. You MUST scale the Z height of the model to your layer height (if you changed how low the pen get to bed, set to this height)<br><br>This ensures the sliced print will only have ONE LAYER.<br><br>I didn't make this to sell things or to replace hand drawing (which i can't do lol). I was simply bored with my laser engraving mod and want something different.<br><br>I hope you all like it.<br><br><br><br><br><br> </p>
With this file you will be able to print Ender 3 Pen Plotter Mod with your 3D printer. Click on the button and save the file on your computer to work, edit or customize your design. You can also find more 3D designs for printers on Ender 3 Pen Plotter Mod.
