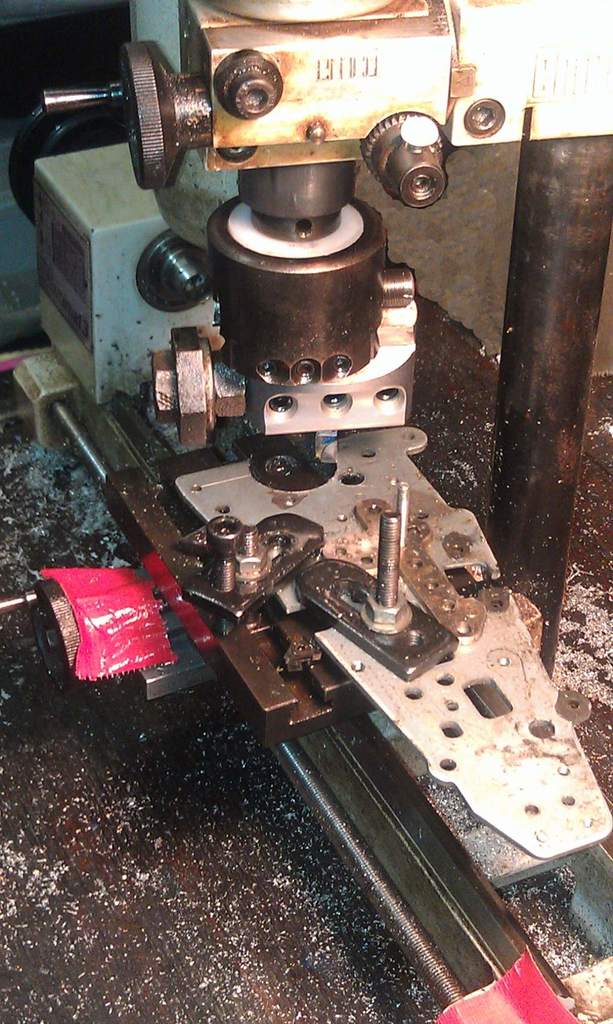
Emco Unimat 3 SL Taig lathe generic boring head adapter
thingiverse
There have been a few Unimat boring head designs over the years. For instance the Compact Micrometer Boring Head' by GA Harding described in Model Engineer 4th June 1982 and 'A Small Boring Head for the Unimat 3' by BR Davies in Model Engineer 7th November 1980. A US eBay seller sometimes lists a boring head made for the Unimat but as far as I am aware this has an imperial thread not metric. Also there is a unit from a UK supplier but it is quite expensive and often listed as out of stock. Considering the above, this solution uses a generic common (and importantly - cheap!) 2" diameter boring head from eBay. These are for larger lathes than the Unimat and introduce their own problems, but if action is taken to mitigate these (see below) then this unit works admirably well on a tiny lathe. Having bought the boring head for a larger lathe (Myford ML7), I realised it might be fitted to the Unimat by machining an adapter plate from steel, threaded M14 internally and for the head externally. However that idea remained on the backburner. Recently I wanted to do some boring so I entertained the idea of a printed plastic one, for light duty. The problems mentioned above are, firstly, the head size is a little larger than I would prefer, but this is no obstacle. The other problem introduced by a larger chunk of spinning metal is the balance. As you can see from the photos, I placed an old bolt with some nuts and washers as a counterweight to compensate the head and toolbit offset. This reduced the vibration down to a very low level and the plastic adapter had absolutely not the slightest bit of trouble in handling the machining task. The photos show a frame from an IBM Selectric typewriter being bored to suit a larger mechanism, after careful concentric alignment to the existing hole. I used cutting fluid to start with but found it easier to spray a tiny squirt of WD40 on whilst cutting, with good results. The pieces of red duct tape are self-reminders that I have locked the cross slide and carriage. ##SAFETY NOTE Take special care in using this tool. Unlike a stationary lathe toolpost bit, the sharp toolbit itself is now moving. It may have a counterweight added which has the potential to catch loose clothing, or become a flying object itself. Remember the closer your fingers come to the spinning boring head, the closer you come to an unplanned trip to hospital. Be very careful. ##RUNNING THE SCRIPT Open the Customiser and select your lathe from the dropdown listbox. Please Note that the first time it runs, it will take a few minutes to generate the preview and longer for the final render. So be patient and go get yourself a cup of tea while you wait. ##PRINTING INSTRUCTIONS I made a few prototypes to get the external thread size to properly fit the 1-1/2" x 18 TPI of the boring head. I used two Unimat tommy bars held in a vice (with soft jaws) and attempted to thread the head on, using a centrepunch as a tommy bar through the head (see photo). It turned out a thread diameter of 1.5 (ie. 1-1/2") was far too tight so I reduced it to 1.46" which was not tight enough. The script is thus set at 1.48" diameter which is pretty snug. If it's too tight just select a smaller diameter from the Customiser and print again. The adapter is purposely about 2mm longer on the inner surface than necessary. This is so you can mount the adapter on the mandrel and face the surface down so it is perfectly flat (see photo). I printed the adapter from PETG as this plastic is oil and grease resistant. Print at 100% (completely solid) infill for maximum regidity. This is a small print and not much filament is consumed anyway. ##USAGE To accommodate a 1/4" toolbit I trimmed a small strip of soft aluminium, rolled it to a U shape and fitted the bit into it and the head. It goes without saying that, as with all machining operations on the Unimat, take light cuts. Patience is the key. ##OTHER SMALL LATHES This script nominally produces an adapter for the Unimat 3 (M14x1) headstock but select the dropdown to do Unimat SL (M12x1) and Taig / Sherline (3/4"x16TPI). Since the facets is set quite high, generation may take from minutes to a few hours. STLs for these lathes are provided so you don't need to wait that long. NOTE I HAVE NOT TESTED THE SL, TAIG OR SHERLINE SIZES only the U3 so if you do try it and they don't fit please let me know and I'll correct it (I do have an SL and a Taig, but other priorities then making the adapters for them). Use this at your own risk and I am not responsible for whether it works (or doesn't) for you.
With this file you will be able to print Emco Unimat 3 SL Taig lathe generic boring head adapter with your 3D printer. Click on the button and save the file on your computer to work, edit or customize your design. You can also find more 3D designs for printers on Emco Unimat 3 SL Taig lathe generic boring head adapter.
