Elegoo Saturn 2 and 8k Quick Release Air Heater
prusaprinters
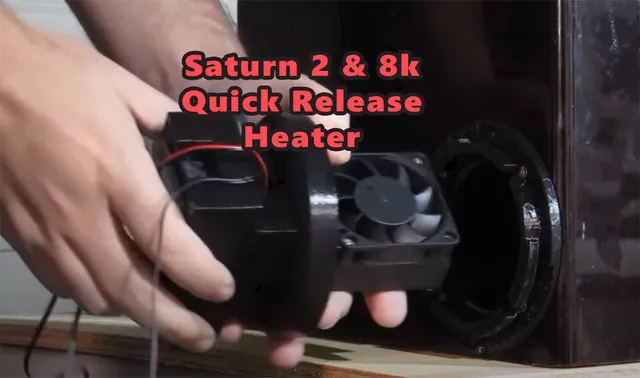
Took the components around this popular resin heater build and designed a solution that is mounted to the 75mm ventilation hole found in the saturn 2 and saturn 8k covers. The heater is mounted via a quick release system to let you remove and add it with ease along with an articulating screen to allow you to view and adjust it from the front of the printer.I will preface this that upon completion I decided to go with a fermentation belt system instead, and released a riser for the cover to deal with the cords. The riser system will also make the existing simpler heater build less of a hassle to deal with as well. But since this design was essentially finished, some one might find it useful and the quick release system might find use in other ways. If you do decide to move forwarded with this design here are the steps required to construct it. I would strongly suggest walking though the steps first to get an idea of where a ‘gotcha’ moment might happen. There are a few moments where it is much easier to get a wire in one location to another in a portion of the assembly.WARNINGIt has come to my attention that the cut out for these ventilation holes lack some precision on their placements. This is very unfortunate as the clearance needed for the heater to clear the zaxis is tight, and even a deviation of 2mm toward the zaxis will make locking in the heater very difficult, if not impossible. SourceTo date this is the most complex project I have created. You can edit it here with OnShape. PrintingAll the orientation for STLs are uploaded in the correct orientation. It is designed to no require supports. As some components are generating heat, keep in mind you probably want to use materials other than PLA and possible PETG to hold them. I make the majority of my components with ABS.FitI do want to mention that when rotating the heater, mid rotation the casing brushes up against the side of the z axes casing inside the printer. Since I have my Saturn 2 Cover opaque, I cant see into it to see exactly what I have to adjust to make the rotation smooth. I am able to attach and detach the heater giving it a little bit of force, but among all kinds of other refinement, this is another section that could use some iteration as well.Updates12/10/2022 - Added Step Files. Note these files may not stay as up to date as the OnShape Source project12/09/2022 - Added an experimental folder. Added heater holder with a side wall missing to test clearance to be able to twist heater in place.AssemblyAcquire components for the heater. Below is what I ended up using. They are Amazon Rev Share linksHeater + Fan combo: https://amzn.to/3UKe7tFTemperature Controller: https://amzn.to/3X9rCo95.5mm Female Barrel connector: https://amzn.to/3ApUbE8 12v 10a 5.5mm male power supply: https://amzn.to/3Efbhpnm3 countersunk bolts + nuts: https://amzn.to/3gdpgEdYou may need some other tools:Soldering Iron and/or other means of joining wires.Wire cutters / strippershex tool for boltswire wrap / electrical tape.18 AWG or thicker wire.Start by bolting together the wiring box and articulating linkage together. Note, I recommend the hex side face the hole on the wiring box so you can twist the knob on the other side to tighten/loosen the stiffness of the articulation in the future. Remove the cover from the ventilation hole and and bolt on the quick release lid bracket". Included slayernine's m3 nobby nut cap to make it easier to tighten, but you can use a nut and washer combo as well. Attach the heater block and fan to the heater holder. I was able to use the m3 bolts and they cut their own threads in the heater holder. The fan has a direction arrow on one of the sides. I oriented my fan so it is blowing through the heater. Mount the screen to the blue screen holder (blue part) but forgo mounting to the purple part. The subsequent step will use the temp probe and it is easier to have this part finished so you don't have to take part and reassemble stuff in the future. The next step is a bit complex.Cyan Dashed line is temperature probeLime Dashed line is fanBlack Dashed line is the heater wiringYou will want to make sure to have the temp probe feeding though the wiring box though the middle hole towards the heater section. Feed the wires though the heater cores to their respective sections, and feed the fan wire though the middle hole into the wiring box. The temperature probe will slot into the “heater cover” portion. You will then want to feed m3 nuts into the the heater holder and attach all these parts together. This is probably the most complicated step of the build. Wiring Diagram Pulled from VogMan's Youtube video on building a different design of this heater setup. You will need to determine how you want to route the wires in your setup before you do the next step or else will probably have to take stuff apart. Finish the construction of the Screen Holder parts. Route wires though the holes between the screen holder and wiring box. I used some heat shrink tube to hold all my wires, but with out heat shrinking it. Attach screen to wiring box. Add dc power supply port to the wiring box, finish your wiring and close it up! Should be done, test you have enough slack in wires to articulate the screen easily. Support:If this has been helpful to you please consider supporting my effort using the donation button at the top:I have also created this sticker set perfect for your ultrasonic cleaner:https://shop.kactuskrunch.com/product/ultrasonic-cleaner-10-sticker-sheet
With this file you will be able to print Elegoo Saturn 2 and 8k Quick Release Air Heater with your 3D printer. Click on the button and save the file on your computer to work, edit or customize your design. You can also find more 3D designs for printers on Elegoo Saturn 2 and 8k Quick Release Air Heater.