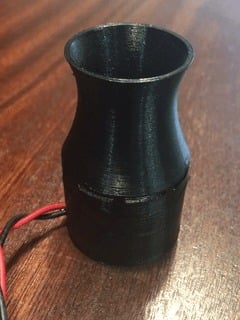
Electronic Smoke Maker
thingiverse
I recently needed to create some smoke for an electronics project, and I thought of using an e-cigarette as a starting point. After doing some research, it seemed feasible to adapt this method for my specific use case. WARNING: This is a decorative smoke maker, please do not attempt to use this device as an electronic cigarette. It will likely be even more hazardous than usual due to the additional fumes released by the 3D printed plastic. ### Parts required + Vape Coil - I found some MTL Fused Clapton wire at my local vape/e-cigarette shop + Electronic Connector Blocks + B.P. Glycerine - I bought it at my local pharmacy, and vape juice will also work + 5V Switching Relay Rated for 240V/10A + 10A 12V power supply + AWG20 or thicker wire + Cotton wool The clapton wire length determines the resistance, you can use a multi-meter to measure the required length or calculate using the resistance per ft on the packaging. I discovered that 1.8 to 2 Ohm with a 12V supply produces a decent amount of smoke and limits the current required to around 6-7 Amp. The 10A power supply I am using works great to meet the required demand. The electric connector blocks are used for the terminals. Take out two copper terminals from a connector block. Solder the wire to one side of the copper terminal. Insert the copper terminals into the element holder, wire first. Heat fit the terminal with a soldering iron if necessary, leaving the top part of the copper terminal with a single screw exposed. This screw is then used to fasten the Vape Coil to the copper terminals. To make up the Coil, I used a piece of steel rod with a diameter of about 3mm to wrap the clapton wire around. Ensure the wire is wrapped tightly next to each other and leave two ends of about 10mm on each side in order to tighten to the terminal blocks. Once the wire is installed, take some cotton wool and thread it through the middle of the coil. Now ensure that the cotton is properly soaked with glycerine; the cotton acts like a wick and as long as it is soaked in the glycerine will feed enough glycerine to generate a generous amount of smoke. I use an Arduino to control the relay, but I have not tested sustained power to the coil. Prolonged power to the coil might cause the wire to overheat and burn out. I apply power for a few seconds and then turn off for a few seconds before applying power again. I have included large and small versions of the design. There are three files required to make the smoker: the bottom, terminal holder, and cap. Print all three large or all three small parts.
With this file you will be able to print Electronic Smoke Maker with your 3D printer. Click on the button and save the file on your computer to work, edit or customize your design. You can also find more 3D designs for printers on Electronic Smoke Maker.
