electronic-circuit-to-working-model
thingiverse
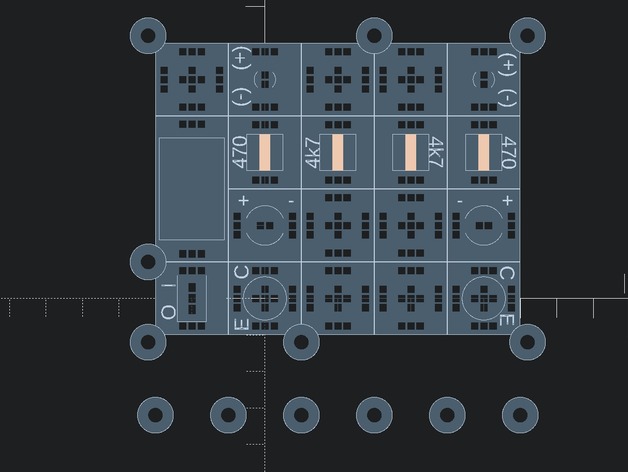
My first foray into crafting a modular circuit-to-model-building-system in Open-Scad was a humble one. You can place 20x20mm components as transistors, resistors, and more, to create a circuit-board/model resembling the AMV-Board. Customizing circuits in Open-Scad is effortless. The wiring process can be straightforward or an artistic expression, depending on your preference. When I printed the object using my k8200, I employed standard resolution. To achieve optimal results, print it with the highest resolution your printer allows. Although the outcome was imperfect, I will add components and share a photo here. This project is ongoing, and for now, it features several modules: Resistors Transistors Electrolytic capacitors Diodes Joints for wiring LEDs Switches 9V blocks Empty blocks Holes for screws Additional parts will be integrated soon. Please excuse any grammatical errors; I am a native German speaker. To customize, refer to the end of the Scad-Source file. The AMV-circuit layout is as follows: // AMV-Wechselblinker Transistor(0,0,0,90,"E C"); Connection(20,0,0,0,""); Capacitor(0,20,0,0," + -"); Resistor(40,0,0,90," 470"); LED(60,0,0,90," (-) (+)"); Connection(20,20,0,0,""); Resistor(40,-20,0,90," 4k7"); Connection(20,60,0,0,""); Connection(40,20,0,0,""); Connection(40,0,0,0,""); Resistor(-40,40,0,-90," 4k7"); Resistor(-40,60,0,-90," 470"); Capacitor(60,20,0,0," - +"); Transistor(0,60,0,-90,"C E"); LED(-60,60,0,-90," (+) (-)"); Connection(40,60,0,0,""); 9V Block(-20,20,0,0,"(+)...(-)"); Connection(-20,60,0,0,""); Switch(0,20,0,90," O I"); Screw hole(-32,-12,0,2); Screw hole(-32,72,0,2); Screw hole(72,-12,0,2); Screw hole(72,72,0,2); Screw hole(-32,10,0,2); Screw hole(10,-12,0,2); Screw hole(30,72,0,2); Screw hole(-30,-32,0,2); Screw hole(-10,-32,0,2); Screw hole(10,-32,0,2); Screw hole(30,-32,0,2); Screw hole(50,-32,0,2); Screw hole(70,-32,0,2); Please allow sufficient time for slicing the STL file. Overview and Background Electronic circuit building system with Scad Design your own circuits using this expandible library and create art-like functioning models. Create modules in Scad tailored to your preferences. Parts are 20x20 mm Lesson Plan and Activity Before printing, it is often recommended that you perform a netfabb-repair on the created circuit. Please allow sufficient time for slicing the STL file. Materials Needed Some electronic components such as resistors, transistors, LEDs, capacitors, etc. Depending on the circuit you want to create, you should be able to solder simple joints.
With this file you will be able to print electronic-circuit-to-working-model with your 3D printer. Click on the button and save the file on your computer to work, edit or customize your design. You can also find more 3D designs for printers on electronic-circuit-to-working-model.
