Electroblok Tinkerkit Braccio Robotic Arm Mount
prusaprinters
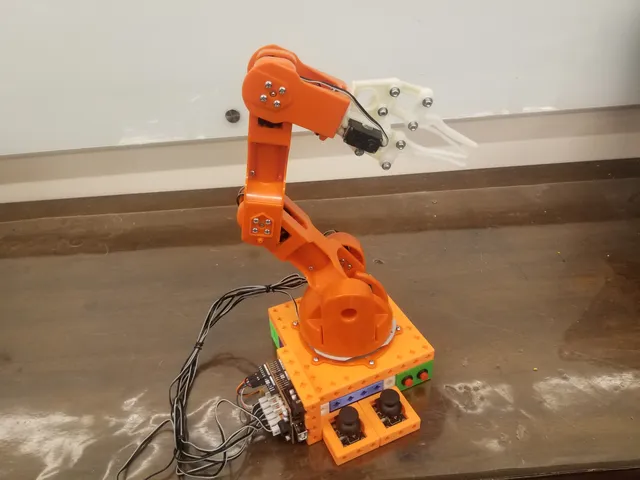
The Braccio Robot arm from Arduino is a fun kit to get started in using robotics. But, it lacks any sort of control scheme. That, you're expected to come up with yourself.Well, I did that. You can use the included code to control the Braccio using just a single joy controller. Or you can add a second controller and two buttons to make a more robust and programmable controller. And you can keep it all together, and test out different control ideas, by using Electroblok!You will need:Braccio Robot Arm https://store-usa.arduino.cc/products/tinkerkit-braccio-robotArduino Uno https://amzn.to/3zMtg2wJoystick Controller: https://amzn.to/3AZQym7Simply print the necessary components, Solder male jumpers to them, and put them in their custom electroblok components. Then, wire them up according to the jumper pins defined in the beginning code. The BraccioSingleJoyController.ino requires no additional hardware. It does some clever math in phases so that the middle 3 motors all get controlled by the same Y-Axis, thought it's movement range is consequently restricted, it can provide an interactive way to play with your Braccio.BraccioTwoJoyProgrammer.ino allows better control through the addition of a second joystick, two additional buttons, and an micro breadboard to split the 5V and ground pins. (button Electrobloks can be found in the main Electroblok listing.) Press in the second joystick while moving the Y to bend the elbow. The two additional buttons are used to save various pose “frames”, and then play them back. When playback is done you can continue to add more frames of motion for playback. If you want to clear the memory, reset the arm.This can also be your jumping off point so you can make your own Braccio controller! Electrobloks give you the power to experiment with your own ideas!Note: I discovered during programming the two joystick code that certain digital pins can sometimes conflict with the servos when they're set to input. Hence why pins 1, 3, 5, and 6 are skipped. If pins 9-13 have conflicts, I haven't found them yet, so that's something to be aware of if you experiment yourself.
With this file you will be able to print Electroblok Tinkerkit Braccio Robotic Arm Mount with your 3D printer. Click on the button and save the file on your computer to work, edit or customize your design. You can also find more 3D designs for printers on Electroblok Tinkerkit Braccio Robotic Arm Mount.