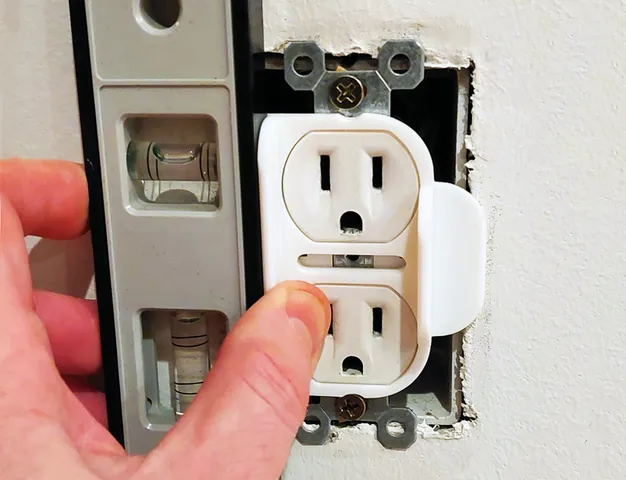
Electrical Outlet Alignment Tool / Jig
prusaprinters
UPDATE 2024-04-25: I uploaded a new version that has more surface area for gripping the tool, and the safety shield/wings on both sides now cover a wider area, reducing the chance of contact with live wires.NOTE 2024-04-08: I just uploaded a new version of this tool, which incorporates a bubble level vial on the tool, making it easier to hold the tool in place while adjusting an outlet: https://www.printables.com/model/836997-improved-electrical-outlet-alignment-tool-jig-flat . However, if you have a small hand level and do not want to purchase separate bubble level vials, this original model works well, and is still fairly easy to use.Often outlet boxes are installed crooked, as are the holes that are cut into wall materials to accommodate an electrical box. This makes it a little difficult to install the outlet or switch nicely perpendicular to the floor. This is an alignment tool that helps with straightening electrical outlets when installing or adjusting them. It works well on most, standard 3-prong, semi-round faced outlets, which are common in the U.S. (NEMA 5-15 Type B – I don't know if this style of outlet is used in other countries outside of the U.S.). It provides a shelf and stop for a hand-held level (see photo), as well as grip surfaces for holding the level and tool with one hand, while tightening the mounting screws with the other hand. It is R or L handed (just flip it around). It also provides shielding to keep fingertips from touching possibly live wires. The stop and tabs can be used to pull off the tool from the outlet face. Even if you do not have a small level, or you are not concerned about installing the outlet very straight, this tool provides a better grip or finger-hold when pushing in and mounting a socket (sometimes, you have to fight the wires a bit and this tool makes the job easier, and it is far less likely that you will bend an outlet wing, gouge your finger, or touch a possibly live wire. I recently adjusted and inspected ~50 outlets (that is a lot of kneeling in one day), and I found this tool to be quite helpful.Helpful Hint: I found that it is easiest to align the outlet if you tighten the bottom screw snuggly, centered in the pill shaped screw slot on the bottom outlet wing. Then, tilt the top of the outlet until it is aligned. Then snug up that top screw, then do the final tightening of both screws, insuring that the outlet remains aligned.NOTE: From a practical standpoint, if you are merely straightening a crooked outlet, and if you are reasonably careful, there is no need to shut off the power to the outlet because the tool acts as a shield from the electrical wires – you would have to force your finger through a gap in the corner and then bend it down to reach a live terminal/screw. Nonetheless … REMEMBER TO TURN OFF THE POWER THAT FEEDS ANY ELECTRICAL OUTLET ON WHICH YOU ARE WORKING. :)NOTE: A rectangular switch/outlet version of this design is available; see:https://www.printables.com/model/857687-electrical-switch-outlet-alignment-tool-jig-flat-sNOTE: If you have outlets that are loose, wobbly or sunken in, it might be helpful to adjust them and tighten them up by installing the following outlet screw spacers:https://www.printables.com/model/431861-electrical-outlet-stand-off-spacer
With this file you will be able to print Electrical Outlet Alignment Tool / Jig with your 3D printer. Click on the button and save the file on your computer to work, edit or customize your design. You can also find more 3D designs for printers on Electrical Outlet Alignment Tool / Jig.
