Electric unicycle headlight mount (Ninebot One trolley handle, Lampenhalter)
prusaprinters
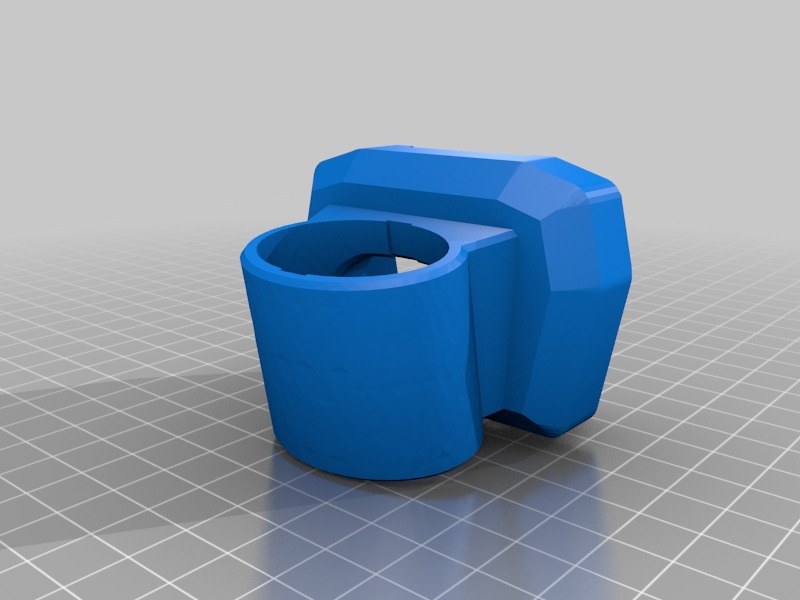
<p>My Ninebot One electric unicycle is equipped with a Trolley-Handle as found e.g. in <a href="http://g02.a.alicdn.com/kf/HTB15Qs6JpXXXXb5XFXXq6xXFXXX5/201283143/HTB15Qs6JpXXXXb5XFXXq6xXFXXX5.jpg">http://g02.a.alicdn.com/kf/HTB15Qs6JpXXXXb5XFXXq6xXFXXX5/201283143/HTB15Qs6JpXXXXb5XFXXq6xXFXXX5.jpg</a></p> <p>The Trolley handle (if mounted front, not rear...) can be used to mount a headlight.</p> <p>In addition to the recommended rubber mount design, there are two earlier alternate approches shown here:</p> <ul> <li>The part with the three large holes printed in black secures a headlight using its normal strap wrapped twice to reduce the needed diameter.</li> <li>The part printed in gray replaces the normal strap and is perfectly suited for this kind of headlight "V-SAV": <a href="https://images-na.ssl-images-amazon.com/images/I/81GgDvzfwdL._SL1500_.jpg?">https://images-na.ssl-images-amazon.com/images/I/81GgDvzfwdL._SL1500_.jpg</a></li> </ul> <p>The smaller part printed in black is the most elegant and durable design. It requires flexible TPU rubber filament to print so that you can insert the lamp into the pocket. (I crashed all the other designs, but with this one, there is almost no chance to break anything). The filament used is black flexible TPU from sainsmart. 210°C with slow 25mm/sec.</p> <p>The design encapsulates the lamp only. Remove the adjustable plate from the back of the lamp.</p> <p>To adjust the angle, I simply wedge extra material into the top or bottom. the foto shows and earlier version with ony 3 deg downwards tilt. the final design has 10 deg, which appears to be just right for the way a ninebot one positions its trolley handle.</p> <p>There is also an adapter for mounting things at the rear: <a href="https://www.thingiverse.com/thing:1734589">http://www.thingiverse.com/thing:1734589</a></p> <h3>Print Settings</h3> <p><strong>Printer:</strong></p> <p>Tinyboy Fabricator</p> <p class="detail-setting rafts"><strong>Rafts: </strong> <div><p>No</p></div> <p><strong>Supports:</strong></p> <p>Yes</p> <p class="detail-setting resolution"><strong>Resolution: </strong> <div><p>0.2mm</p></div> <p><strong>Infill:</strong></p> <p>35%</p> <p><br/> <p class="detail-setting notes"><strong>Notes: </strong></p> </p><div><p>The final version was printed with TPU rubber filament.<br/> Orientation was face down, with 15% zigzag support (touching base) carrying the 'ceiling' of the pocket, and reaching through the central hole to support (portions of) the upper side of the eliptical ring. <p>Machine parameters for cura 2.1.2 were</p> <p>0.2mm layers, 0.8mm shell, 35% infill triangles, 25mm/sec, 210°C, 110% flow.</p> <p>My settings for using a TinyBoy with Cura 2.1.2 are at <a href="https://github.com/fablabnbg/tinyboy/tree/master/cura">https://github.com/fablabnbg/tinyboy/tree/master/cura</a></p> <h3>How I Designed This</h3> <p><strong>Removing Support</strong></p> <p>The TPU rubber filament strongly sticks to itself. (It is not the best support material, but on a single nozzle printer I have no choice.)</p> <p>Zigzag support walls can be removed with almost no tools, by applying manual force. As soon as you can tear away one wall, the rest follows, as they are all connected.</p> <p>That leaves a rugged surface behind, but with the face down orientation, those surfaces are not visible later. A sharp pair of pliers was used to remove some nasty bits and some stringing.</p> </p></div></p></p> Category: Sport & Outdoors
With this file you will be able to print Electric unicycle headlight mount (Ninebot One trolley handle, Lampenhalter) with your 3D printer. Click on the button and save the file on your computer to work, edit or customize your design. You can also find more 3D designs for printers on Electric unicycle headlight mount (Ninebot One trolley handle, Lampenhalter).