EL Wire Halloween Photo frame
pinshape
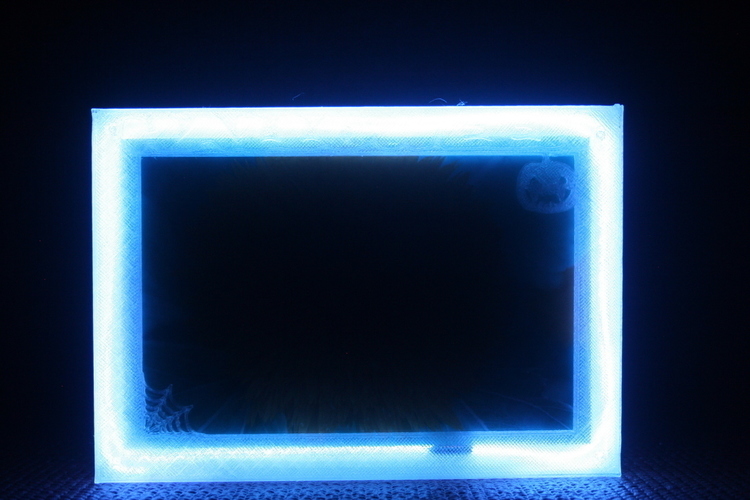
Human: Summary This EL Wire Photo Frame is perfect for capturing cherished moments with friends during Halloween. Print Settings Printer: BQ Witbox Rafts: No Supports: No Resolution: 0.2 Infill: 20% Post-Printing Remove any holes by clearing them out with a rasp on the front part of the photo frame. How I Designed This Step 1 - Back Part of Photo Frame I used Openscad to design this standard picture frame, which is suitable for pictures measuring 15x10 inches. Step 2 - Front Part of Photo Frame After searching online images, I converted them into .dxf files using Inkscape and then utilized them in Openscad. Step 3 - Support for Photo Frame This simple support frame design provides a stable base for the photo display. Assembly Step 1 - Materials Needed You will require: Photo frame printed STL files 1m EL Wire with an inverter Rasp A picture Step 2 - Install the EL Wire Pass the EL Wire through the hole and wrap it around the frame. Step 3 - Install the Support Insert the support into the back part of the photo frame. Step 4 - Add the Photo Choose a suitable picture. Step 5 - Fit the Front Part of the Photo Frame Remember to use the rasp if necessary! Step 6 - Turn On the EL Wire Turn on the EL Wire and then switch off the lights. Your photo will now disappear into the darkness. References All About EL Wire This is an excellent PDF created by Lady Ada, which can be downloaded from https://cdn-learn.adafruit.com/downloads/pdf/el-wire.pdf. Using Inkscape A brief tutorial on how to use Inkscape to vectorize images can be found at https://inkscape.org/en/doc/tracing/tutorial-tracing.html.
With this file you will be able to print EL Wire Halloween Photo frame with your 3D printer. Click on the button and save the file on your computer to work, edit or customize your design. You can also find more 3D designs for printers on EL Wire Halloween Photo frame.