Ekobots - Perpetual motion motor
thingiverse
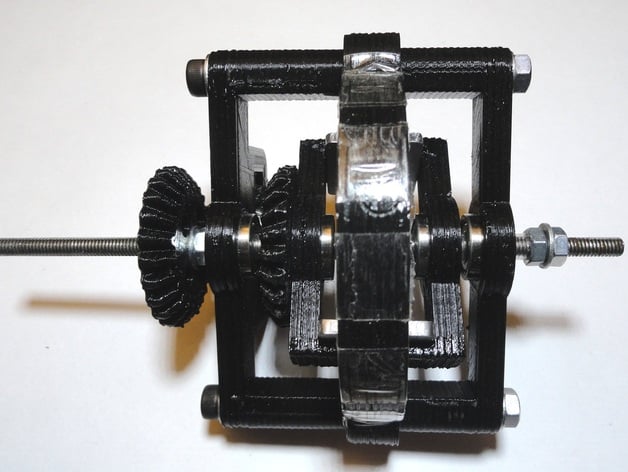
Perpetual motion motor, magnetic shield engine. Sunny day in Brazil... Let's create a perpetual motion engine. Unlike other perpetual motion engines online, THIS ONE DOES NOT WORK, yet. But that's just a minor detail. You can try rearranging the magnets - who knows what will happen? I know all physics and thermodynamics laws, but this object goes against them, so why not give it a shot? Here's what you need: 5x bearing (13 x 5 x 4 mm) for the shield frame, motor frame, and 18 teeth gear; 2 screws (60 x 4 mm) for the motor frame; 1 screw (20 x 4 mm) for the 18 teeth gear; 1 threaded rod (120 x 4mm) or a full-threaded screw for the shaft; 10 cylinder magnetic (6 x 5 mm) for the rotor; 12 rectangular magnetic (10 x 10 x 3 mm) for the stator; 2 mild steel plates (20 x 20 x 2.5 mm) for the magnetic shield, or an old hard disk to remove and cut the magnetic shielding; some nuts and washers for (4 mm) screw. Simulation video: http://www.youtube.com/watch?v=LyJRjkUYaVE Assembly sequence: Clean all parts; Use small washers or plastic pipe to adjust the position of all parts in the shaft; Fix the magnets in the rotor with glue or adhesive tape; Fix the magnets in the stator with glue or adhesive tape; Fix the rotor near the center of the shaft with 2 nuts and 2 washers, making sure it's really well fixed; Fix 2 bearings in the shield frame; Fix 2 bearings in the motor frame; Fix 1 bearing in the 18 teeth gear; Use 2 pieces of filament 3mm to adjust the 24 teeth shield gear over the shield frame and glue all; Insert the 2 parts of the shield frame in the shaft with the rotor in the center and glue them; Glue the mild steel plates inside the shield frame; Mount the motor frame with the rotor and the shield using screws, washers, and nuts; Mount the 18 teeth gear in the motor frame using a small screw, nut, and washer; Fix the 24 teeth rotor gear in the shaft with 2 nuts and 2 washers. How it should work: The same as an electric motor, you have magnetic fields in the rotor and stator. But the main idea is to use the magnetic shield to "turn off" the power like in an electric motor where the shield cuts the rotor magnetic field at determined positions. Because we have 2 full rings of magnets, the shield can rotate almost "free," with just some diamagnetic effect force. In the correct position, the rotor will be attracted and in all other positions repulsed. The shield prevents the stop of the rotor when facing the opposite magnetic field in the stator. Inertial movement does the job until the next position of attraction. Maybe you can't see it, but there are a lot of variables like size, number, and position of magnets to keep the rotor and shield spinning "free." We can add some improvements like Hallbach arrangement, curved shield, active magnetically shield, etc. See the images for the magnets' arrangement. Use small washers or plastic pipe to adjust the rotor position. That's all!
With this file you will be able to print Ekobots - Perpetual motion motor with your 3D printer. Click on the button and save the file on your computer to work, edit or customize your design. You can also find more 3D designs for printers on Ekobots - Perpetual motion motor.