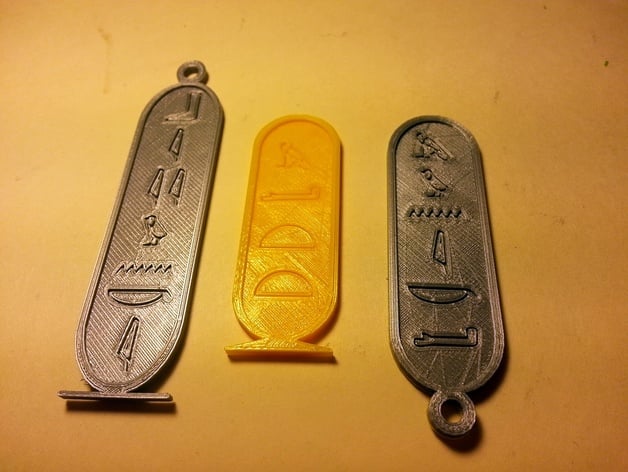
Egyptian Cartouche Hieroglyphics Construction Kit
thingiverse
I made this project for a 4th grade history unit on Ancient Egypt, where students spell out their names in hieroglyphics like a cartouche. To make it easy, open the construction kit on Tinkercad.com, drag and drop the right letters into place, and delete any extra pieces. This is an extremely simple project perfect for beginners. https://tinkercad.com/things/jc2XaoHVt13 Or assemble parts in your preferred CAD program. Standards NGSS Overview and Background I created this project for a 4th grade history unit on Ancient Egypt. Students can spell out their names in hieroglyphics like a cartouche. The easiest way to do this is by opening the construction kit on Tinkercad.com, dragging and dropping the correct letters into place, and deleting any extra pieces. This project is very easy for beginners. https://tinkercad.com/things/jc2XaoHVt13 Or assemble parts in your preferred CAD program. Lesson Plan and Activity Open the construction kit on Tinkercad.com https://tinkercad.com/things/jc2XaoHVt13, which may take some time to load. Choose a cartouche shape you like, delete the other one. It's easier if you lock the cartouche before moving hieroglyphics onto it. Drag and drop hieroglyphics onto the cartouche. Use Edit --> Duplicate if you need more copies of a symbol. The arrow keys help position symbols correctly. You can use Adjust --> Align to center symbols. Lengthen or shorten the cartouche as needed Delete all extra pieces Download your completed model and print If you don't use the Construction Kit on Tinkercad, import the cartouche and hieroglyphs into your favorite CAD program and assemble it there. It's more authentic if you inscribe (negative space) hieroglyphics instead of embossing them (raised positive space). Project: Egyptian Cartouche Hieroglyphics Objective Students create a cartouche by spelling out their names in hieroglyphics. Audience This is a 4th grade project that's easy for beginners to complete. Preparation This project is intended for use as part of a lesson on ancient Egypt. Steps Open the construction kit on Tinkercad.com https://tinkercad.com/things/jc2XaoHVt13, which may take some time to load. Choose a cartouche shape you like, delete the other one. It's easier if you lock the cartouche before moving hieroglyphics onto it. Drag and drop hieroglyphics onto the cartouche. Use Edit --> Duplicate if you need more copies of a symbol. The arrow keys help position symbols correctly. You can use Adjust --> Align to center symbols. Lengthen or shorten the cartouche as needed Delete all extra pieces Download your completed model and print If you don't use the Construction Kit on Tinkercad, import the cartouche and hieroglyphs into your favorite CAD program and assemble it there. It's more authentic if you inscribe (negative space) hieroglyphics instead of embossing them (raised positive space). Extensions This project simplifies things by assigning a symbol to each letter of the alphabet. The Egyptians used hieroglyphs to represent sounds, so it would be more accurate to spell out a name phonetically. Older or more skilled students can engrave their names on other objects, such as an obelisk. Additional hieroglyphics can be created and included in the project. These can be drawn then converted to SVG format and imported into Tinkercad. Or images of hieroglyphics can be found on the Internet and converted to SVG format and imported. Results This project hasn't been tested with students yet, but sample models were created and included here.
With this file you will be able to print Egyptian Cartouche Hieroglyphics Construction Kit with your 3D printer. Click on the button and save the file on your computer to work, edit or customize your design. You can also find more 3D designs for printers on Egyptian Cartouche Hieroglyphics Construction Kit.
