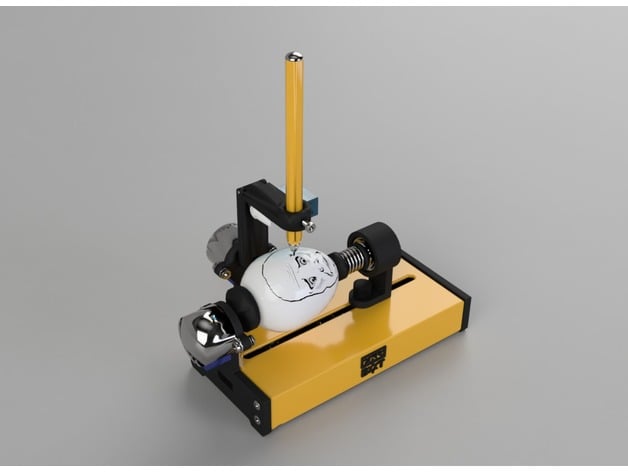
Egg Painter Mini (Eggbot derivative) v1.1
thingiverse
This is a budget-friendly modification of EggBot, printable 3D printers that accept large prints. It's available for just $10 in Chinese electronics components. Links: * First Launch: https://www.youtube.com/watch?v=123456 * Github Original EggBot: https://github.com/Egg-Bot/Eggbot * CAD Assembly kits: Available for purchase You can buy a complete assembly kit - this is the list of parts to print: 1. Case_Bottom (0000001) 2. Case_Top (0000002) 3. Logo (0000003) 4. M5_Nut_Holder (x2, 0000004) 5. Axis_R (0000005) 6. Spring_Holder (0000006) 7. Axis_R_Holder (0000007) 8. Axis_R_Lock (0000008) 9. М5_Bolt_Holder_Bottom (x2, 0000009) 10. М5_Bolt_Holder_Top (x2, 0000010) 11. Axis_L_Holder (0000011) 12. Axis_L (0000012) 13. Hand_Holder (0000013) 14. Hand_Holder_Guide (0000014) 15. Hand_Holder_Guide_Case (0000015) 16. Hand_H (0000016) 17. Hand_V (0000017) 18. Case_Right (0000018) Non-printable parts: * 2 x 608zz Bearing * 1 x 24mm Silicone or Rubber Gasket * 1 x 15mm Silicone or Rubber Gasket * Screws & Nuts: + 1 x Spring Diameter 9-15mm Length 17-20mm + 1 x 2x18mm Iron Nail without a hat or Rivet + 2 x M5x20 Bolt + 2 x M5 Nut + 8 x M3x10 Screw + 5 x M3x16 Screw + 12 x M3 Nut + 4 x M3 Washer + 12 x M2x5 Screw Electronics: * 1 x Arduino UNO * 2 x 28byj-48-5v Stepper Motor + ULN2003 Stepper Motor Driver Board * 1 x SG90 Micro Servo * 1 x USB Cable for connection to PCA few wires Assembly: * Video Assembly Instructions: https://www.youtube.com/watch?v=123456 * Assembly Instructions PDF: Available for download * Assembly in 3D: Available for download * Assembled Egg Painter: Available for purchase Firmware: * The firmware used is Eggduino, an Arduino firmware for EggBot / Spherebot with Inkscape-Integration (Github). * For installation: 1. Download and unzip Firmware.zip. 2. For UNO board with CH340G download and install driver: http://www.wch.cn/download/CH341SER_ZIP.html. 3. Download the ARDUINO IDE and install it. 4. Run the software. Select the Arduino UNO board and the proper COM PORT (should be COM5 or so) in the menu "Tools->Board"… 5. Open Eggduino.ino from Firmware.zip and upload the Eggduino code to your Arduino Uno. Controlling program: * The controlling program used is Inkscape software. * For installation: 1. Download and unzip the Inkscape software Software_inkscape+extension.zip. 2. EggBot Control Extension already included in the Inkscape from Software_inkscape+extension.zip. 3. Run the software. The EggBot Control extension for Inkscape is the tool that you will use to help you test and align the EggBot, as well as transfer your drawings to an egg. Once Inkscape is running, you’ll have an Extensions menu, and on that menu will be a submenu labeled Eggbot. If the Inkscape does not connect to the device, please check name of your Arduino in to device manager. And change it in ebb_serial.py on line 52 instead of "USB-SERIAL CH340". Use template EggBot (File->New from Template) for your drawing. Print Settings: * Printer: Anet A8 * Resolution: 0.2 * Infill: 25% * Notes: Easy print. No support required. * Black parts - ABS +1% Scale * Yellow parts - PLA
With this file you will be able to print Egg Painter Mini (Eggbot derivative) v1.1 with your 3D printer. Click on the button and save the file on your computer to work, edit or customize your design. You can also find more 3D designs for printers on Egg Painter Mini (Eggbot derivative) v1.1.