Educational Force Sensor + Lab Exercises
thingiverse
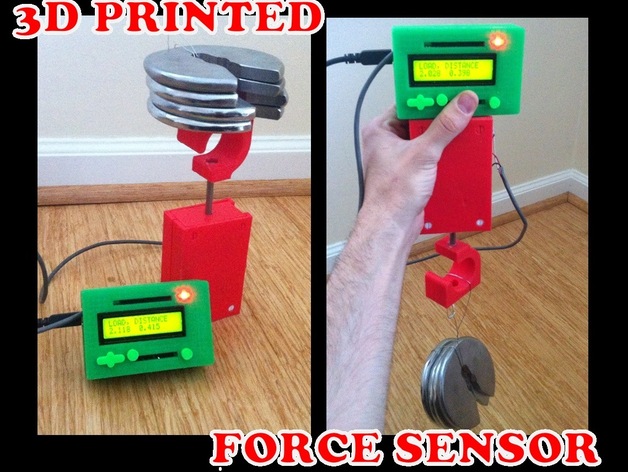
3D printers are becoming increasingly popular in schools, but what kind of educational opportunities do they offer? Why not start with an introductory lesson in physics?! This is a functional 3D printed load cell model capable of measuring force in tension and compression. You can replace the spring to measure forces up to 20 pounds! Links to the purchased parts and lessons explaining the science behind it are provided in this Thingiverse post. This hands-on project is safe for kids, and the result is durable enough to be used for future educational experiments. Here's a video demo: https://www.youtube.com/watch?v=wAwtl4TtXP8 Update: Links to non-printed parts for quick reference: Hardware: (1) Spring (Spring-rate = 5.1 lb/in): http://www.mcmaster.com/#9657K428 (1) Alternate Spring (Rate = 3.77 lb/in): http://www.mcmaster.com/#9657K115 (1) Alternate Spring (Rate = 10 lb/in): http://www.mcmaster.com/#9657K429 (1) Sliding Potentiometer (2.36 inch travel): https://www.sparkfun.com/products/9119 (1) 1/4"-20 nut (1) 1/4"-20 hex bolt, 4" long, PARTIALLY threaded Data Acquisition: (1) Arduino Uno (Program in the ThingFiles) http://amzn.to/1XrtSUa (1) Screen Interface (this is optional because you can just use the Arduino serial monitor on the computer to read measurements. The buttons are overkill for this project but they are nice to have for other things.) http://amzn.to/2b47mQ8 Print Settings: Manufacturer: XYZ 3D Printer Model: XYZ-1000 Layer Height: 0.1 mm Infill Density: 20% Support Material: None Audiences: This tool is intended as a tool for use in a science (physics) lesson/class. The intended audience for the full lessons are middle school through high school students, although the finished tool/toy itself can be enjoyed by all ages. Subjects: Physics, Math, Science, Computers/electronics Skills Learned (Standards): Hooke's Law & how to determine the spring rate of an unknown spring. Wiring up a potentiometer. Wiring up & programming Arduino. Lesson/Activity: Lessons take the form of guided discussion and experimentation with the device, intended in a specific order. (The complexity increases as you go!) Please refer to the ThingFiles download section for PDF files. Here are the steps for reference: Step 1: Printable Parts & BOM Step 2: Assemble The Parts Step 3: Wire It Up and Play! Step 4: Discuss How It Works+Mystery Spring Exercise Step 5: Comparison to Real Load Cell Step 6: Perform A Calibration (See MS Excel based Step 6_Calibration Calculator) Step 7: Discuss Bit Resolution & Proportional Scaling (See MS Excel based Step 7_Printed LoadCell Calculations) Quiz Loadcell Lab: Consider each step a 15-minute activity with the difficulty level increasing as you go. Although the explanation and discussion itself can last as long as the kids remain interested enough to ask questions! Preparation: It helps a lot to have assembled the parts at least once before introducing them to the kids. (Just to make sure everything fits!) Then disassemble them before class so the kids can rebuild them to achieve the 'i-made-this' feeling. (If you have a late high school class then let them 3D print the parts by themselves.) References: The teachers will definitely want to read through the entire lesson before hand to make sure than they themselves understand what it is that they are sharing! Rubric & Assessment: Students should be able to answer all the questions on the quiz handout. They should be able to tell you what would happen if you were to do the following: * Use a stronger or weaker spring * Use a longer or shorter potentiometer * Use a different bit measurement system Also: * What is Hookes Law? * How do we define what a lb actually is? * How to determine the spring rate of an unknown spring? Handouts & Assets: See optional quiz handout. If the students are young then give them this at the beginning of class and have them turn it in after you perform the lab as a class or in small groups.
With this file you will be able to print Educational Force Sensor + Lab Exercises with your 3D printer. Click on the button and save the file on your computer to work, edit or customize your design. You can also find more 3D designs for printers on Educational Force Sensor + Lab Exercises.