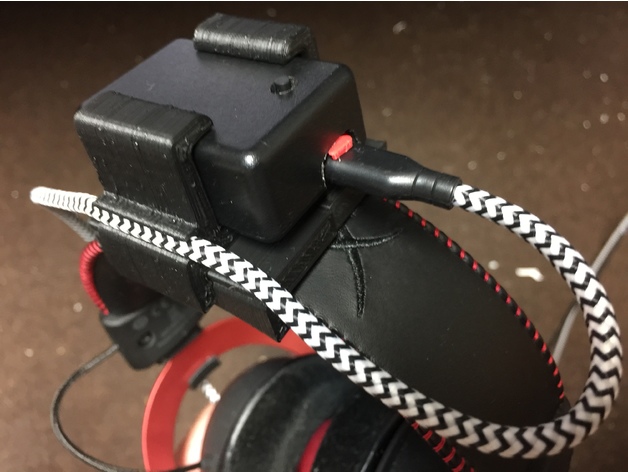
EDTracker mount for HyperX Cloud II headset
thingiverse
This is a mounting bracket for an EDTracker gyroscopic-based head-tracker to a HyperX Cloud II headset. Update 30-Jun-2017: After several months using the original design, I found that the mini-USB connector was failing big time. Believe it or not, when the headphones were opened up (i.e., put on or taken off), even though the USB cord was restrained at the ear cup, that motion still caused some movement and stress at the tracker's USB connector. So, I incorporated a cord strain relief channel into the bracket to ensure zero movement at the connector. It was a game-changer! If you don't know what an EDTracker is, just check out http://www.edtracker.org.uk for DIY or http://www.edtracker.co.uk for a pre-built unit. I opted to build my own and got a complete kit from http://hobbycomponents.com/home/440-diy-head-tracker-bundle - all I needed was a long USB micro B cable. This thing is a non-invasive, non-damaging mount for the EDTracker in a Hammond 1551GBK plastic enclosure that came with my kit; it requires no glue, sticky pads, rubber bands, etc. and can be easily removed without any hassle. There are four parts to print: one you need to print twice for a total of five pieces. Print two "Headband Clamp half" parts; it's a mirror-image part that forms the "base clamp" that is held together when you slide the EDTracker Bracket onto it (via tongue-and-groove). Once that is fastened to the headband, the EDTracker can be slid into the bracket. It's a snug fit and should actually flex a bit, keeping the two clamp halves snugly together. Next, slide the Cord Restraint onto the metal "T" that holds the ear cup, then slide the Cord Restraint Clip around the restraint and the metal to hold it in place. There are two slots (at the top and bottom) designed to hold a 4mm USB cable (e.g., the braided nylon type). The Cord Restraint prevents any undue tension on the USB connector of the EDTracker. Then I just used some pieces of harness spiral wrap every several inches to keep the headset and EDTracker cords together in one neat bundle. Print Settings Printer Brand: Prusa Rafts: No Supports: No Resolution: .25mm layers Infill: 50% (but it really won't matter much, there's hardly any infill) Notes: I use WolfBite for bed adhesion, so don't need to use any brim etc. even though these parts have fairly small footprints. Post-Printing Use acetone on the cord restraint "slots". The "overhang" of the cord restraint slots are fairly thin and might break off if not handled carefully. I use acetone and a Q-tip after printing to ensure good strong layer bonds there.
With this file you will be able to print EDTracker mount for HyperX Cloud II headset with your 3D printer. Click on the button and save the file on your computer to work, edit or customize your design. You can also find more 3D designs for printers on EDTracker mount for HyperX Cloud II headset.
