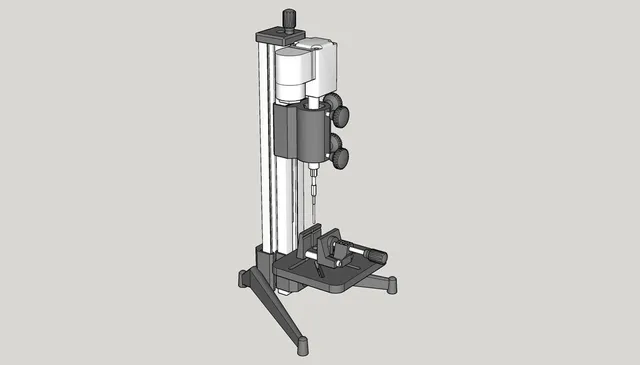
EDM sinker drill for small parts
prusaprinters
Electric discharge machining, or EDM for short is a process to electrically remove metal from a work piece. This is especially useful to machine very hard metals like tool steel or carbide steel. This is a small variant using magnetic reflex (like an old fashioned ringning bell) to electrically poke a metal part and slowly erode the metal. I plan to use this to remove broken taps. It is a work in progress. Print Settings Printer: Anet A6 Rafts: No Supports: Yes Resolution: 0.2mm Infill: 100% Notes: The file Gnist2-fot and Gnist2-vice2 needs support, the others can do without. Post-Printing Assembly Parts: 1x aluminum profile 30x30x260mm 1x threaded rod M4x200mm 1x threaded rod M4x60mm 4x threaded rod M4x27 mm 1x threaded rod M4x30 mm 1x threaded rod M3x115 mm 8x nut M4 8x nut M3 6x flat headed screw M4 x 8mm 1x gypsum screw to hold the profile lid 1x steel tensioner 11 x 48 x 0.5mm (packaging steel strip works fine) 1x 24V electromagnet from an electric valve 1x 24V variable power supply 2x 4x6x40mm PTFE or PE tube 1x ceramic tube 6x10x100 mm (may work with stainless steel) The Knobs: The M4x27mm threaded rod is forcibly screwed into the four knob2 parts. use a piece of folded paper around the threaded rod to avoid thread damage and turn it with a pair of pliers until 14 mm of the rod is left. Do the same with M4x30 into knob1 until 15mm of the rod is left, and M4x60 into knob1 with 41mm left, and last M4x200 into knob1 with 190mm left. The foot: Two M4x8mm goes into the back of Gnist2-fot. They are used to tension the plastic spring onto the aluminum profile to hold firmly with friction. Force the screws into the plastic hole to generate a plastic thread. Screw them until they reach the flexible tensioner in the bottom. Slide the part onto the aluminum profile and turn the screws until the plastic tensioner firmly holds the part on the aluminum profile. The work-board: Insert two M4x8mm into the Gnist2-bord the same way as for the foot. The sled: Insert a plastic expander into the top end middle hole of the aluminum profile, this is later used for the gypsum screw and profile lid. For the Gnist2-slade the set screws need to be inserted and screwed with a smaller screw driver that can fit all the way trough the hole for the knob screw. Insert two M4 nuts into the back of Gnist2-slade part. Insert the long M4x200mm (with the knob) into the Gnist2-lock side hole, add two M4 nuts all the way up to the plastic part. Turn the nuts together with a bit of force to lock them, but allowing the knob and rod to turn freely. Insert the threaded rod into the back part of Gnist2-slade and turn it all the way through the two M4 nuts. Slide the whole thing onto the aluminum profile. Adjust the set screws until the part can move along the aluminum profile with a slightly bit of friction. Fasten the lid with the gypsum screw onto the aluminum profile end and the previously inserted plastic expander. Forcibly turn Gnist2-knob2 rod into the four holes of Gnist2-slade, until they slightly comes out the other side. Bend the steel tensioner so it bows up about 7mm from a flat surface. Insert the steel tensioner into Gnist2-slade along with the 10mm ceramic tube. Turn the knobs until the tube is placed straight in the middle of the hole and held firmly by the steel tensioner. The vice: insert two M4 nuts into Gnist2-vilce1 part top. Screw the M4x60mm threaded rod with the knob all the way trough the two nuts and let it stick out 20mm. Add a single M4 nut to the end of the threaded rod and apply a tiny drop of superglue between the nut and threaded rod to lock it. Slide the Gnist-vice2 part onto the end nut. Insert the two 6x40mm plastic tube on each side between the vice1 and vice2 parts as a linear bearing that holds it together. Add a M4 nut in the bottom cut. Screw the M4x30 threaded rod with knob through the work-board and into this nut to hold the vice in place on the work-board. That's it for now, more will follow. Category: Machine Tools
With this file you will be able to print EDM sinker drill for small parts with your 3D printer. Click on the button and save the file on your computer to work, edit or customize your design. You can also find more 3D designs for printers on EDM sinker drill for small parts.
