Edge glass bed clamps for Kossel, Rostock & Co.
thingiverse
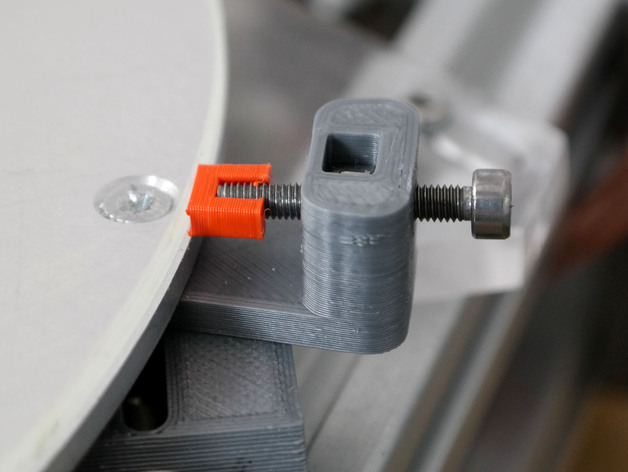
Up to this point, I've been using paper clips or picture frame clips to clamp my glass bed down onto my aluminum heated bed. However, I must admit that I really dislike this solution because you inevitably imprint the imperfections of your aluminum heated bed onto the otherwise nearly perfectly flat glass surface, which completely defeats a major part of the entire purpose. This little device was inspired by an alternative way to clamp glass beds: By its edge (common on Prusa i3's, such as Wanhao DI3 etc). I adapted this method for the round bed shape of Kossels/Rostocks etc. The result is quite impressive: With paper clip clamping and using DC42's calculator (http://escher3d.com/pages/wizards/wizarddelta.php), I was able to get the standard deviation of the probed bed height down to ~70 µm. With this device, I tend to get a standard deviation of 40 µm over the entire bed area. Also, Escher tends to "guess" the diagonal rod length more accurately. I no longer use bed correction since I opted for this clamping method. For me, bed correction did not result in any noticeable improvements. To be clear, this method also has a disadvantage: As you are not forcing the glass bed onto the heated bed anymore, you will tend to get gaps between the glass and the aluminum (for me ~ 1 mm to 1.5 mm at maximum). I.e., the heat will not spread as evenly as before. In my case, I have fluctuations of ~6 Kelvin over the bed surface (@ 60°C). Though, this did not influence the printing in any significant way for me yet. Print Settings Rafts: No Supports: No Resolution: 0.2 mm layer height, 0.4 mm nozzle diameter Infill: 100% Notes: As this will be in contact with the heated bed: ABS. Also, this part is rather small, so I would suggest printing with 100% infill. You won't save much time and plastic with a smaller infill ratio. There are optional screw heads which you may print additionally. For me, these made clamping a lot easier as the glass edge tends to move off the tip of a screw as clamping force increases. Print them as they are oriented in the .stl. If you plan to use a nylon washer between this device and the heated bed, print out the 6.5 mm version which accommodates for the increased height. If you want to use this device directly underneath the heated bed, use the 5.5 mm version. Post-Printing You will need: 3x M3x20 or longer screw (either steel or nylon, the latter to be preferred) 3x either normal or locking M3 nut (will both fit, locking nut to be preferred) Optionally 3x nylon M3 washers to fit between this device and the heated bed as insulation. If you got Nylon washers, print the Kossel_glass_bed_clamp_6.5mm.STL, if not ...5.5mm.STL. Install the clamps below the heated bed (either with or without nylon washers). Insert the M3 nut (should be a pretty tight fit) and the M3 screw into the nut. Tip: For easy access, orient the clamp in any way you like. (Optionally but recommended) put the screw heads into place. Should be loose fit on the screw tip. Orient the clamp normal/perpendicular to the circular bed surface and put glass bed into place. Decide on a "main" clamp which you can reach most easily. Tighten up the other two clamps so that the glass bed is flush with the heated bed. Tighten up the main clamp, while slightly pushing the glass bed down, so that it will not fling upwards and out of the clamp. DO NOT OVERTIGHTEN. You do NOT need a lot of force to keep the glass bed in place. It's a feel thing. Test whether you can still move the glass. If not, it's tightened enough already. You do not need to tighten more.
With this file you will be able to print Edge glass bed clamps for Kossel, Rostock & Co. with your 3D printer. Click on the button and save the file on your computer to work, edit or customize your design. You can also find more 3D designs for printers on Edge glass bed clamps for Kossel, Rostock & Co..