Easy Needle Bearing uses 1.75mm chopped filament
prusaprinters
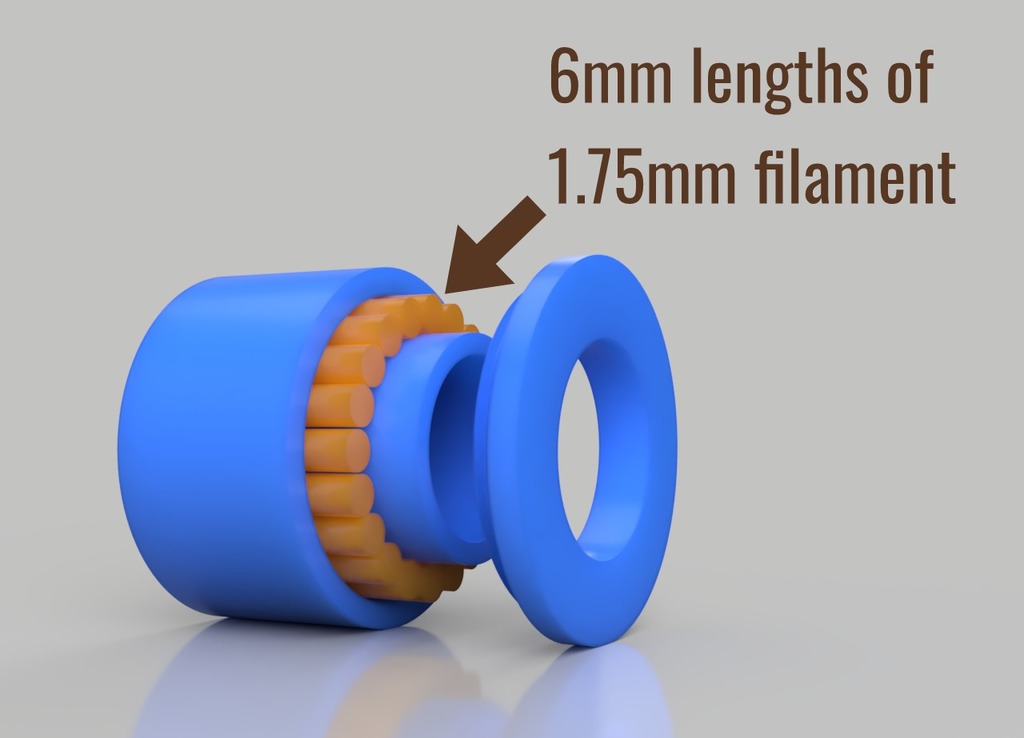
<p>I wanted to replace a 608Z bearing with something more compact for a focus rail I'm designing. I wondered if I could make a needle style bearing using chopped raw filament, which would have the size and precision I need.</p><p>This object is a prototype, but it appears to work ridiculously well and only adds 4mm to the height of the 8mm lead screw. (Half that of the 608Z). It should translate well to the focus rail project as this is a low speed, low mass, and likely low wear environment.</p><p>It would be interesting to know how much speed, weight, and wear this design could tolerate; I suspect as is not a lot. However, when the bearing needs to be very small and load, speed and wear are not too high, it may be the only alternative to no bearing at all.</p><p>In theory, to overcome these shortcomings, the concept could be extended with alternative materials like fibreglass rods as these come in various appropriate diameters, longer 'needles' and a thicker outer casing.</p><h3>Print Settings</h3><p><strong>Printer Brand:</strong></p><p>Prusa</p><p> </p><p><strong>Printer: </strong></p><p>i3 MK3 MMU 2</p><p><strong>Rafts:</strong></p><p> </p><p>No</p><p> </p><p><strong>Supports: </strong></p><p>No</p><p><strong>Resolution:</strong></p><p> </p><p>0.1 to 0.2mm</p><h3><strong>Filament:</strong> 3D Fillies PETG <br/> </h3><p><strong>Notes: </strong></p><p>Use the lowest layer height you have when printing the threads.</p><h3>Post-Printing</h3><p><strong>Cleanup</strong></p><p> </p><p>Carefully clean off any burrs and blobs to reduce friction.</p><p><strong>Assembly</strong></p><p>Create needles</p><p>1. Straighten filament as much as you can<br/>2 Chop 20 'needles' with a sharp craft knife using the cutting block provided.</p><p> </p><p>Clean off burrs if they occur</p><p>Assemble bearing</p><p>If you have silicon grease, mix the needles into a small glob. The silicone will help them stick to the sides of the casing while you build. When the bearing operates, the grease will lubricate it.</p><ol><li>Start laying needles around the inside of the outer hub</li><li>When it's about half-filled, put the inner hub in place</li><li>The remainder should slip in comfortably. Don't force the last one. A small gap would be better than a tight fit.</li><li>Screw on the end cap on, and you are good to go!</li></ol><p> </p><p> </p><p>Category: Engineering</p>
With this file you will be able to print Easy Needle Bearing uses 1.75mm chopped filament with your 3D printer. Click on the button and save the file on your computer to work, edit or customize your design. You can also find more 3D designs for printers on Easy Needle Bearing uses 1.75mm chopped filament.