Easy Fill Pepper Mill Grinder
prusaprinters
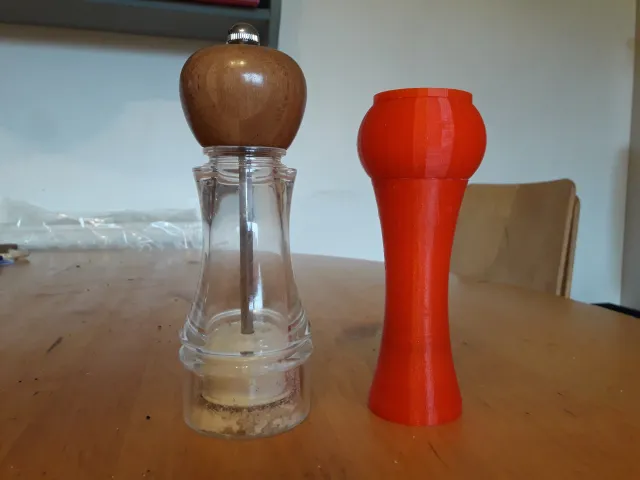
Easy Fill Pepper Mill / Grinder You may have seen a few pepper grinder designs on the internet. I wanted to create a fully 3d printed pepper grinder that didn’t just kind-of-work-ok-ish… I wanted to make one that would look good, be reliable, be as good as a shop bought item and last for many years. I think this could be it…! Attributions Two things stood out for me in the previous designs – one was the brilliant ‘grinding faces’ created by ‘MDesigner423’ and also the threaded lock nut created by ‘JollyCreations’ (not mastered screw threads as yet). So, thanks to all the designers involved in developing this project this far – I could not have done this without you. See notes below for further details on the print and mods etc. Feel free to make improvements! UPDATE The lid for the Pepper Mill was a little too loose and was driving me and my family a bit nuts, so I have re-designed it to be a better fit. See V2 Lid. Apart from that, the Pepper mill is still going strong and is used every day! UPDATE 16/10/19 The Pepper Grinder spindle was flawed sadly - from the original remix. The flaw being it only catered for small peppercorns! I bought a batch of larger peppercorns which simply did not work using the grind surfaces of the original design. So I have modified the grind surfaces - so it works for larger peppercorns too now. So if your grinder has also failed, this is probably why. I have also stopped using PLA - I now use PETG, because PETG is food safe, much stronger and does not 'wear' as much as PLA. Print instructionsUnassociated tags: best 3d printer, easy print, first print, low cost, Save money, Small cost Category: Kitchen & Dining Print Settings Printer Brand: Prusa Printer: i3 MK3 Resolution: 0.1 and 0.15 Infill: Between 20% and 50% Triangular Filament: SUNLU PETG Black Notes: There were a number of things I felt could be improved, these were: None of the ‘knobs’ created so far really appealed to me aesthetically or ergonomically. I think it needs something someone with poor grip could use - as well as those of us who are fortunate enough to be fully able. The ‘traditional’ design of a large round knob is still a good one I think here – so that’s what I have designed. Most Peppercorn grinders need to be largely disassembled to load in more peppercorns, which even for commercial designs - is a pain. The nut for adjusting the coarse/fine adjustment often works loose, once again – this happens even on commercial Pepper Mills. There is a flaw in the spindle/grinder part of the previous design. The square section near the top has a void in the side. This makes the spindle weaker, as shown when I did some extreme testing of the spindle under load and… it snapped at exactly this point. The original spindle design has other issues too. The bottom of the grinder shaft is not locked in place by a bracket. Also the body was not symmetrical - top to bottom, making it look 'top heavy'. How I have solved the above: Designed a large round knob that gives good grip and torque. Also looks nicer in my opinion and hides the adjustment nut. Easy-Fill!! I have taken advantage of the space inside the knob and put holes through to the container so that it makes it easier to fill it up without having to take the whole thing to bits. It also provides a larger filling area with guides for the peppercorns, so hopefully it’s less likely you will have to chase them around your kitchen! Also added a screw-lock cap to avoid any dust etc. getting in the container. All I have done here is to scale the size of the nut down to 95% because the original size was way too loose to be usable. If you do one or two ‘test grinds’ after assembling, you can either fix the nut with glue permanently (not ideal) or do what I have done and ‘lock’ the nut with a locking liquid. I have used (which is absolutely fine) – good old nail varnish! Apply a good brush full to the top 2/3 of the inner thread of the spindle nut - then screw the nut in place, ‘tweak your grind’ as required - then allow 24 - 48 hrs to dry out thoroughly before use. If you fancy something organic to lock it, a little flour and water should work too. You could also leave it completely unlocked too if you want. The nut is reasonably tight now – so it shouldn’t need adjusting too often. I have basically stripped down the original spindle STL, leaving just the grinding faces and the screw thread. I did not like the zillion polygon mesh it was made with, so I simplified it and resized it to suit the new knob. I also added the hole for the bottom bracket. It now prints about 30 mins quicker too. Created a small bracket that locates snugly in the new extended symmetrical body. It holds the bottom end of the grinder spindle – which gives a more consistent grind size. It’s a nice tight fit, but you may want to use a little super glue (cyanoacrylate) to stop any embarrassing bottom issues… My tips for printing these parts… These are just my personal preferences... Use a food safe filament. PETG is food safe and much stonger than PLA of any sort, so this is what I use now. I printed the main shaft at 0.10mm resolution which produces a nice clean thread for the adjustment nut. The shaft needs to cope with A LOT of torque, so I chose a 50% infill, a triangular profile and 3 perimeters. This will deliver better all-round strength for this rather critical part! I would strongly recommend printing this part horizontally - like in the STL file. This will make it capable of handling considerably more torque than a vertical print. Yes, it will need supports - but the strength improvement outweighs this minor inconvenience by a long way. MY PRINT SETTINGS FOR EACH PART FORMAT: Part / Layer height / Infill% / Supports KNOB / 0.15mm / 20 - 30% / Support everywhere BODY / 0.15mm / 20 - 30% / No supports GRINDER SPINDLE / 0.1mm / 50% / Support on build plate only LID / 0.1mm / 20% / Support everywhere BRACKET / 0.15mm / 30% / No supports NUT / 0.1mm / 20 - 30% / No supports
With this file you will be able to print Easy Fill Pepper Mill Grinder with your 3D printer. Click on the button and save the file on your computer to work, edit or customize your design. You can also find more 3D designs for printers on Easy Fill Pepper Mill Grinder.