Easy exchange filament extruder
pinshape
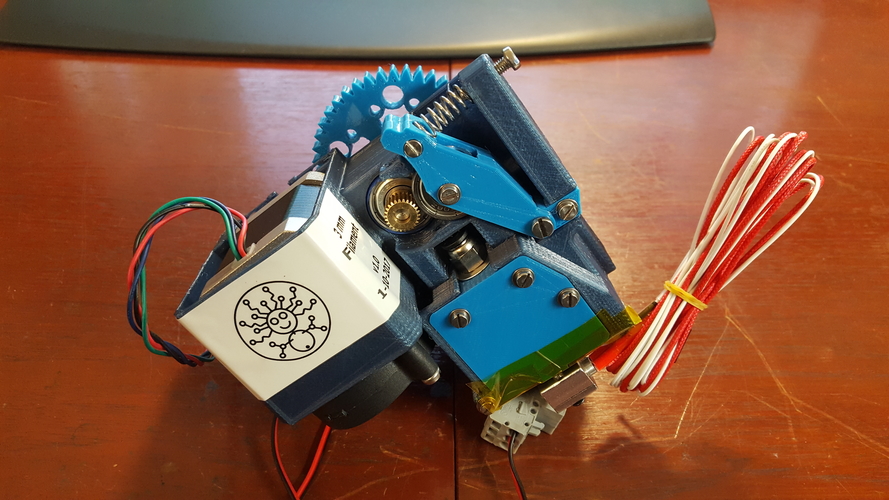
For a brand new printer, I needed an extruder setup that would meet my requirements. Because I print extensively with ABS, this extruder is designed specifically for that purpose (but it also works effectively with other filaments). When printing with ABS, you don't want airflow passing through the printed parts. To achieve this, air is drawn in from above and then passed through to the hot-end before being released at the top. The same airflow design is used for the motor as well. This ensures that the printed part never gets cooled by these two fans. For more details on the dimensions of these snail house fans, see the picture. I also wanted an extruder where changing filament would be effortless. On most extruders, you can't see the filament wire, which makes it difficult to change filament. If you run out of filament during a print job, you're in big trouble. Therefore, I designed this one so that you can always see the filament wire. Since I have three different sizes of filament (1.75mm, 2.85mm & 3mm), this extruder can accommodate them all. To achieve this, I created an exchangeable filament guide. For the 1.75 mm filament, I also need to insert a Teflon tube because the hot-end is designed for 3mm wire (I highly recommend using the Teflon tube anyway, as it allows the filament to pass through much more smoothly). The filament guide is also adjustable, allowing you to guide your filament perfectly. In the photos, you won't see this guide because that's still the prototype model; on that version, the 3mm guide is fixed to the body – not a very smart design, as you can no longer adjust anything once it's assembled. I broke mine, too! As an optional part, you can simply print out the guide again and attach it using a washer, M3 nut, and 10mm bolt. The little filament driver (11mm diameter) is mounted on an M8x50mm bolt that was lying around. On my lathe, I turned down the end of this M8 bolt to 5mm so the driver can be securely attached to it – see the pictures for details. The hot-end itself is a cheap Chinese one; I don't even know its name, but it works incredibly well. For more information on its dimensions, refer to the picture. The stepper motor is a Nema 17 x 47mm. If you plan on using 2.85 & 3mm filament wire, I highly recommend a strong motor for this setup – in the picture, you see a 42BYGHW811, but I'm currently using an SL42S247A (which has a bit more torque). As a driver, I still use an A9844 with heavy cooling and heat sink. For the main body, I had to add some support material; see the picture for instructions on how to remove it. All other parts can be printed without any issues. I printed all parts in PET-G at 0.2mm resolution using a 0.4 nozzle. You'll also need: * 3x bearing 608z * 1x 11mm driver * 1X M8 x 50mm bolt or something similar * 1x hot-end * 2x snail house fan * 1X spring (optional, depending on filament material) * 1X nema 17 stepper * 1x kapton tape * 12X M3 nut * 4X M3 x6mm bolt * 9X M3 x 10 mm bolt * 3X M3 x20mm bolt * 9X M3 washer (optional) * 1X M3 big washer for filament guide * 8X M4 nut * 5X M4 x20mm bolt * 1X M4 x40mm bolt * 5X M4 washer (optional) After assembling everything, it's a good idea to apply kapton tape on the bottom to protect the plastic from all the heat. This way, the plastic will last longer.
With this file you will be able to print Easy exchange filament extruder with your 3D printer. Click on the button and save the file on your computer to work, edit or customize your design. You can also find more 3D designs for printers on Easy exchange filament extruder.