east3D gecko coreXY Z-wheel-carriage
prusaprinters
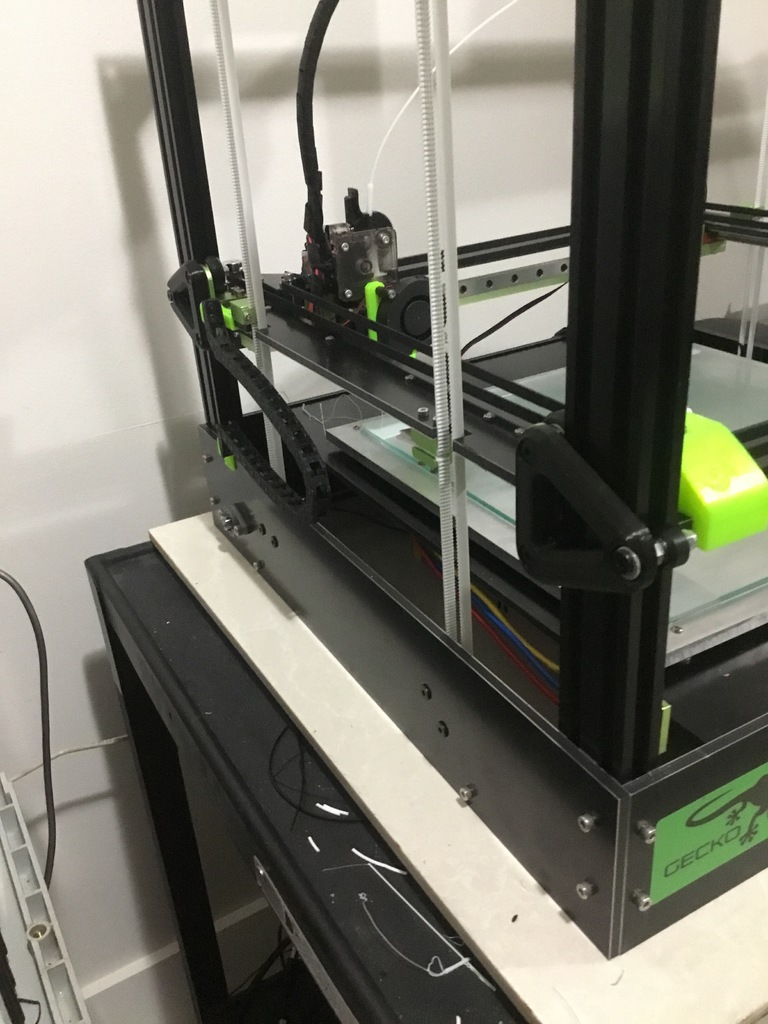
<p>I created these to fix an issue that i had due to poor handling by the courier .</p> <p>Parts Needed.</p> <p>4x 3d printed z wheel carriage</p> <p>4x <a href="http://openbuildspartstore.com/delrin-mini-v-wheel-kit/">http://openbuildspartstore.com/delrin-mini-v-wheel-kit/</a></p> <p>8x <a href="http://openbuildspartstore.com/mini-v-wheel-precision-shim/">http://openbuildspartstore.com/mini-v-wheel-precision-shim/</a></p> <p>4x 6mm <a href="http://openbuildspartstore.com/eccentric-spacer/">http://openbuildspartstore.com/eccentric-spacer/</a></p> <p>12x <a href="http://openbuildspartstore.com/nylon-insert-hex-locknut-m5/">http://openbuildspartstore.com/nylon-insert-hex-locknut-m5/</a></p> <p>12x 30mm <a href="http://openbuildspartstore.com/low-profile-screws-m5/">http://openbuildspartstore.com/low-profile-screws-m5/</a></p> <p>8x (M5 washer works also) <a href="http://openbuildspartstore.com/precision-shim-10x5x1mm/">http://openbuildspartstore.com/precision-shim-10x5x1mm/</a></p> <p>4x m6 washers like these. https://www.amazon.com/Steel-Washer-Plated-Finish-Metric/dp/B009OK4VLQ</p> <p>assembly:</p> <p>take off the wheels from the cart.</p> <p>and remove it from the z stage.</p> <p>insert one 6mm eccentric spacer into each carriage .</p> <p>screw the new carriages to the carts with the m5x30mm screws. nice and tight.</p> <p>(wheels are now held inplace with nuts.)</p> <p>wheel instalment.</p> <p>copper spacer first then wheel last precision shim. (or a m5 washer works)</p> <p>last the nut and hold the bolt with the allen key so it does not want to loosen.</p> <p>put the carraiges back on the z stage.(do not tighten the bolts till the end)</p> <p>now the mini wheels .</p> <p>put the M6 washer on the m5x30mm bolt put it in thru the hole a step at a time now put a mini-v wheel precision shim then the wheel then another mini-v wheel precision shim then the nut. tighten up the eccentric spacers to hold the wheels enough . not to tight( you should be able to spin the wheels with slight resistance ) finaly tighten the carriages to the z stage.</p> <p>(i do advise to relevel and retighten the z belts at this time.)</p> <h3>Print Settings</h3> <p><strong>Printer:</strong></p> <p>east3D gecko coreXY</p> <p class="detail-setting rafts"><strong>Rafts: </strong> <div><p>No</p></div> <p><strong>Supports:</strong></p> <p>Yes</p> <p class="detail-setting resolution"><strong>Resolution: </strong> <div><p>0.20</p></div> <p><strong>Infill:</strong></p> <p>100%</p> <p><br/> <p class="detail-setting notes"><strong>Notes: </strong></p> </p><div><p>support from build plate only. </p></div> How I Designed This =================== </p></p> Category: 3D Printer Parts
With this file you will be able to print east3D gecko coreXY Z-wheel-carriage with your 3D printer. Click on the button and save the file on your computer to work, edit or customize your design. You can also find more 3D designs for printers on east3D gecko coreXY Z-wheel-carriage .