E3D V6 Mount For Tronxy P802
prusaprinters
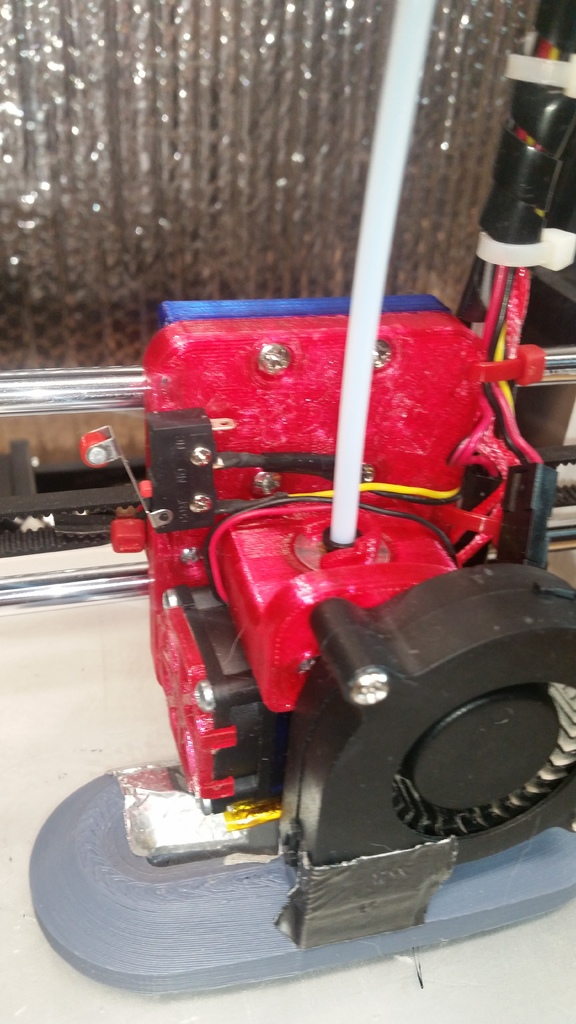
<p>I upgraded to an E3D V6 and made this mount and part cooling duct for it. I've been using this design for several months now. The only thing that is relatively new is my using of printed bushings and the bushing holders I made. The part cooling duct is a few versions in and works well. It is wide and rides low so you will need some low profile bed clips like I have posted here. <a href="https://www.thingiverse.com/thing:2536787">https://www.thingiverse.com/thing:2536787</a></p> <p>I do not have any provisions for bed level sensors and I have no plans on doing so as I rarely have to mess with leveling my bed once I have it adjusted. I just use a measurement jig to check my z height on each side after homing and rarely have to adjust and that only takes a few seconds. <a href="https://www.thingiverse.com/thing:2538266">https://www.thingiverse.com/thing:2538266</a></p> <p>The fan guard I am using is a great clip-on guard I found at <a href="https://www.thingiverse.com/thing:1264041">https://www.thingiverse.com/thing:1264041</a></p> <p>A bowden coupling clip is a must. I used <a href="https://www.thingiverse.com/thing:1330497">https://www.thingiverse.com/thing:1330497</a></p> <p>I really like my E3D V6 by the way. It is definitely better than the poorly made v5 knockoff that came with the printer.</p> <ul> <li>Update: 10-6-2017</li> </ul> <p>I created a new and improved cooling duct that isn't so big and ugly. <a href="https://www.thingiverse.com/thing:2572490">https://www.thingiverse.com/thing:2572490</a></p> <p>I also added the file here as well.</p> <h3>Print Settings</h3> <p><strong>Printer:</strong></p> <p>Tronxy P802E</p> <p><strong>Rafts:</strong></p> <p>No</p> <p><strong>Supports:</strong></p> <p>No</p> <p><strong>Resolution:</strong></p> <p>.2</p> <p><strong>Notes:</strong></p> <p>E3D mount and clamp parts: I suggest printing from petg or ABS. I used petg with 4 walls and ~30% infill.</p> <p>X-belt holder: you will need to flip the part so that the "REAR" text is up. I used petg and same settings as the mount since I printed all at the same time.</p> <p>Cooling duct: - Make sure you use my new design <a href="https://www.thingiverse.com/thing:2572490">https://www.thingiverse.com/thing:2572490</a></p> <p>Flip it flat side down and it is a fairly easy print. I suggest using abs. I used petg initially which worked ok until I started doing more high temperature prints then it started to warp.</p> <p>Wide bushing mount: You don't have to use this as you can just use regular bushing blocks. This part needs to be flipped down flat. I made this to cable tie a printed bushing stretched to 2x length. I am using bushings from <a href="https://www.thingiverse.com/thing:1811769">https://www.thingiverse.com/thing:1811769</a></p> <p>I used Taulman bridge nylon for my X bushings and used PLA ones under my bed. It has drastically improved my print smoothness. I did have to fuss around with getting them well aligned to avoid binding and had to increase the power to the motors some.</p> <p>I also included two other bushing holders where the bushing is attached by a single cable tie. This helps reduce binding problems caused by slightly misaligned bushings. These are both intend to print on end the way they come in, but the flatter one can be flipped and printed on its base just as well. petg has worked very well for these.</p> <h3>Post-Printing</h3> <p>Hardware needed:</p> <p>For the most part I reused the hardware from my p802e assembly. (bearing mounting, limit switch, blower fan)</p> <p>The screws for the hot end clamp are 4mm and 35mm works best though there is plenty clearance for 40mm. The 4mm nuts slide tightly into the slots on the mount.</p> <p>The cable clamp is designed to mount with 3mm x 25mm long screws and nuts. I didn't have that handy when I assembled so I substituted some #4 imperial.</p> <p>Cooling Duct</p> <p>Use <a href="https://www.thingiverse.com/thing:2572490">https://www.thingiverse.com/thing:2572490</a> and ignore the instructions below.</p> <p>The thin strip at the bottom corner of the nozzles is there as support and is meant to be cut away after printing.</p> <p>I also covered the areas close to the heater block with aluminum tape for extra protection. This may not be needed if abs is used but doesn't hurt. Definitely do this if you want to try petg.</p> <p>The duct has an air deflector right under the blower. Without it way too much air goes to one side. With it as printed it will overcorrect and too much will go to the other side. I trimmed it a little at a time with an exacto until it was balanced. I used a thin strip of paper a few inches long to determine. When the airflow held the strip about centered under the nozzle I knew it was pretty good. I have thought about adjusting the model to match that, but haven't yet out of laziness but also concern that some blowers may behave a bit different.</p> Category: 3D Printer Parts
With this file you will be able to print E3D V6 Mount For Tronxy P802 with your 3D printer. Click on the button and save the file on your computer to work, edit or customize your design. You can also find more 3D designs for printers on E3D V6 Mount For Tronxy P802.
