E3D v6 40 mm Fan Duct and Extruder for MakerGear M2
pinshape
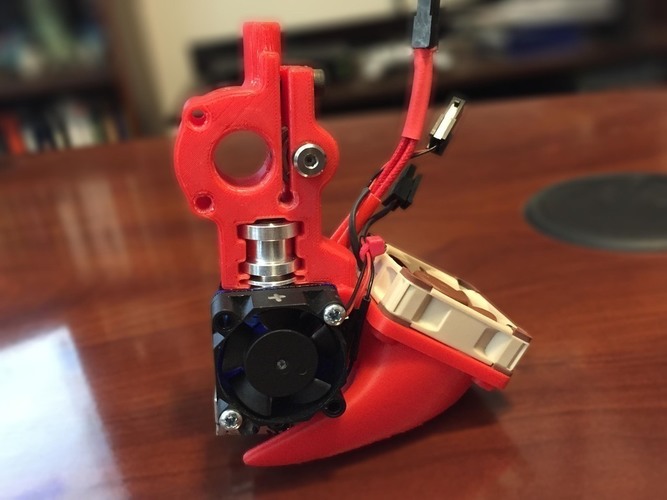
UPDATE 2: In response to numerous requests to make several significant changes to the design, I've updated the 40mm duct and moved the mounting to a modified 30mm E3D shroud. The updated design can be found at: http://www.thingiverse.com/thing:1165614. This adds magnetic couplers and makes assembly and removal of the ducts a simple matter of snapping parts together or tugging them apart. I've tested the hold and all parts fit snuggly and hold well. I've had my printer testing this redesign for over a month and there have been no failures. Both fans hold very firmly in place while still being easy to assemble. UPDATE 1: I've recently updated my E3D v5 extruder and fan duct (http://www.thingiverse.com/thing:533029) and significantly improved the fit of the hotend into the extruder. I translated these improvements to my E3D v6 extruder so inserting the hotend into the extruder won't require as much force and will hold the hotend tighter due to better fit. This update has improved my print qualities over the previous extruder version, because the hotend nozzle doesn't have as much play. I've also renamed the part with the 2.0 mm ID PTFE upper opening to accurately reflect the inner diameter of the upper inlet. Here is my duct for version 6 of the E3D hotend for the MakerGear M2 printer. To design this, I used my reference model for the E3D v6 (http://www.thingiverse.com/thing:433258). Because I like the design and fit of the 30 mm fan duct that comes with the E3D v6, I took a different design approach for this than I did for v5 of the hotend (http://www.thingiverse.com/thing:254004). So instead of bolting the 40 mm fan duct to the 30 mm fan duct, I bolted the 40 mm fan duct to a redesigned extruder. This may make the design more MakerGear M2 specific. The upside is that the redesigned extruder holds the hot end very stably and provides a solid platform for the 40 mm fan duct. For the extruder design, I was inspired by both rsilvers' M2 extruder design (http://www.thingiverse.com/thing:267137) and cmenard's adaptation for the E3D v6 (http://www.thingiverse.com/thing:495756). So while not bolted onto the 30 mm duct, they closely wrap around the 30 mm fan duct and this provides stable support for the 40 mm duct. I posted a version of the extruder without this sidearm (http://www.thingiverse.com/thing:495756) so that this extruder could be used with a different duct solution for the E3D v6. While the new duct resembles my previous E3D v5 hotend duct, it is a complete redesign. I noticed that the print quality of my E3D v5 hotend slowly degraded with time and this corresponded with changes / warping of the duct. So I maximized the distance between the rim of duct outlet and the hotend heaterblock, while not colliding with the M2 frame. I included a bottom view photo to illustrate the relatively small space this all had to fit within. With this added distance, the angle and the width of the duct outlet had to be taken into account so as to get a more balanced air flow directed specifically at the extruded plastic coming out of the nozzle. So the shape of the outlet is very different and in my opinion more tuned to positioning airflow where it is needed and not directed at the heater block. It is still not perfect as high cooling rates will still drop the heater block temp. If printed in the posted orientation, the duct will not need any supports. With this setup, I've been able to tackle some really big PLA print projects. These models were very large with a lot of retractions. I'd consistently run into heat creep issues with high retraction zones. So this has solved a big problem. I hope this works as well for you as it does for me. Please comment if you have any design suggestions or requested fixes. If there is enough demand for this, I'll implement this design for the E3D v5. Instructions: To assemble this extruder, follow these steps: 1. Attach the redesigned extruder to the 30mm fan duct using magnetic couplers. 2. Mount the 40 mm fan duct onto the sidearm of the extruder using bolts. 3. Connect the hotend heaterblock to the redesigned extruder. Note: The redesigned extruder may require some force to get into place, but it should fit snugly and hold well. I hope this helps! Let me know if you have any questions or need further clarification.
With this file you will be able to print E3D v6 40 mm Fan Duct and Extruder for MakerGear M2 with your 3D printer. Click on the button and save the file on your computer to work, edit or customize your design. You can also find more 3D designs for printers on E3D v6 40 mm Fan Duct and Extruder for MakerGear M2.