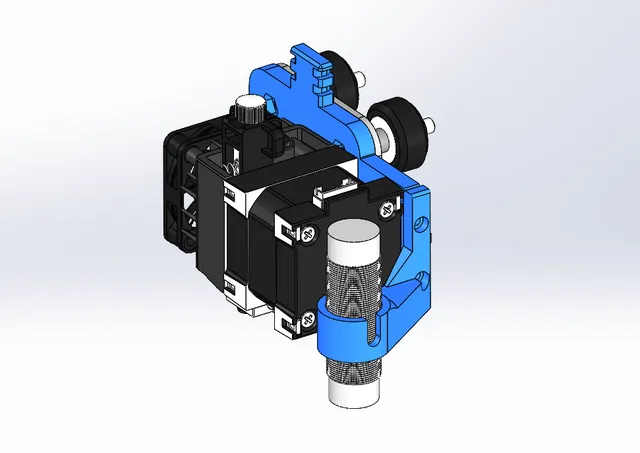
E3D Hemera Mount for Ender 3 w/ EZABL
prusaprinters
This is mainly a remixed version of the modular Hemera mount from ChipCE on Thingiverse: https://www.thingiverse.com/thing:4017555. If you want to use the other modular options, I would just go directly to his versions. I am simply sharing my adaptation of his. The same instructions and such apply. I changed the AIO mount to remove the BLTouch mount and added reinforcements to the mounting of the Hemera extruder itself. I adapted an EZABL mount to attach to the far side of the print head (opposite the fan) since I was using a 20mm thick Noctua and had no more room.I'm using this duct with the mount: https://www.thingiverse.com/thing:4042492. OFFSETS:Home position: #define X_MIN_POS -7#define Y_MIN_POS -16Okay, so some people change the X and Y minimum positions in the firmware, and these values are from ChipCE's model. In my firmware build, I left the XY minimum positions alone and changed the size of the build volume to (235, 230). I then changed the manual XY home positions. I'm not really sure which is “more correct” but the E3D guide for Marlin 2.0 only changes the home offsets.#define MANUAL_X_HOME_POS -10#define MANUAL_Y_HOME_POS -16EZABL probe: I'm using an EZABL Mini with an adapter ring, so the center points should theoretically work on any size.#define NOZZLE_TO_PROBE_OFFSET { 64, -14, 0 } A Little Write-up:I did a lot of research for the mounting options for a Hemera + Ender 3 (Pro) combo. There's hundreds of different options but I did not like the most popular options for a few reasons:Many employed a 2-part mounting system that had an anchor on the X carriage and a matching piece on the extruder - and the two would either interlock or screw together. I've seen a couple videos that feature this kind of mount and as an engineer, I really didn't like the decrease in mount rigidity by having some sort of plastic “middleman” that didn't directly mount the Hemera to the carriage. This includes the mount supplied from E3D at the time. It looks like they have a better version now that is similar in character to this model.I explored the option of purchasing a PrinterMods MDD mounting plate, but unfortunately, despite the flexibility of this product, it still used a 2-part system which defeats the purpose of me buying a $40 additional part.Many were also really bulky and pulled the extruder out from the carriage in the Y direction, which adds unnecessary cantilevering of the gantry and sacrifices even more Y-axis build space (the Hemera inherently will eat up about ~5-10mm on an Ender 3 unless you modify the frame).I saw a few custom-milled carriages for sale, and I could've machined one myself as well but I didn't want to put in that much effort.I wanted to save money since the Hemera itself was already pretty pricey.This solution from ChipCE was near perfect as it appeared to be:Simple and compact, with minimal build volume loss.Easily printable and quite robust, since the Hemera mounts directly to the plate which is directly mounted to the carriage. It is functionally efficient.Uses stock Ender 3 hardware to mount to the carriage.I would highly recommend this mount.
With this file you will be able to print E3D Hemera Mount for Ender 3 w/ EZABL with your 3D printer. Click on the button and save the file on your computer to work, edit or customize your design. You can also find more 3D designs for printers on E3D Hemera Mount for Ender 3 w/ EZABL.
