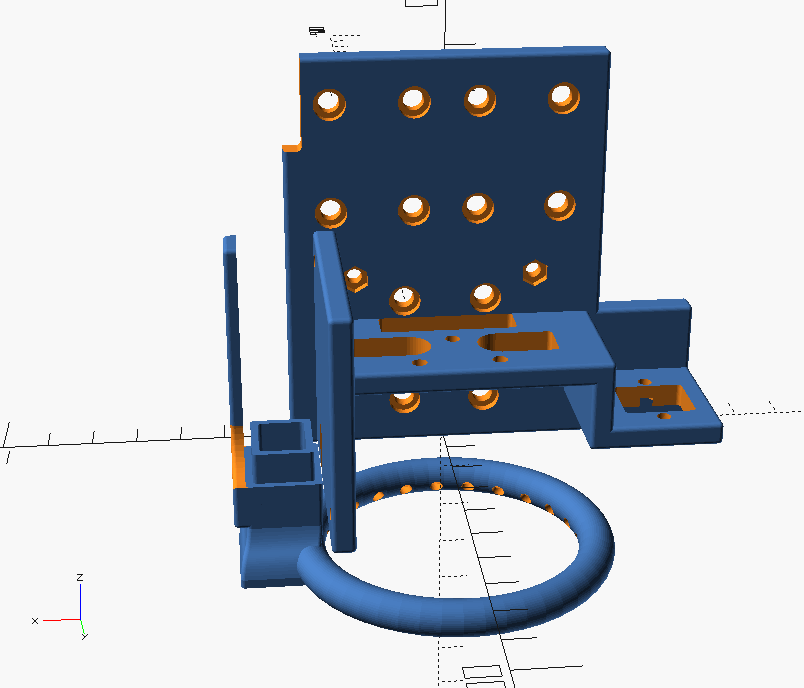
E3D Chimera+ mount for Anet A8
prusaprinters
<p>A simple but effective E3D Chimera+ (air-cooled) mount for the Anet A8 and printers with a similar X axis.</p> <p>The Anet A8 5015 blower fan mounts on the side, and a fan duct is included that encircles both hotends. A BLTouch can be mounted on the other side. If you mount the BLTouch through the hole and without springs, the NOZZLE_TO_PROBE_OFFSET setting in Marlin 2 should be { -54, 0, -3 }, give or take a bit for the Z-component.</p> <p>I'd strongly advise against using PLA for this, because of its low glass transition temperature. I have used PETG, which seems to work well enough, but ABS, ASA, PC or POM would all be better choices, if you can print them without warping. The extra stiffness offered by carbon-fibre PETG or Nylon composites may also be useful to prevent sagging over time.</p> <p>See below for installation instructions.</p> <h3>Post-Printing</h3> <p><strong>Mounting/installation instructions</strong></p> <p>After printing and removing any supports, first put some M3 nuts into the appropriate holes: two in the blower fan bracket, and two for the screws that hold the X belt. It's a good idea to glue these nuts down, especially those for the fan bracket. If you aim to mount a BLTouch, you can find M2.5 hex holes at the bottom of the bracket on the right. Definitely glue the BLTouch nuts down!</p> <p>Remove the entire Anet A8 extruder carriage, and screw the Chimera+ mount to the bearing blocks. Install the belt as you would on the original carriage. Make sure all M4 screws are secured: the lower two will not be accessible once you mount the Chimera+.</p> <p>Fully assemble your Chimera+, plug your Bowden tubes into it and secure them with the included clips before mounting it to the carriage. Although the clips can be accessed after the Chimera+ is mounted, this is a bit tricky.</p> <p>Pull the Bowden tubes through the two bullet-shaped holes in the carriage, and guide the hotend, thermistor and fan cables through the wide slot near the back plate of the carriage. Gently pull everything up until you can secure the Chimera+ using the top mounting holes. The thermistor connectors fit through the slot, but only in one orientation, and you may find you need to move them to the centre and pull them through one by one if your M4 screws protrude too much.</p> <p>Now is a good time to make sure your nozzles are aligned; this gets trickier if the BLTouch and blower fan are mounted.</p> <p>Insert the fan duct into the blower fan and mount this assembly to the side bracket. If you notice that the far side of the fan duct droops down too much, you can put some washers or a thin standoff between the fan duct bracket and the top blower fan hole; this will tilt the duct a bit. You can pull the blower fan cable across the top of the bracket and stuff it into a cable wrap or zip-tie it down.</p> <p>Finally, the BLTouch may be installed through the square hole on the right-hand side; a BLTouch Smart v3.1 should exactly fit through. The included springs may be used but should not be needed; you can screw it straight down through the bracket. Point the PCB away from the Chimera+ to avoid damaging it when realigning the nozzles, and to minimise heat exposure.</p> <p>If you're using Marlin 2, set NOZZLE_TO_PROBE_OFFSET to { -54, 0, -3 }. The Z-component may need to be changed a bit. According to my old config, X_MIN_POS and Y_MIN_POS should both be -5.7 to get the left nozzle at (0, 0), but please measure these offsets yourself, as I can't verify them (my printer is no longer recognisably an A8).</p> <p>If you wish to realign the nozzles after installing the fan and BLTouch, you can access the left nozzle's grub screws by removing the top fan screw, removing the fan duct, and then swinging the fan out of the way. The right nozzle's grub screws should be accessible directly with the short side of a hex key; if not, you will need to remove the BLTouch first (alternatively -- and I would actually recommend this -- get a cheap hex key and shorten it with some snips or a rotary multitool).</p> <p>To remove the Bowden tubes after mounting (e.g. to clear a jam), use needle-nose pliers to remove the clip and to press down on the collet. This procedure is a bit finicky, and reinserting the clip afterwards even more so. Be careful not to lose the clip, as it has a tendency to fly off if you fail to insert it correctly.</p> Category: 3D Printer Parts
With this file you will be able to print E3D Chimera+ mount for Anet A8 with your 3D printer. Click on the button and save the file on your computer to work, edit or customize your design. You can also find more 3D designs for printers on E3D Chimera+ mount for Anet A8.
