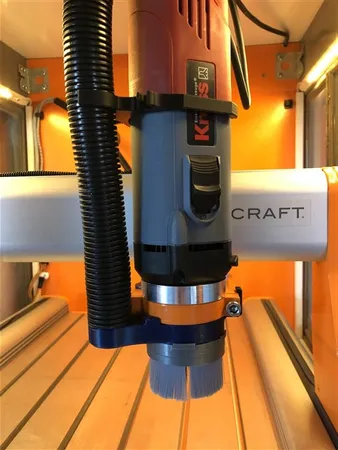
Dust shoe for Kress on a Stepcraft CNC
prusaprinters
Dust shoe Kress 1050 FME-P Update 01/23 - posted STEP files on request. The Kress 1050 FME-P has the ER-16 Collet system and therefore the clamp nut has a diameter of 25mm instead of the 18mm on the normal Kress.So, the old dust shoe I had is of no further use because there was not enough clearance in the dust shoe. Now the challenge is to adapt the dust extraction shoe to the new parameters.I want it to be a flexible solution for different spindles eq. different clamping nut sizes.And this is the result of some drawing and printing.• Part 1 is the mounting plate suitable for all diameters of clamping nuts. This is mounted on the tool-holder plate using the hole in the plate to secure and an extra clip on the side to prevent turning;• Part 2 is the washer to secure the mounting plate;• Part 3 is the adapter ring for the different nut sizes and brushes. This is clamped to the clamping ring by 5 magnets on top;• Part 4 is the brush ring. This is a self-made brush ring with an additional utility ring to fill it with brush hairs. The complete brush is than glued to the adapter ring with CA-glue;• Part 5 is the filling utility ring for the brush After the ring is filled and glued remove;• Part 6 is hose guidance clamp. Not necessary, but can take the stress from the vacuum hosePart 3, 4 and 5 should be made for every size spindle and/or clamping nut in use.*** For user who place the Kress direct on the toolholder plate.***When the Kress is placed direct on the plate the bottom extrudes 12mm under the plate and will seal the dust shoe. To correct this I made a spacer ring of 12mm height so it flushes with the underside of the plate.- part 7 Spacer ring 12mm height (infill 50%) Printer settings:Standard 0,4 nozzle and 0,2mm layer height Filament used PLA or PETGPart 1 needs a support only under the clip.Part 2, 3, 4 and 6 no support or extra settings.Part 5 needs support from build plate. (V-groove up) Extra material used:10x cylinder magnets Dia 3mm 1,5mm thick1 set screw M5CA superglueHose Dia 22mm outer 20mm innerBrush made of dustpan brush or old paint brushBuild:Put part 5 on part 4 should be a snug fit;Cut brush and put into utility ring and continue until first quarter is stuffed;Continue for the rest of the ring;Tap brush back on table to get the back lined up to the brush-ring;Test fit part 4 on 3 and secure tight fit;Remove part 3 from 4 and put some CA glue on brush backside, now glue part 3 on 4 and replace part 5 from glue area, remove when glue is set;Last is to glue the 10 mini magnets on part 1 and 3.Finally trim the brush to your desired length.
With this file you will be able to print Dust shoe for Kress on a Stepcraft CNC with your 3D printer. Click on the button and save the file on your computer to work, edit or customize your design. You can also find more 3D designs for printers on Dust shoe for Kress on a Stepcraft CNC.
