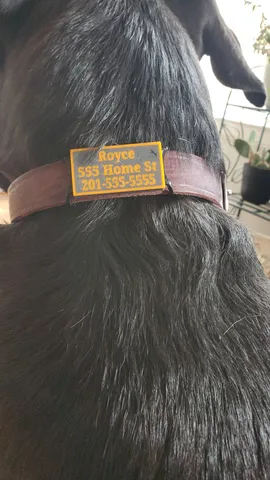
Durable Customizable Dog Tag
prusaprinters
This print uses pretty simple shapes that can be replicated pretty easily. I'll mostly be going into the process I've developed that gives the best outcome. This print uses Chep's process of inlayed multi-color prints using z hop. Familiarize yourself with his process before continuing. Notes:I designed the tag to work on my dog's leather collar. It is pretty slim, but the axes can be adjusted to fit your needs. I use tinkercad to do the model editing because of ease of use, but any CAD program will do.I'm using Cura to slice the models, any slicer will work as long as the equivalent setting are changed.I've had good luck with PETG. PLA will work fine but longevity may suffer. I'm using a .4mm nozzle on a stock Ender 3 For printing the TPU tag holder, use whatever TPU settings work well for you. Before printing doublecheck the tag holder is at least .5mm shorter than the gap in the tag.Setup:We have two separate parts to print at once, a body and a letter section. For the letters any font will do but I use Multilanguage because of the bold letters. (Parts of thin font will be ignored by the slicer if not large enough). I prefer to use .8mm tall text for contrast and readability. It's possible to use only one or two .2mm layers like in Chep's video, but I found that's not enough material for such small details. Once you have text and size sorted, you can center the parts, verify fitment, and create the negative in the body. Save the letters and body as separate STLs to prepare for printing.Slicing Instructions:We'll be working with two prints, so I find it easier to use two instances of your slicer of choice. In both instances make sure the model is centered at 0, 0, 0.Letters:Printing is pretty straight forward. Adjust any setting you may need to increase layer adhesion but be conscious of lateral squish, accuracy is very important here. I've had good luck with a very level bed, and slightly higher bed temperatures than normal. Do not use any rafts, brims, or skirts, they should be unnecessary if using proper first layer adhesion techniques for your material. Body:There's a few slicing setting we need to change to have clearly defined letters:100% infill Enable supports but block the first .8mm (the letters act as support for the body). For PETG I've found 10% support density and .3mm Z distance works very wellInitial layer height at .32mm and Initial layer line width to 150% to prevent the nozzle from bashing the letters. (The nozzle may still contact the letters but if bed adhesion is good there should be little issue)Initial layer flow at 107%. (To fill gaps made by 150% line width)Z hop when retracting of at least .9mm (or +.1mm over the height of the letters)Printing Instructions: Print the letters, change filament, print the body. I'd recommend printing the TPU tag holder first, just to check fitment between the tag and holder once the first tag is finished. It may take a couple attempts and setting changes to get the letters to appear how you like, but the above works very well for me. Please share your makes and comments on how I could improve!
With this file you will be able to print Durable Customizable Dog Tag with your 3D printer. Click on the button and save the file on your computer to work, edit or customize your design. You can also find more 3D designs for printers on Durable Customizable Dog Tag.
