DuPont Polarizing Pin Plug
prusaprinters
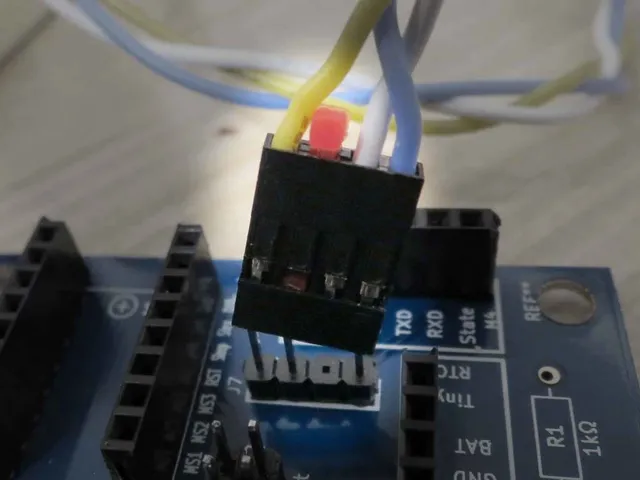
These tiny items fit into Dupont(R)-style pin header housings to prevent plugging it in unless a pin has been omitted in that location. This allows reasonable polarization protection while using common 0.1" (2.54mm) pin headers that normally could be plugged in backwards. This worked great for a 3-conductor cable; I just used a four-position housing and plugged up one of the interior holes. The first picture shows that preventing backwards connection. For a 6-pin cable, I didn't want to add just one position because 7-position housings are uncommon. So I added 2 positions and made a double plug for convenience. This is shown in the second picture. I had been using JST's MHT connectors on the board because they are polarized. But scaling this up proved a problem because the US$40 crimping pliers I found for them requires separate crimp steps for wire and insulation while the US$20 iWiss crimper does the wire and insulation on the DuPont-style pins at the same time. I really don't love crimping, we couldn't find anyone to make our odd cables for us (all that hot-melt is to reinforce the 30ga silicone wires from a slip ring... quite finicky to work with) Near as I can figure out online, these are called DuPont-style connectors because the DuPont chemical company developed them as an application of one of their flame-retardant plastics. The manufacture of them is no longer done by the DuPont company. So, (R)/TM as appropriate on the name DuPont. Print Settings Printer Brand: Prusa Printer: i3 MK2S Rafts: No Supports: No Resolution: 0.1mm Infill: n.a. Notes: It will work fine with 0.2mm layer heights, but I didn't like the roughness of the ramp. With a 0.4 nozzle, two perimeters fills the width of the pin, so infill is irrelevant.rnrnWith a printer similar to the Prusa i3 MK2S, one of these will print well under 3 minutes. A pair of both designs, about 4. I printed a plate of 25 of each in about 50 minutes.rnrnI have found that unless I've got my first layer dialed in really perfectly (or have the live-Z too close and am squishing the first layer) some of these will detach since there's so little contact area. Adding a brim seems like it wouldn't be a good idea, so I just print a bunch more than I actually need, toss the ones that detached, and throw the spares in my parts box. You might need to keep an eye on things and carefully pluck off loose filament during printing. Keep your hands out of the way of the print head travel! I sometimes use a long, flat-tipped pair of tweezers. Post-Printing Let it cool Be patient and let the bed cool before removing. I was printing some refinements of the design in PETG and didn't let them cool. The PETG bottom layer stuck to the still-warm PEI better than it did to the second layer, so I lost the first 0.2mm which made the part non-functional. How I Designed This Started with some drawings I found online for the housings, tweaked it a bit, added a 2mm cube at the end to make it easier to hold (and, if needed, to remove), last change was to add a 0.2mm chamfer on the underside so a squishy first layer is less likely to cause fit problems.rnrnFreeCAD file attached. Original version was just some cubes and a wedge, but I decided to redo it as an extruded sketch. The connecting block is still just a rectangle, and it looks like thingiverse's viewer isn't too happy that the double STL file has that connecting block as part of a separate shell overlapping the first plug. Oh, well... it printed fine in Slic3r. Category: Electronics
With this file you will be able to print DuPont Polarizing Pin Plug with your 3D printer. Click on the button and save the file on your computer to work, edit or customize your design. You can also find more 3D designs for printers on DuPont Polarizing Pin Plug.
