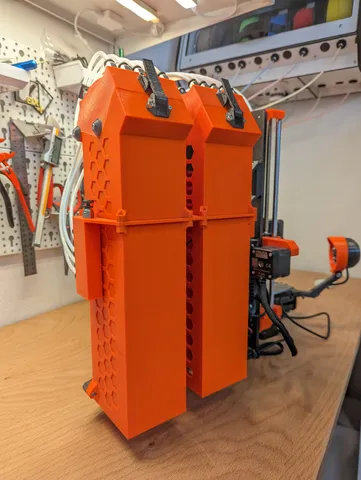
Dual RMU-Mk3 Connector and Bracket
prusaprinters
The RMU-Mk3 is a nicer buffer for the MMU2S. It enables easy switching between five loaded filaments. However, I have two Repboxes, one for PETG and one for PLA. I usually switch to a set of five filaments of the respective material. With a single buffer, switching materials becomes a tedious process. It requires to retract all five filaments from the buffer, and then again feed five filaments through the buffer to the MMU2S.Therefore, I decided to have two buffers on my Mk3S, one for each material kind. Then it becomes matter of swapping the 5 tubes that lead to the MMU2S, but not to refeed the buffers each time.The model consists of two parts: a connector which is screwed between the upper and lower part of the body, and a bracket that holds two RMU-Mk3. Using the RMU-Mk3 Closed Sides Mod to have better protection of the filament while buffered. The connector has two additional compartments, to which you can screw the same PC4-M10 pneumatic couplings that are used for the RMU-Mk3. The larger one with 5+1 connectors take the 5 unused tubes that lead from the RMU-Mk3 to the MMU2S. The filament can stand out for easier loading in the MMU2S later, but the compartments keep them enclosed and in a tidy position. The smaller buffer and the top coupler of the larger one can be used to hold additional unused tubes, for example the repbox can hold 6 filament spools, but you can feed only 5 at a time. If you are using only one consider my PC4 plug to close the unused one.I have used the Top Mod-T with repboxes mounted overhead (see photo). It would probably also work with the Mod-S version.For easy switching use the MMU2 PTFE holder PC4-M10 mod. This is what enables quick switching from one RMU to another by just switching the set of RMU output to MMU tubes and running through the loading sequence once.I'm using Sorbothane feet to prevent noise transmission. To get this stable with the dual RMU-Mk3, I have created a Dual 1-inch Sorbothane Mk3s feet that give more stability and compensate the extra weight . With this my Mk3s is solid, produces good print results, and makes material swapping an easy process, leading to more conscious material choices for my prints. I can recommend the MMU2s Material Marker to see what's loaded at a simple glance (I have printed them in the respective material and color so that I also know which colors are loaded).Print InstructionsPrinterMk3s+FilamentPrusament PETGLayer height0.2 mmInfill100%SupportsNonePerimeters4Solid Layers6 (connector), 5 (bracket)Place the bracket diagonal on the printbed, bottom to bed (you can use the original file that comes with the RMU-Mk3 for the print parameters).Place the connector on the flat surface (which becomes the top). Print at 100% infill and change the perimeters and solid layers to get the necessary stability.Assembly InstructionsAssembly requires two RMU-Mk3 (consider the RMU-Mk3 Closed Sides Mod when printing yourself for better filament protection). Additionally 8x PC4-M10 pneumatic couplings, 2x M3 10mm screws and 4x M3 hex nuts, 8x M3 12mm screw, 2x M3 20mm screws.Assemble the RMU-Mk3 as per their instructions, but keep the upper and lower body separate and do not mount them on the Mk3s, yet.Place 4x M3 hex nuts in the lower bracket (using two from the original and two from the modified material).Mount the dual RMU-Mk3 bracket to the printer instead of the original one (also mount the original upper bracket).Mount the PC4-M10 pneumatic couplings in the connector.Place two M3 hex nuts in the connector into the respective holes on the solid middle part (screw pulling technique advisable).Place the connector between the upper and lower parts of the bodies, the compartment with two tube couplers will go to the front, the one with 5 to the back. The five connectors point towards the printbed.Screw the upper and lower parts together using the four screws at the corner of each body (follow the RMU-Mk3 instructions). Replace the 10mm with a 12mm screw to compensate for the extra thickness.Screw the body at the back to the vertical part of the connector with two M3 10mm screws.Mount the dual RMU-Mk3 by holding it to the printer (hold it for the whole time until it's fully fixed), start two screws on the lower bracket (one per body), then the two screws on the upper bracket, and finish with the remaining screws on the lower bracket. Fasten all mounting screws.Feed the material into the buffers and give it a try.
With this file you will be able to print Dual RMU-Mk3 Connector and Bracket with your 3D printer. Click on the button and save the file on your computer to work, edit or customize your design. You can also find more 3D designs for printers on Dual RMU-Mk3 Connector and Bracket.
