Dual MEAN WELL LRS-350 PSU
prusaprinters
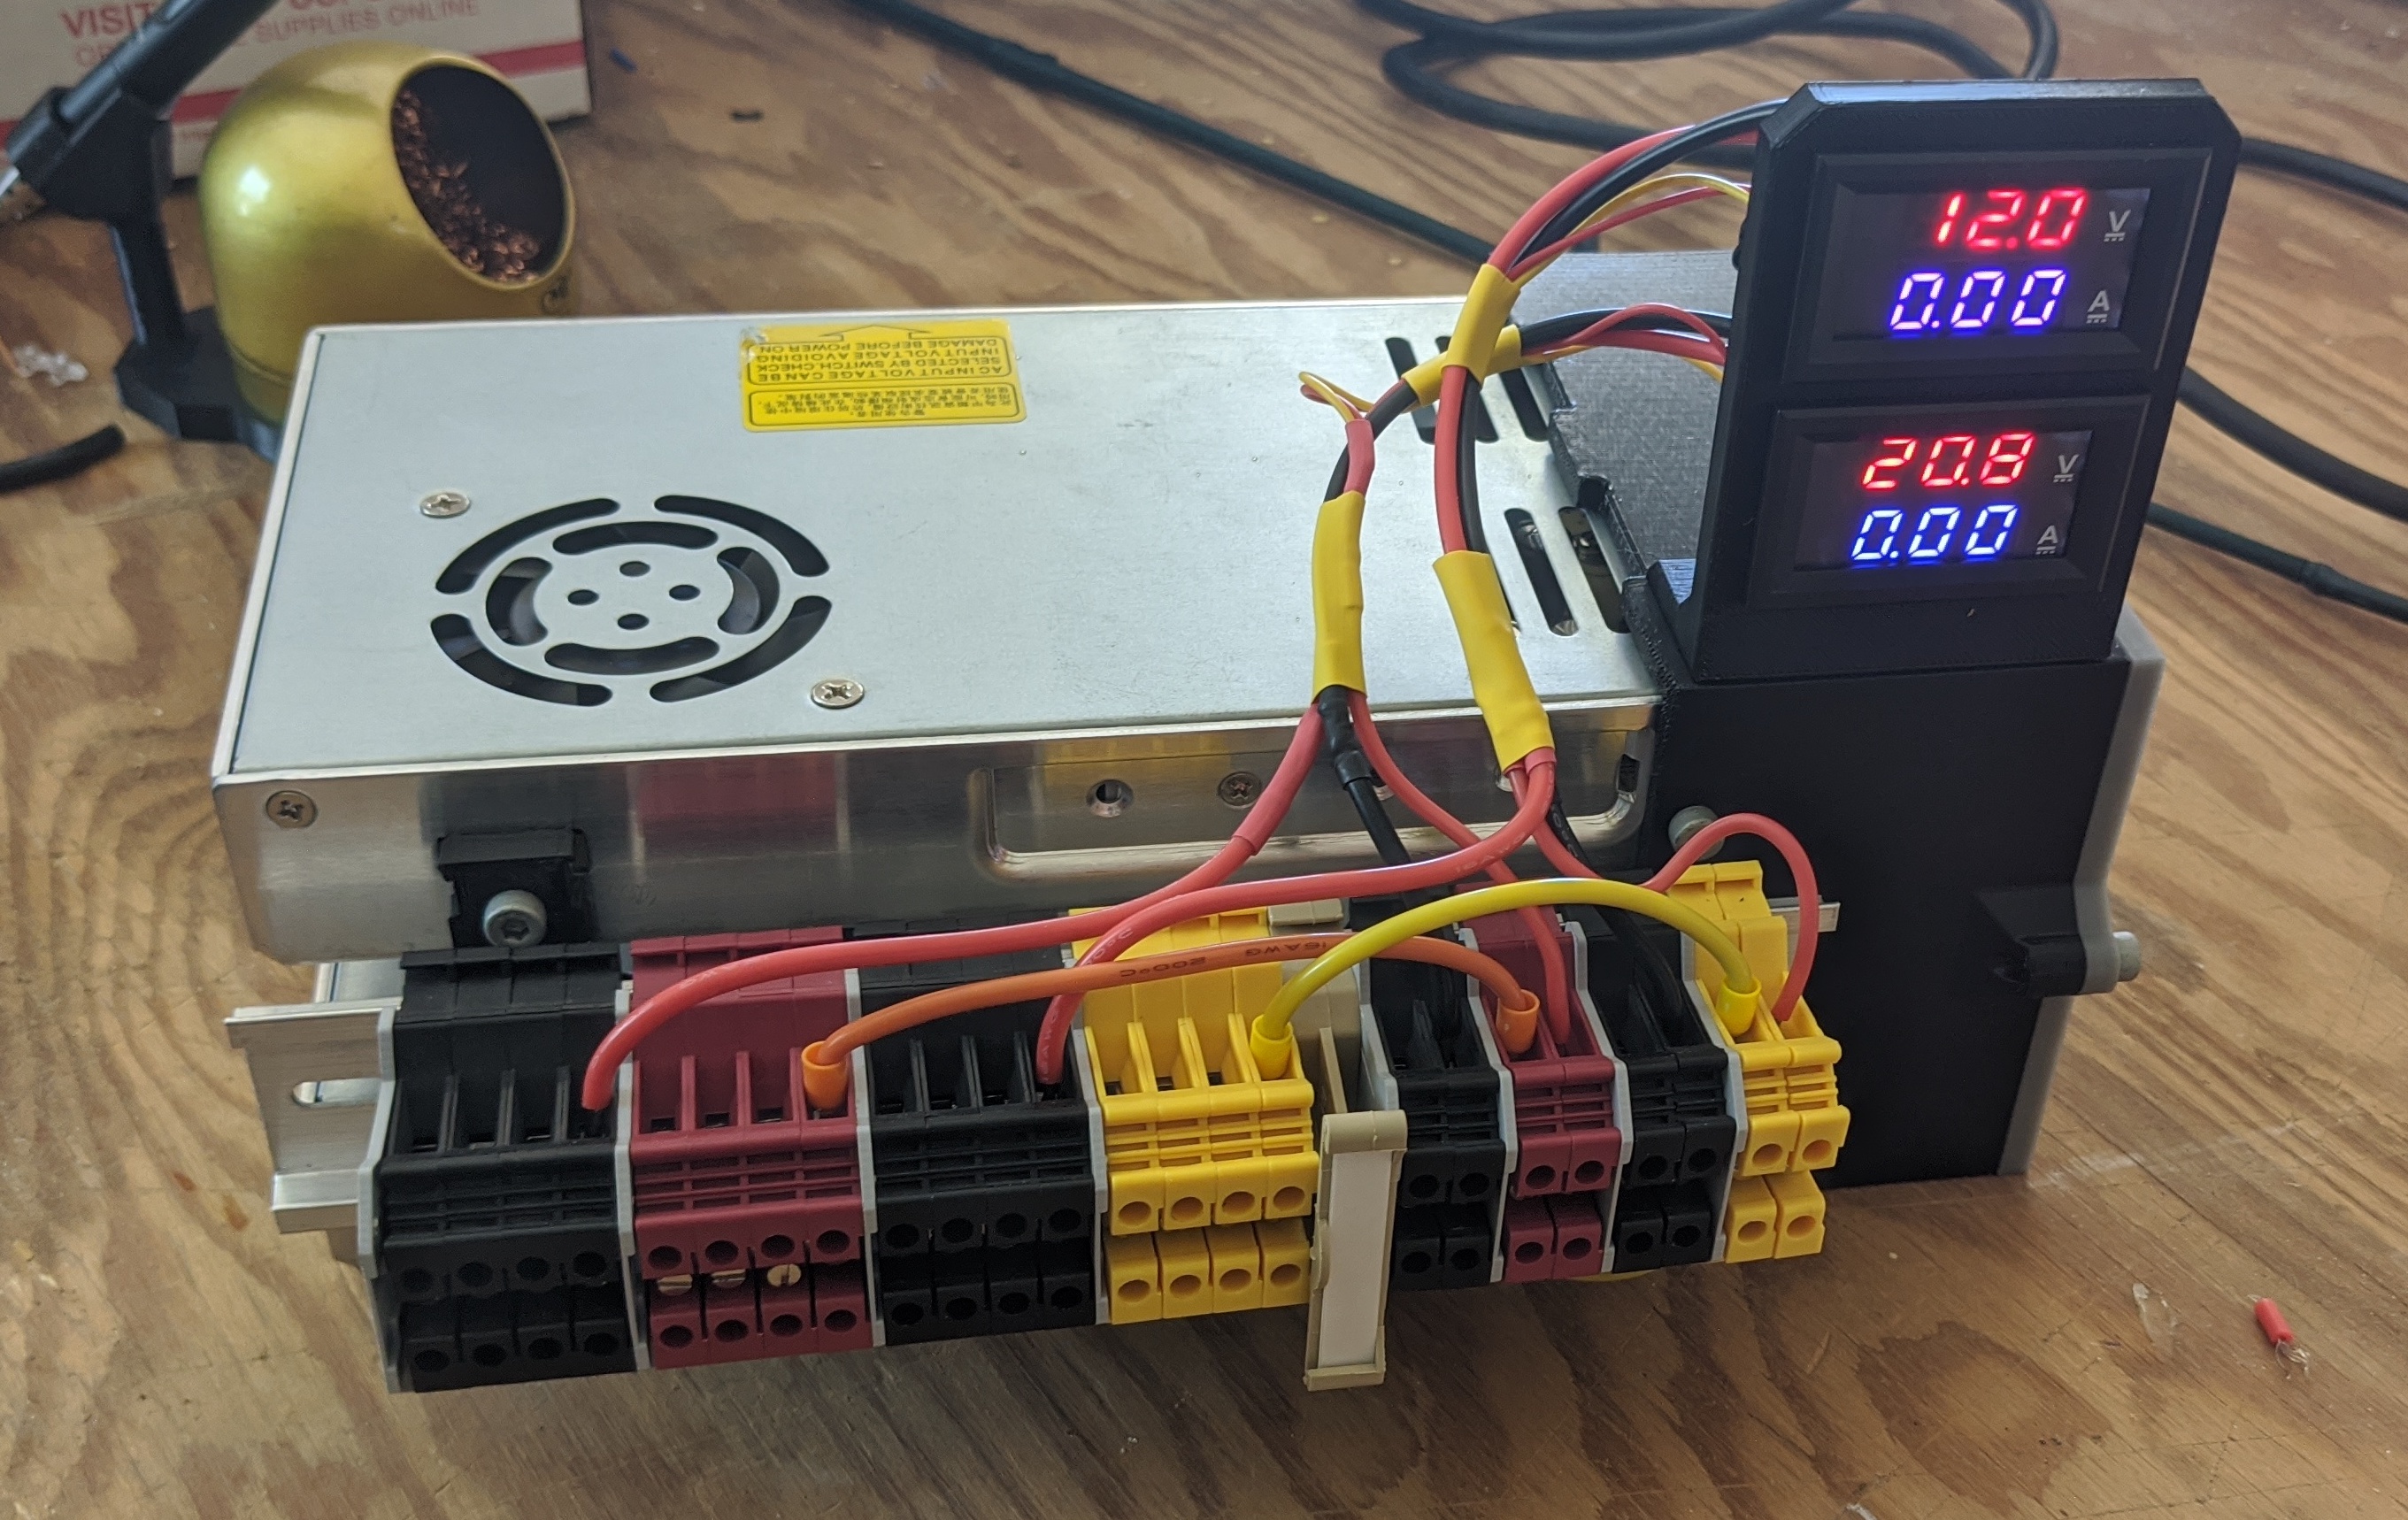
<h3>Description:</h3> <p>A set of 3d printable parts to compactly combine two LRS-350 PSUs into a compact unit with optional voltage and current displays.</p> <p>I put this device together so i could consolidate the 10+ individual power bricks for each compute node in my home lab into just a single power supply. This allowed me to clean up the wiring, get some space back, and reclaim several outlets on the power distribution system in my rack. And it's a lovely excuse to sharpen some of my f360 skills :)</p> <p>In theory, swapping out several small SMPS with a larger one (with the equivalent total load) should be more efficient, but I don't have the time or tools needed to confirm this. You can also make similar claims about the quality of the output power, but I've not checked the ripple on this supply compared to the ripple on the multiple supplies that this replaces.</p> <p>The compute nodes in my rack are a mix of 12V devices and 19V Intel NUCs. I was not able to find a 19V rated power supply, but the 24 volt version can be 'dialed down' to only 20V which is well within the 19V ± 10% that the Intel NUCs want.</p> <p>I use a segment of cheap DIN rail and some terminal blocks to tidy everything up.</p> <h3>Additional Hardware:</h3> <ul> <li><a href="https://www.amazon.com/gp/product/B072BY4XZ7/">2x DC Voltmeter&Ammeter</a>: Optional, but suggested so you can keep an eye on current demands. You don't need to print <code>meter-panel.stl</code> if you omit the meters. You can also use your slicer to 'cut' the second meter cutout if you decide to use only one meter.</li> </ul> <ul> <li><a href="https://www.amazon.com/gp/product/B07VTLJS18/">2x MEAN WELL LRS-350</a>: Any two will fit. I designed this specifically for two different voltages, but that's not a requirement. </li> </ul> <ul> <li><p><a href="https://www.amazon.com/gp/product/B07KS2TQ45/">1x IEC socket + Rocker Switch w/ Fuse</a>: A simple way to BYO power cord and still have a kill switch and over-current protection.</p> </li> <li><p><a href="https://www.mcmaster.com/91274A115">M4 Screws</a>: I used a combination of 8, 10, 12 mm screws for this design, but you can use only 8MM screws. You'll get 'better' attachment to the PSU modules with 10mm, but 8 will work. Any M4 screw will work, but I linked to the 8mm version of the screws that I used both in the CAD and actual build.</p> </li> </ul> <ul> <li>DIN rail / blocks. Any 'UK2.5B' style DIN terminal block will work with any 'NS35-S' style rail. I don't have any links as I buy in bulk and usually just have some lying around. Ali Express has <em>many</em> vendors as will your local electronics supply place.</li> </ul> <h3>Additional CAD Components:</h3> <p>To help w/ the design, I used several components from <a href="https://grabcad.com/library">grabcad.com</a>. The components used are:</p> <ul> <li><p><a href="https://grabcad.com/library/parametric-din-rail-1">DIN Rail</a>: Thanks to <a href="https://grabcad.com/dennis.yilmaz-1">Dennis Yilmaz</a></p> </li> <li><p><a href="https://grabcad.com/library/digital-voltmeter-ammeter-gauge-1">Volt/Amp Meter</a>: Thanks to <a href="https://grabcad.com/sean.gilley-1">Sean Gilley</a> for this one.</p> </li> </ul> <ul> <li><a href="https://grabcad.com/library/terminal-block-5">Generic DIN Terminal Block</a>: Thanks to <a href="https://grabcad.com/narendran.k-2">Narendran K</a> for this one. This model does not <em>precisely</em> match the rail blocks that i used, but it was useful for general size/alignment purposes.</li> </ul> <ul> <li><a href="https://grabcad.com/library/mean-well-lrs-350-24-1">MeanWell LRS model</a>: Thanks to <a href="https://grabcad.com/chris-1010">Chris</a> for this one. The models don't <em>quite</em> match the PSUs that I got, but the model was perfect for screws and height measurements.</li> </ul> <ul> <li><a href="https://grabcad.com/library/power-inlet-iec-320-c14-1">IEC Socket Model</a>: Thanks to <a href="https://grabcad.com/sisul.galog-1">Sisul Galog</a> for this one. The models don't <em>quite</em> match the screw holes on the actual part that I ordered from amazon, but otherwise was a perfect fit.</li> </ul> <h3>License and Source:</h3> <p>On the <a href="https://www.thingiverse.com/thing:4504948">thingaverse version</a> of this post, I have included the f360 file should you want to make any modifications. It's not the cleanest timeline, but the names should be clear enough to figure out how things are put together. I didn't have an overarching design in mind when i started, so that's part of why the timeline is messy.</p> <p>You <strong>do <em>not</em> have my permission to use the source file or any rendered artifacts (stl/3mf files) for any commercial purpose</strong>.</p> <p>Please let me know if you do make any modifications and please share the update f360 file so we can all learn how you did the mod.</p> <h3>Print instructions</h3><p>There are <strong>5</strong> total parts, <strong>4</strong> of which are distinct and <strong>2</strong> of which are optional:</p> <ul> <li><p><strong>box.stl:</strong> This is the core body that houses the two PSUs and keeps fingers out away from the screw terminals.</p> </li> <li><p><strong>lid.stl:</strong> This is <em>technically</em> optional, but is a good idea as the screw terminals on the PSU(s) are otherwise pretty accessible too fingers and the like.</p> </li> <li><p><strong>brace.stl:</strong> A small plastic part to keep the 'front' ends of the PSUs spaced apart and to support the DIN rail. Print two.</p> </li> <li><p><strong>meter-panel.stl:</strong> This is optional. If you don't want to use meters, then don't print this part. You can use your slicer to cut the top meter cutout if you want. See attached picture.</p> </li> </ul> <p>I have combined the stl files into <code>core.3mf</code> and <code>meter-panel.3mf</code></p> <p>Use your best judgement about which material and layer height to use for which part. Likewise for infill and perimeters. There are a few screws that hold everything together, but no single screw has a significant load on it. As such, there's no need for threaded inserts. the holes are intentionally undersized specifically so the screws will tap their own threads.</p> <p>I printed in a mix of ABS and PLA because that's all the filament that I had handy @ the time. A 3mf file with each STL and the support enforcers is attached.</p> <p>I did the entire design in Fusion360 and was very careful to limit the number of supports needed. Only <code>box.stl</code> needs minimal support, directly from the build plate. Cleanup is quick and simple :).</p>
With this file you will be able to print Dual MEAN WELL LRS-350 PSU with your 3D printer. Click on the button and save the file on your computer to work, edit or customize your design. You can also find more 3D designs for printers on Dual MEAN WELL LRS-350 PSU.