Dual Extruder Fan Duct
thingiverse
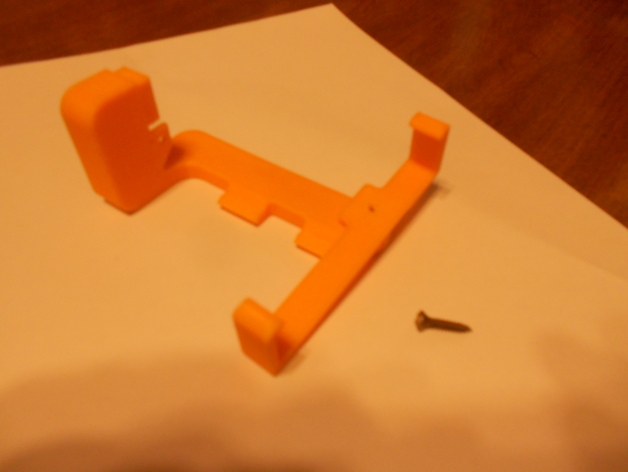
QUIDI Avatar rear mount fan duct with support bracket. This design is a better solution than the previous publish for the Avatar dual. It places the fan duct behind the nozzles so you can see your print. 6/1/17 Just added two new pictures of my third fan duct. I had no problems printing without support in areas where it cannot be removed. Print Settings: Rafts: Doesn't Matter Supports: Yes Resolution: .2 Infill: 25% Notes: Use a slicing program that lets you use leaky connections for the support. This will help remove support on the inside. Also, set bridging to 80mm so there is no support on the inside of smaller areas. Custom Section: Post Process: If your part warps, use a heat gun to soften the plastic and pull it back. It's very important to assemble the duct and support bracket and make sure the screw used does not go past the bracket. It will kill the belt! Instead of a screw, you could glue it. New files were added 2/13/17 that have no support in areas where it cannot be removed. Added S3D FFF file, g-code, and x3g file. Settings are ABS (Bed 115C / RT EXTRUDER 230C / SPEED 60mm/s). Print the part like it fits on your printer. Place the side with the most flat surface area down on the bed. If the part warps too much, turn off the fan and print at slower speeds. In S3D, go to the View tab. Turn off SOLID MODEL and turn on WIRE FRAME. Your part should look transparent. Now auto-generate support. The support is all over inside but can be removed by clicking remove supports structures or you can add your own. Only remove support from areas where it's impossible to get it out, make sure that your BRIDGING setting is set to 80mm.
With this file you will be able to print Dual Extruder Fan Duct with your 3D printer. Click on the button and save the file on your computer to work, edit or customize your design. You can also find more 3D designs for printers on Dual Extruder Fan Duct.